Saturday, October 31, 2015

Even More German Heavy Metal

Oh yeah, 1981. I was in grade 10, and the Scorpions, a German heavy metal band, were one of my faves:


I remember seeing them live in concert in Vancouver around 1982. Despite their fearsome appearance, I lived to tell the tale. Not that it is a tale I tell especially often….

Anyway, nostalgia aside, I have finally gotten to meet a new German heavy metal friend, by the name of Zimmermann, FZ-5V to be more accurate. After it languished in customs for 10 days, a semi had gone to the Boston customs house to pick it up only to find the crate it came in was too tall to fit inside the trailer. That lead to a 4-day delay, the hiring of another trucking company, extra charges slapped on for storage, and then finally it made its way out to Western Mass. Then it sat at the tow truck/riggers yard for another 12 days as they were simply run off their feet with towing work.

Yesterday, they showed up with ‘the monster’ however:


After backing up into a suitable alignment with the doorway, and pushing the hydraulically-operated 'Jerrdan’ deck of the truck all the way back to the door threshold, it was obvious that the the pallet was not going to fit through the opening:


Out came a sawzall with a very dull blade and the pallet trimming could begin:


While this was going on, I wriggled the secondary milling head off the pallet and onto a dolly:


This looks like such a little milling head when mounted on the machine, but it weighs close to 200 lbs. More than I want to lift by my own muscle power.

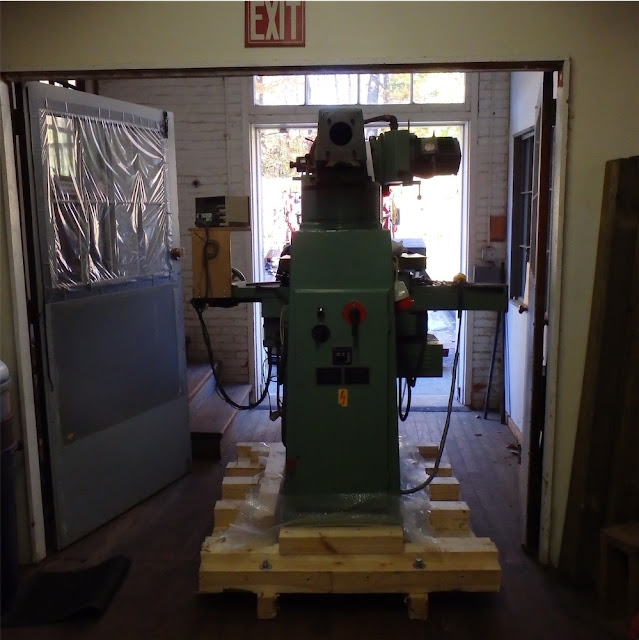
After a good 45 minutes of sweating and cursing by the riggers, and an extremely tight squeeze through the doorway, the machine was in the building:


I had been more worried about the height of the machine being a problem through the doorway, but the width of it turned out to be nearly the exact same dimension as the doorway, at 64". If the machine had been turned 90˚ on its base it would have gone through no problem, but the riggers double checked the measurements and were able to just get it through without recourse to spinning the pallet, which would have created other headaches. A sheet metal part on the machine did get a little damaged during the squeeze-though, but it will be easy to straighten out.

With the help of another two guys from the adjacent cabinet shop, the 5 of us pushed the machine down to the back of the shop and close to its eventual resting position:


I (and my landlord) had also been concerned about the building floor getting crushed by a machine twice as heavy as any other in the shop, but the old floor bore the weight no problem, albeit with some loud creaks and squeaks at various spots along the journey. I did take care to locate the machine position directly above a sleeper, in the interest of minimizing floor deflection.

At this point, given that the riggers charge $225/hour, I said “thank you very much!” and sent them on their way. The rigging cost me $800 altogether. I figured I could get the machine off the pallet by myself.

A while later I had used a handsaw to cut the middle portion of the pallet away, which enabled me to tuck the pallet jack in there:


The FZ-5V weighs around 5500lbs, which is in fact the very limit of the pallet jack. I’ve certainly never lifted something this heavy with the jack before. It did the job!

A while later, the rest of the pallet is gone and I’m onto blocks each side:


And then finally I got it onto the floor, with a couple of blocks on the front to level it out (yes, the floor in my building is that far out of level in that location):


I also rotated the milling head into the normal upright position. It was nice to find that the milling head can be moved forward and back, angled up and down, and turned clockwise or counter-clockwise using hand-cranked gear-driven mechanisms. No need to take the weight directly with my body, thank god. I loosened the central pivot (4 bolts), and found that the entire upper ram with milling head can be easily swiveled around.

Next Day:

The top beam needed to be swiveled around for the next step, which was mounting the secondary milling head. I rigged up a come-along to an overhead ceiling joist and winched the head up to position:


I have learned to trust bowlines with many tasks and have never been let down.

It took all of 10 minutes to get it into position and bolted up:


With that head bolted into place, the upper ram assembly had certainly become a fairly long affair.

I could now turn my attention to the other matters. After trying unsuccessfully to tighten the spindle locknut, I finally realized it needed to turn the opposite way and off it came (the doh! moment of the day):


The local machine shop guy came by to take a look at the German invader, and he was also thinking the collet nut went the other way to come off, so I am glad it wasn’t just me. That collet nut is a big chunk of metal, with ball bearing smoothness built in. I thought the ISO 40 tool holders were fixed by a long 16mm bolt from above, but they are tightened from below by the collet nut just like a (giant) router.

I discovered one issue, and that is that the main spindle’s quill is frozen in terms of z-axis travel. It should be able to work just like a drill press, but the quill assembly seems totally stuck. I suspect the locking mechanism inside is somehow not loosening when it should. I’m thinking I may have to disassemble the head to get to the bottom of it.

The high speed spindle, once power was put to the machine, worked great and I tested it out by mounting the chuck and drilling in some teak, a task I had been waiting to do until the machine was in place:


It made by far the cleanest and straightest hole I have ever produced in all my years around woodworking equipment of all kinds. In my building there are at least 5 drill presses scattered here and there, and not one of them can produce a concentric hole. Why woodworking drill presses are typically so poor, I have no idea.

I was happy to have at least that modest 'drill press’ functionality, with so much more to come, as I gain familiarity with the machine and resolve remaining technical issues.

The DRO works just fine:


I’m hoping that the z-axis can be hooked up to the display and the machine at some point.

A look next at the electrical area, accessed from the rear of the machine through a heavy door. I guess you can tell the manufacturer gives a shit when they have painted the inside of the casting with gloss paint:


Some very old school fuses in there - I refer to those white knobs you see all over the door panel. Nothing too complicated, and no computers or sensors. That simplicity translates into fixability and should ensure a long lifespan for the machine.

The electrical hook up is temporary for the time being as I will need to drill a larger hole in the side of the machine to accept the porky 10-gauge electrical cable. The machine is wired with a neutral, which was a surprise. Hopefully it will run fine without having to provide a neutral on the supply side, which bonds to ground at the transformer in any case.

I had a minor issue with a loose wire as a result of squeezing the machine in through the doorway, but once rectified, everything seemed to work well. Curiously, while the spindles turned the correct direction, the powered z-axis and x-axis controls worked backwards in direction. Not sure at this point exactly why that is, but it will be easy to correct. One of the nice things about 3-phase motors is that they are happy running both forwards and reverse, and can be switched quickly.

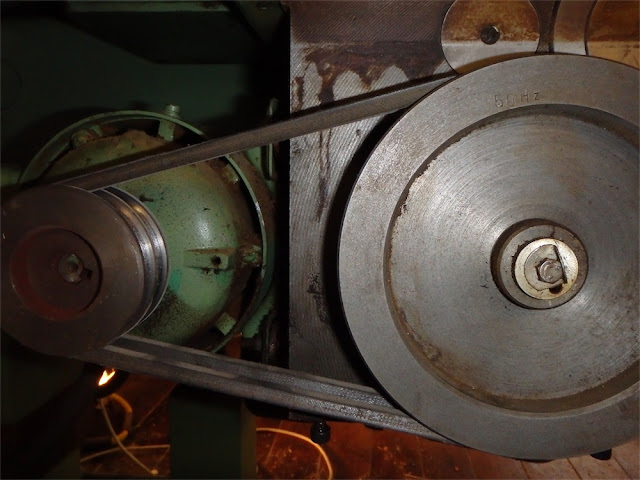
I pulled the cover off the x-axis drive motor, and noted that the pulleys were marked '50 Hz’:


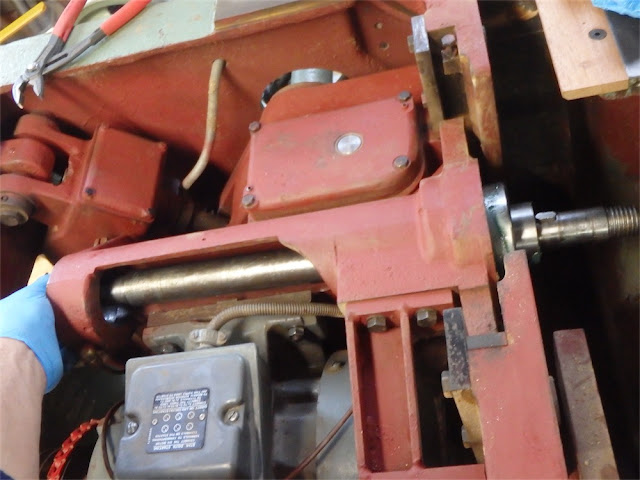
The drive pulley seems to have a minor issue with the woodruff key:


I am guessing they marked both pulleys with '50 Hz’ so they went in as a set without confusion, though to make an adjustment for 60 Hz, only one of the pulleys would have to be sized down 20% I would think.

All in all, the machine is massively built and oozes high quality, certainly on a par with Martin. I’m pleased to call it mine. Everything works except for the main spindle’s frozen quill. At least I can use the high speed secondary head in the meantime, though it has a somewhat less convenient z-travel adjustment. I’ve still got some cleaning and inspection to do, and the machine needs oiling and greasing. The electric cables are a bit greasy and tatty and one of the electrical junction boxes could use replacement. The x-axis drive motor belts are also tired.

I’m hampered by having no operation manual or spare parts list, so I am very much fumbling around in the dark at present with some of the functions.

The machine came with what appeared to be a good assortment of tooling, however on closer inspection, there are some important parts missing from several of the tool holders. I’m in the process of identifying what I have and what is missing and will be ordering parts as I figure out my requirements and as I can afford them. I have a couple of collet tool holders, one is the ER 32 size and the other is larger and another type, perhaps 'OZ’. I’m not sure. All the collets I have are metric, so I think it will be a plan to also obtain some inch-scale ones as well. The shell mill tool holder needs a special wrench to mount and demount the cutters, and now that I have figured out its size I can order one from Germany.

Collets also appear in woodworking machines, notably routers, however it is a greatly simplified situation as compared to metal working equipment. There is a dizzying array of different types of tool attachment systems, tool tapers and collet types, and I’m in the early stages of getting my head around all that. It’s been very educational so far.

That’s it for this time - hope you’ll pop back for another visit somewhere down the line. Until then, keep the tools and mind sharp.

via Tumblr http://davidpires578.tumblr.com/post/132300941729

Friday, October 30, 2015

Wadkin's Glen (4)

I purchased the Wadkin PP 450 Dimension saw from an outfit near London called Scott and Sargeant. After we had agreed on the price, they prepared the machine for export. I mentioned to them that I was looking for a saw which would be ready to put to work after I had it in my shop.  To this end, or so it seemed, they fitted a new brake cable, new bearings to the main spindle, and a new saw blade. I wasn’t expecting such an apparently thorough job, so I had started to feel rather positively about the company, thinking they were going above and beyond.

Well, in the previous post I got the machine set up and running at my shop. I found the wooden table lips that Scott and Sargeant had fitted were rather poorly done, so I took them off and fabricated new ones. Then I found that the support legs for the extension table were significantly bent at their upper threads, which makes them orbit around in a circle at their lower ends, making fitting them flat to the floor at the correct height a bit of a problem. Then I found the table rule was broken and non-original. Then I found that the secondary lock arm for the fence was missing. Then I found that the alignment of the sliding table and main table was out of whack with the saw spindle and had to go to the length of removing one of the main table locating pins to effect correct alignment. Oh, and the sliding table is bowed about 1/32" up along its length, which is an issue both for precision of cutting and the table’s linear bearing life. That bowing is a fault with the casting, and not a wear issue. I understand that castings can sometimes bow upward from hammer peens, but this does not describe this situation. I guess Wadkin sometimes had castings move later on.

I had asked early on, prior to negotiating price, if there were any broken, damaged or missing parts. The response from the seller was that they were not aware of any issues. It turned out that there were a few things that they could have mentioned, however due to the other fine work they appeared to be doing, I figured it was one of those things where the salesman I was dealing with was simply unaware of these items which were missing or damaged. I was giving them a pass as the issues were comparatively minor, and after all, this is an old saw.

After getting the machine set up, I used it for all of about 4 minutes on a bit of teak, part of the J. Koons project work. My shop neighbor Joe asked me how the saw was cutting and I gave him a quick demo by doing a cross cut in a piece of Jatoba. When I looked at the end grain, it was quite rough, which was a surprise given that the saw blade was new when installed and had seen but a few linear inches of teak. I had to conclude that the Atkinson walker saw blade wasn’t the finest I had come across. I decided to replace it with a couple of 14" blades with Cermet II teeth from Carbide Processors. Those blades are custom made to order, so I will be getting my hands on them in another 3 weeks or so.

Then the Japanese carpentry classes started so I didn’t get a chance to do much more with the machine. One thing though: I had noticed a low rumbling sound from the machine was getting progressively louder. At first I thought it was my imagination, however it was starting to intrude rather more into reality. With my attention shifting to the course work preparation, I kind of put my head in the sand, preferring to ignore that noise for the moment.

Then, several days into the course, in a conversation with a fellow from England who had flown over to take the classes, I learned that his father had rebuilt many woodworking machines and could apparently tell very quickly from a noise what sort of problem might be occurring. I joked with this fellow that maybe some of this could have rubbed off, or be a genetically-endowed talent, as I had some concerns about noise I was hearing out of the saw. I may have been joking, but shortly thereafter I brought him over to the saw to have a listen. I fired it up for a moment and then shut it off. He immediately thought it sounded bad too. Nothing like a second opinion to confirm one’s suspicions.

I realized that the saw would have to be moved out of the way to make way for another machine coming into the shop within a few days, and realized that some further investigation was required in regards to the noise. I decided to pull the extension table off and then the main table could also be removed. Having three other people around to help with the lifting was most advantageous in this regard. While it wasn’t strictly part of the class course work, it certainly was a typical sort of situation one might run into with woodworking machinery and everyone seemed quite interested to see what unfolded. So, I kept going, and it didn’t take too long at all to get to the bottom of it.

With the table out of the way and the trunnion exposed to view, I turned the machine on again. It was quite obvious to all of us that the front spindle bearing was making a loud rumbling noise.

I had understood that the bearings had been changed by the seller, so it was not an issue I had been expecting to rear its ugly head. Twenty minutes later I had the spindle out. The rear bearing, marked Codex (a Slovenian bearing manufacturer) looked to have older grease in it and seemed to be missing two ball bearings:


It hadn’t been noisy though. I was sure I hadn’t knocked any of the bearings out during removal of the spindle, and others also said they hadn’t seen or heard any bearings pop out. Weird. I’ve subsequently looked all over the area to see if I came across a bearing on the floor, but nothing.

The noisy one was the front, which came out looking like this:


This bearing is unmarked - the company who produced it not having the pride to put their name on it, which doesn’t bode especially well. The biggest issue though is the grease - there’s almost none. Just a cursory skim on the bearing was all that could be seen, and there were large empty voids of space within the unit. Normally one would pack a bearing thoroughly with bearing grease before installing it. This one had not been properly packed at all, and no wonder it started complaining after about 5 minute’s of spindle rotation.

I also discovered, in removing the spindle, that the main pulley on the spindle end was chewed up and damaged at the portion upon which the brake shoe engages. Clearly, at some point, the brake shoe had been reduced to metal-on-metal contact and had severely worn the surface of the pulley. If they had changed out the bearings they surely would have noticed this.

———-

Whenever you deal with a company and enter into a transaction, there are two aspects: what the seller does before the sale, and what the seller does after the sale. Scott and Sargeant had seemed pretty good up to the point of sale. Here was an opportunity to see what sort of after sales service they might provide.

I now have the answer to that question: NONE

We’re talking a couple of bearings, and I happen to now know that the correct SKF bearings for the saw (the ones specified by Wadkin) cost all of $32 (rear) or $39.00 (front). I’m a customer who happened to find that the front bearing was some cheapie and hadn’t been properly packed with grease and was failing prematurely. It wouldn’t be unreasonable for me to expect that a seller would opt to send me a couple of bearings. We’re talking chump change here for a company like Scott and Sargeant to throw a replacement bearing my way.

No, that’s not what happened. Rather than acknowledge in any way they might have had any role to play in a bearing which began to fail within 5 minutes of use, let alone send me a new bearing, they chose to ascribe all the problems to my end. I’m just a bad customer I guess. Here’s some direct quotes from the conversations I had with Peter Charnaud at Scott and Sargeant:

…you are incorrect in your assertion that we have misled you in any way. You will get a low rumbling from these machines as they have large “deep groove” ball bearings which were designed and fitted for durability though somewhat noisier than modern smaller bearings will be.
As I said we had fitted a new set of bearings so if you are saying that we did not and that I have misled you then you will need to retract that assertion.
We did put grease in the bearings- as is evident in the photos you have sent.
The missing ball out of the double race bearing was probably ejected during your removal of it or your turning of it out of its outer shell.
I don’t intend to enter into any further correspondence as I believe I have covered your complaints and offered you a replacement of the possibly faulty bearings and you retract your incorrect assertion that the bearings were not replaced.

I guess the idea that the ‘customer is always right’ never made it to these guys. There was an offer on their part to possibly replace the bearings if I sent them back to them so they could be inspected by a specialist, which was jolly nice and all but I wanted to put the machine back into service and not wait weeks. I thought my description of what had gone on and the photos I supplied should have been sufficient to argue my case. It’s hardly the case that I would pull the tables off and the spindle apart simply due to curiosity or paranoia.

So that was that. They won’t even respond to my emails now so there’s no point in further attempts at dialog. I was incredulous with how I had been treated, but at the end of the day there’s not much I can do about it. I certainly won’t be buying products from that company any more, and would encourage anyone thinking of buying a used machine in the UK to look elsewhere for a supplier.

Funny enough, at the time I had been getting the machine, I read with some interest some comments by various folks on a Canadian woodworking forum thread in regards to Scott and Sargeant:

Commenter M: I would not trust anything said by “scot and sargent” AKA Scot and scumbags!!
Commenter H: I have the same feelings as M. about S & S. They are right on my doorstep but I would rather deal with firms further up country.
They generally:
Don’t know their own equipment
Don’t have the stock
Charge like a rhino for mediocre quality
Have a shocking attitude to service and people who walk through the door
Commenter F: I think W. has summed up S & S perfectly , many woodworkers I know hate them, very poor service. For a example, A good friend of mine brought a brand new scm minimax saw bench from them ( yes I know mad, says he don’t like old british machines because to much trouble ) , anyway s & s delivered it , my friend unpacked it and had a electrician wirer it up, did not work so rang s & s but they did not want to know !!!, mean while the electrician traced the problem to a faulty switch on the machine, all s & s would do was send a new switch !!!, could not even be bothered to send out a engineer to fix a brand new machine !!. I say no more!!!

When I first came across these comments, I thought to myself, “well, that certainly hasn’t been my experience so far”.  I guess I needed to wait a little longer. I can now add myself to the chorus saying “no more!!!” I drilled out the rivets holding their company tag to the front of the saw and threw the plate into the trash. That felt satisfying.

Enough of that muck. The pulley is at a machine shop, along with the support legs, for some repair work. I’m still mulling over what to do about the bowed sliding table. In the meantime, I can at least deal with the bearings.

I picked up a couple of new SKF bearings from a supplier in Boston, then shortly thereafter came across a higher precision 'P5’ (ABEC 5) version for 55% off on Ebay, so I snapped it up.

Here’s that sweet new bearing:


Here’s that same bearing, fully packed with grease:


FAG is a German bearing company, so it ought to be decent quality. I’m using a Lucas grease product intended for high speed bearings.

The bearing is a tight slip fit onto the spindle, and after it is seated the lock ring spins into place:


Then the lone slotted screw is tightened to secure the lock ring onto the thread:


The rear bearing, SKF 1306, seems to be only available in a basic configuration, with phenolic retainer:


It’ll be fine. Older versions are available with a bronze retainer, however I read somewhere that the phenolic retainers are better.

The rear bearing was checked for fit onto the spindle. Again, a slip fit, however the last 1/16" was a little tight and required a drift to seat it:


I was just confirming it would go all the way on before trying to put the spindle into place and then finding myself having a struggle to fit it. Been there done that, more than once.

I popped the rear bearing off so I could then slide the spindle with front bearing attached into the trunnion:


Another view:


Before I went any further I retracted the spindle slightly and fitted the rear bearing’s dust shield/spacer piece over the end of the spindle. Then the spindle could be reinserted and the rear bearing started:


Once the rear bearing was all the way in, the woodruff key could be put back:


From the other side of the casting, a look at the rear bearing spacer/shield seating in position:


Next step is to reattach the rear bearing’s end cap:


And then the same procedure with the front bearing’s end cap, held with socket cap screws:


It spins really nicely now, and I have confirmed that the grease injection system feeding each bearing is working properly. Should be good for the rest of my working life.

I am waiting on the return of the spindle pulley from the machine shop to complete the job. I’ve also decided to swap in some link belts for the drive belts, which, although new, are likely to be a slight contributor to vibration on the machine.

I have kind of a 'mad inventor’ idea for fixing the bowed sliding table, however I’ll save that for a later post. Need to get my head examined first. I hope, at least, you enjoyed the tour through the trunnion.

Thanks for visiting the Carpentry Way.

via Tumblr http://davidpires578.tumblr.com/post/132251706069

My Journey As A Scroll Saw Pattern Designer #1645: In Between

I often get creeped out when things all fall into place like they should. I am uncertain why this happens. Perhaps after years of growing up with family, pets and children we learn that even when we try to plan things out in advance, there always seems to be something that happens and things change. Sometimes for the better, sometimes not. 


Lately things have worked out pretty well. Could it be that after all these years I am finally getting the hang of scheduling things for myself?  It hasn’t that I have ‘coasted’ along in my ventures – as there were more crazy/busy days than not – but after the past month of meeting several deadlines and then being able to create some new patterns AND get them posted on the site on time, I am beginning to wonder about myself. It is so unusual for me.  ;) 


I used to (kiddingly) tell my children “If you reach all your goals, you aren’t setting them high enough.”


Even though I only said that in jest (and I made sure they KNEW I was kidding) I wonder if there was a part of me deep down inside that actually believed it. Hummm …  


But as I get older and I re-evaluate my life, I am learning (finally) what IS and is NOT important in this life, and I have been adjusting myself accordingly. And for some weird, unknown reason, it seems to be actually working. 


By late afternoon yesterday our site was updated and I had finished writing my three new patterns. Keith went out for the evening and after tidying up our little place a bit, I made a pot of chili and after dinner sat here with my kitties and thought a bit. 


Nothing was pressing and nothing was 'due’ immediately and I actually had a night to do something 'for ME’. Wow. 


My head began spinning and I almost got caught in the 'not knowing what to do first’ thing. I want to start a new embroidery project. I want to use my colored pencils and learn. I want to paint some new things. I have more scroll saw patterns to draw. The list was long and every item on it was both fun and exciting. So where do I start? 


I decided to work on my drawing skills. I had all the supplies that I needed to make a new pencil drawing, but I didn’t have a clue of what to draw. I am still in the very early 'learning phase’ with pencils, so I thought I would try to work on the October Challenge from Lisa Clough, which was drawing a single rose. The more I thought about it, the more I liked the idea. The reference photo was beautiful and the rose itself was simple, yet complex. The single rose was not as intimidating as several would be and it would be a good exercise for my own learning. So I began.  


Here is what I have after a couple of hours:


It isn’t much, but it is far more difficult than I can imagine. It only has a couple of layers on it and by the time I am done, there will be several more. But it is a great choice for learning and I am glad I chose it. 


Today is going to be a more 'relaxed’ day. For the first time in a long while, I don’t have something screaming at me. The rain stopped and the sun is out and it is cool and beautiful so I may wind up doing something outside like going for a walk. It will be lovely weekend. 


I want you all to know that there will be a special event hosted by Toletown this weekend to celebrate Halloween. 


I am also participating in it and would love to share it with you. If you click on the link above (the Toletown name) after 5pm Eastern time tonight, the link will take you to a map. On the map are many great painting businesses and sites that will offer 'specials’ just for this event. There are all kinds of freebies, coupons and discounts from the different sites, and the event will last until November 1st. I hope you take advantage of these specials. It will be like “Trick or Treating” right from your computer! :) 


And finally today, I want to show a wonderful gift I received from my dear friend in Tennessee – Charlotte:


She generously gave away something each day this month, and I was so thrilled to win this adorable kitty ornament as well as three little mini canvases to paint on. Isn’t the kitty adorable??? I absolutely love it and I will cherish it and think of my sweet friend every time I see it! (She gave me chocolate too, but I (ahem) ate it!) 


You can visit Charlotte’s Facebook page (and LIKE it!) here:  Roma Land Woodcrafts.


She also has a wonderful BLOG where she talks of creating, her family and even shares recipes. I love her posts and enjoy them tremendously. (Oh, and today is her birthday – go wish her some love! :) )


These 'in between’ days are really rather nice. It is nice to feel that I don’t have to always rush around and chase my tail all the time. These little breaths are great for learning and taking time to just 'be’. I have forgotten how good that can feel. 


I wish you all a wonderful weekend. Take time for yourself and to enjoy all the things in your life that are important to you. They won’t always be there, and you will be happy that you did. 


Happy Friday to you!


via Tumblr http://davidpires578.tumblr.com/post/132207919349

Thursday, October 29, 2015

My Journey As A Scroll Saw Pattern Designer #1644: New Scrolling Patterns

My goodness the mornings go fast! It is hard to believe that I have already been up a couple of hours. I love my mornings, as many of you already know, because it seems that I am able to accomplish so much in those first few quiet hours of the day. 


Yesterday was a really productive day. It was one of those (rare) times when everything went ‘as it should’ and I was able to tick off just about everything that I had on my list – and then some. I filled orders, did errands, helped customers and I even assembled and photographed my new trinket box projects. At the end of the day I was even able to sit back for an hour and relax before going to bed. It doesn’t happen often, but I will take it. 


Today I am going to be finishing up writing the instructions for the three new projects that I have created and I will also write and send out the newsletter to our customers announcing our site update. If you don’t get our newsletter, you can join our Mailing List (click the link). It is a great way to catch up on all of our new things that you may have missed. As always, we never share your information with anyone or SPAM you. 


I’ll be quick today and show you the three new pattern sets that I am just finishing up. I really like how they came out and I think they will be pretty popular. (I hope so, anyway)


I decided to make some more smaller trinket boxes (about 6" in diameter or so) with matching ornaments that will fit into the box. Each pattern will have two versions of the ornaments – one with the date and one without. This way those of you who like to add the dates on your gifts or keepsakes will be able to do so nicely. I am including all the numbers in the pattern so that the date can be changed from year to year. The boxes are a nice size for giving candy, gift cards or just about anything small. They are really easy to make and can be done in varying wood species and thicknesses so you can use up those smaller pieces of wood that you have laying around your shop.


For now, I created three new designs that will all be sold separately:


A tree (SLD516 Overlay Layered Christmas Box - Tree) (The link will work a little later when the product is available)


A Poinsettia (SLD517 Layered Christmas Box - Poinsettia


… and a Bell (SLD518 Christmas Overlay Layered Box - Bell)


I am also going to be offering them at a special set price for all three, so if you are thinking of getting all of them, wait until your newsletter arrives to get the link for them. 


I also wanted to show Keith’s new pattern today as well:


This beautiful plaque is SLDK621 - Self-Framing “Cozy Winter Nights”.  It is a great addition to his series of these types of plaques and will be wonderful both during the holiday season as well as after all the holiday decorations are put away. I always feel that time of year is so bleak after the holiday season is over, so I love decorating during those cold winter months. 


I have some 'surprises’ for my painting followers as well, but you will have to come back tomorrow for that. I try to do a little something for everyone for each update, and I think you will find you will like this little perk that I will have. 


Well, that is all for today. Watch for your newsletter later on if you subscribe and also watch for my patterns to be added to the site. I think I will have Keith put 'pre-order’ pages on the site so you can get your order in to be emailed out later today or mailed out tomorrow. No one seems to mind that. 


It is pouring out right now and very windy. But I am warm and cozy here with the kitties snuggled up with me. It is a perfect day to stay in and write. 


I hope you have a great day as well. Happy Thursday to you! 


via Tumblr http://davidpires578.tumblr.com/post/132145234939

Wednesday, October 28, 2015

My Journey As A Scroll Saw Pattern Designer #1643: Online Learning

When I think back to when I began painting and scroll sawing, I remember how different things were back then. I started both in the mid-90’s and there was very little available online. I remember when we purchased our first home computer and I was thrilled at the thought of being able to type on it. My biggest excitement was that I would have a way to find and organize things like recipes and photos, as it was a time when my kids were young and my own little family was a focus. I never could have imagined how things would evolve. 


As things changed and the internet grew, we are all able to reach farther out to the endless possibilities that are offered to us every day. From the early days of making friends from all over the country through chat rooms (I am still friends with many who I ‘met’ in woodworking rooms back in the 90’s) to our online communities that we frequent today (such as Facebook) it has helps us reconnect with old friends, connect and meet new friends, and learn new skills that would have never been possible otherwise. When you think about it, it is truly amazing. 


As you all come to read my posts here and watch me explore so many new types of creating, just think of how much of that learning that I do is from online sources. Think of your own learning journey as well. While some of you may have access to classes and lessons in  person, I find that the vast majority of those that I know depend on online learning to further their knowledge. While some may give the internet a bad rap, one can’t deny the positive aspects of learning that it can bring to our lives. 


Several weeks back, I received my newsletter from Mary Kingslan Gibilsco. Mary has been a positive influence on my painting skills for just about as long as I remember. I have followed her through her painting books, magazine articles, and now online. I am happy to say that we have even become 'friends’ on facebook and I feel that I have met one of my idols whom I have admired for many years. One thing that I like about Mary is that when she teaches, she teaches core values. She doesn’t just teach 'a project’. She teaches the methods and processes and the theory that goes along with the projects so that as a student, we can apply it to our other art projects. To me, this is the most valuable kind of lesson, for it builds our knowledge base and makes us better artists in our own rites.


In the newsletter that I received, I noticed that Mary was offering a free Amazon Fire 7" Tablet for those who subscribe to her Online Video Learning course. What an incredible and generous value that is!


As many of you may remember, I don’t own a portable phone. Since I am close to home all the time, I find that my Vonage line is adequate here at home and I don’t want the extra expense or bother of having one at this point in my life. I know I am a 'dinosaur’ as far as this is concerned, but I am going to hold out as long as I can. I would rather spend my money on online lessons or art supplies at this point.


But having a tablet like this is a wonderful option for me. Until now, I have had to sit at my computer and try to paint along or mix colors while sitting on my couch, where I am able to access my screen. Being able to sit at a table where I can actually work is definitely a step up for me. I have been subscribing to Mary’s online course for years anyway, so I was happy to extend my experience.


My tablet arrived last week. I must say, I am a total novice as far as things like this are concerned. While I am rather competent on the computer, I had to fumble around quite a bit to get my footing on the tablet. But after a little while, I am feeling more comfortable on it and I am able to access my videos on it, which is the main reason I wanted it. The picture and sound are really nice:


I even got a snazzy little case for it that folds over to make an easel:


I read up on it and it is supposed to have really nice battery life. Some people said they didn’t like the sound, but I find it to be great. It is clear and certainly goes loud enough for me to hear what is going on. Needless to say, I am thrilled. 


I hope that my painting followers that are looking to learn will consider taking Mary’s course. There are many different levels of subscribing and I think that if you try one of the shorter periods, you will certainly want to up your membership. (Wouldn’t that make a wonderful Christmas present for those of you who have family members who are wondering what to get you??) I started by trying it out for a month and then I took the full subscription. Whether I paint the exact projects or not, I find that I like to watch the videos just to see the techniques and theory that Mary is teaching. I can certainly say that Mary’s course has helped me improve my painting skills a great deal. You can access the Online Video Course choices by clicking on this link: Online Video Learning


I truly hope you consider it. Mary is one of the best teachers I have seen. Not only will this be great for painting, but for watching my embroidery videos as well. I am really thrilled and grateful to Mary for this generous offer. 


On other fronts, I just about finished my three new projects yesterday. Today I will be doing more assembly and then taking the final photos of them and writing the packet. We are (hopefully) going to update our site tomorrow (Thursday) and send out a newsletter as well.


Here is a quick photo of ONE of the new patterns:


It is a Christmas Tree trinket box with two matching ornaments. There is an overlay pattern on the top of the box and one of the ornaments will have the date on it (ALL numbers are included in the pattern, so you can change the date from year to year) and also a plain ornament. 


Those of you who know me will figure that I will probably embellish these pieces with some interesting 'sparkle’ or rhinestones. ;)  I just can’t leave them be! But they look rather handsome right now on their own, don’t they? 


I am late today in my posting because I am still fighting this little cold. But I am beginning to feel better and hopefully I will be 100% soon. 


I promise to have more photos tomorrow of the other two patterns. 


Have a wonderful and creative day! Happy Wednesday!


via Tumblr http://davidpires578.tumblr.com/post/132081999864

Tuesday, October 27, 2015

My Journey As A Scroll Saw Pattern Designer #1642: If the Garbage Looks This Good . . . Think How Nice the Project Will Be

I am happy to say that I had a tremendously productive day yesterday. It was one of those days when everything just went like it was supposed to go. Perhaps it is in part because of my early start (I got up my ‘normal time’ for the first time in a couple of weeks – I have a slight cold) and I was able to get a jump start on my day and accomplish a great deal. I am hoping that many more days like that will follow. 


The main thing that I accomplished yesterday was cutting out my three projects. It was one of those rare times when Keith and I both had cutting to do, so we enlisted our DeWalt saw into service. We looked like quite the pair, I am sure, with Keith and I both wearing our headphones and listening to our favorite things while cutting. I love listening to upbeat music when working on the scroll saw. It is uplifting and makes things even more enjoyable. Before long, I knew I was in the “zone”. 


After my main cutting was done, I needed to do my final detail work. Keith had an appointment, so I switched to the Excalibur saw. While I still don’t mine the DeWalt for cutting some of the larger pieces, (it’s slight front to back motion of the blade helps much of the cutting go quickly) I still feel that the Excalibur is a better saw for the fine detail. It’s precision can’t be beat and makes cutting things out pure pleasure. 


I spent the next couple of hours nearly finishing up my three projects. I still have about half an hour to an hour to go today, but for the most part, I am done. It was getting late and my eyes were getting tired and I felt that there was no need to push things when I didn’t have to do so. (Especially the most delicate parts!) So I will probably finish things up today. 


As I was cleaning up the area around the saw, I found some interesting 'garbage’. It is rare that when I cut, the pieces come out in tact. Believe me – it is not a goal to have them do so. There are are other things to worry about when cutting that are far more important. But come out in tact they did, and I thought they looked pretty cool. 


(Ok – there is some blatant 'product placement’ there. I wanted to give credit where credit was due! I love my Excalibur saw!)


If the 'garbage’ looks this nice, I hope the project can look even better. You will have to wait until tomorrow to see though … (Yes – I am MEAN!) 


In the mean time, Keith added another beautiful pattern to our site yesterday. His SLDK620 - It Must Be Autumn Self-Framing plaque is just in time for you to celebrate this beautiful season:


… and there is more to come from this series as well … 


Today I will be working on finishing up my three new projects. I should have some nice photos of them by tomorrow. It is a beautiful day again today and while it is very cool out, it is sunny and pretty. 


I hope you all have a great day. Happy Tuesday to you all! 


via Tumblr http://davidpires578.tumblr.com/post/132012944299

Monday, October 26, 2015

Amber Tiger Maple Bo

Amber Tiger Maple Box

via Tumblr http://davidpires578.tumblr.com/post/131992509594

Z's Wedding Box - Re

Z’s Wedding Box - Reader’s Gallery - Fine Woodworking

via Tumblr http://davidpires578.tumblr.com/post/131992508289

book binding tutoria

book binding tutorial.

via Tumblr http://davidpires578.tumblr.com/post/131992508654

pretty jewelry box

pretty jewelry box

via Tumblr http://davidpires578.tumblr.com/post/131992509109