Wednesday, January 20, 2016

My Journey As A Scroll Saw Pattern Designer #1683: Patience

I was really happy that so many of you liked the look of the Metallic Lustre Acrylic Wax from DecoArt that I added to my latest scroll saw projects. After allowing it to dry a day, I continued to finish off the project. 


I know we live in a world where we want immediate results on everything, but sometimes we just need to wait a little bit and let things do their job or run their course for the best results. Not only when crafting, but in many situations in our lives. 


After posting my blog about the Metallic Lustre the other day, I had many ask questions as to whether the wax would be permanent or a good base to paint subsequent layers on top. I was happy that before I did this project, I had called DecoArt to find these things out for myself and to be sure I was using the product properly before I blogged about it and told you all. I didn’t want to misinform you or send you down a path that would bring poor results. Doing my homework paid off. 


I was told that it was best to use thin coats of the Metallic Lustre, and then let it set or dry for several hours or overnight. Yes – it is a ‘wax’ but not in the traditional sense that it contains oil. It is acrylic based and therefore actually does 'dry’ (unlike traditional waxes) and can be set. Since it is highly pigmented and has an amazing amount of shine, I find that in any application, just a very thin coat is necessary to achieve beautiful coverage and effects. I also found that by applying it too thick, it not only has trouble drying, but can rub off or flake off, depending on if you have 'chunks’ or not. For this reason, it is best to put it on very sparingly and build coats if you desire more color. But I find that one coat has been clearly enough to give a maximum effect and see little point in adding more. 


After I allowed the pieces to 'set’ overnight, I touched them to see if they were dry. I even rubbed pretty hard with my dampened finger and nothing came off. Good. That is how I wanted things to be. But just to be sure, I sprayed the pieces with a light coat of DecoArt Matte Spray Sealer to seal them in. (a LIGHT coat!) This did not seem to dull the shine of the Metallic Lustre at all, and I felt better that it offered an additional layer of protection. 


Once again, I got busy with other things and waited until I felt the pieces were fully dry (this is where the PATIENCE comes into play!)  I had plenty of other work to do yesterday and had no trouble letting the finish set. By the time I was ready to proceed, it was after 10pm and several hours after I sprayed. I tried to scratch a little corner with my nail and much to my delight, nothing came off! GOOD!  I was ready to add some beautiful crystal rhinestones to finish off the pieces. 


I began with the lovely SLD522 Heart and Soul Candle Tray. As I said, I absolutely loved that Rose Gold and was anxious to see how it would look finished. I chose to add some beautiful light pink hot fix rhinestones that I purchased from Rhinestone Canada. I had trouble with choosing a color, as I was fighting myself between the light pink the Aurora Borealis and clear. I even considered using peach, as it would compliment the color nicely. But I finally decided that the light pink would be the best match with the Rose Gold Metallic Lustre on the heart motif. So I went with that.


The result was just lovely:


You can see in the above photo the difference between the 'plain’ and 'blinged’ piece from left to right. 


I felt the stones really added some beauty and elegance to an already pretty piece:


The overall appearance of the piece looks beautiful and professional and it brought it up another notch, I feel:


I got tired after finishing that part up, so I called it a night. I will be continuing to add some stones to the ornaments that I showed the other day and I will have photos for you tomorrow. I did want to report on the Metallic Lustre though because so many of you were interested in it. 


Today I am working on another project using the Metallic Lustre. I will be painting over it and I will also share my results with you in that respect. I want to both paint and stencil over it, and I am encouraged by this process that I showed here that all will work out well. Having a little patience with things seems to be the key to success. 


I hope you all enjoy learning about these products. I am thrilled with them and have lots of ideas as to how to incorporate them into both woodworking and painting. They are fun and certainly add a lot of beauty!


I wish you all a very happy Wednesday! It is snowy here in Nova Scotia and a good day to stay inside and create! I hope you have a wonderful day wherever you are! 


via Tumblr http://davidpires578.tumblr.com/post/137685539864

Monday, January 18, 2016

My Journey As A Scroll Saw Pattern Designer #1682: Fun With DecoArt Metallic Lustre Acrylic Wax

I had a truly busy weekend and I am finally feeling as if I am getting caught up with things. I spent much of Saturday cutting orders and I will be sending all of them out today. Then I can get on to more designing and some other things. 


I also finished creating the pattern packets for my SLD521 Damask Heart Ornaments and also my SLD522 Heart and Soul Damask Candle Tray that I showed last week. I am really thrilled with these patterns and I love how they came out. 


But … 


While the wood is pretty on its own, I really thought that I wanted to add more to it.  I purposely ‘stack-cut’ the ornaments with one layer of 1/8" Baltic birch plywood underneath so I would have an extra set to 'play’ with.  DecoArt recently had come out with a new color of its beautiful Metallic Lustre Acrylic Wax called “Rose Gold” and I had a jar of it here just screaming to be used on these romantic-themed projects! So I gave it a go.


I chose six of the colors that I thought would be suitable for a nice, romantic theme:


<div>The colors I picked were Fab Fuchsia, Silver Spark, Champagne Ice, Majestic Purple, Radiant Red, and NEW Rose Gold. For product information and to see the full line of colors, you can visit DecoArt’s site http://decoart.com/metallics/metallic-lustre” target=”_blank”>HERE.


The Metallic Lustres are one of my favorite of DecoArt’s products. The are an acrylic, water-based “wax” that can be applied in several different ways. It is particularly wonderful to apply to relief surfaces, such as picture frames or textured stenciling, but also looks great on fretwork as well. Because it is an acrylic based product, it thins and cleans up with water, and has absolutely NO odor to it. I think that is a definite 'plus’. And because it is a wax, it is very easy to control the application. You can use a damp cosmetic sponge to daub it on for stenciling, or a stencil brush to 'dry brush’ it over textures and stencils, or you can even use a little water to thin it and make it more liquid, for fine, detailed areas.  Below are some photos of how I applied it to my fretwork … 


For the heart ornaments, I decided to use a traditional stencil brush. This is a brush that is round and has stiff, flat bristles. I decided that for my ornaments, I would NOT be adding the Metallic Lustres to the sides of the designs, as the were pretty intricately cut. I thought that leaving them the natural wood color would be very attractive and I chose to apply the Metallic Lustre to only the face and back of each ornament by lightly loading the brush and gently tapping the color into place:


The stiff, flat bristles in combination with using just a small amount of wax helped to keep the color from going over the edge. I absolutely LOVED this pale pinkish gold “Rose Gold” color!  I think I have a new favorite! 


I like it so much in fact that I decided to use it on the hearts of my SLD522 Heart and Soul Candle Tray as well:


I only wanted it on the face of the six hearts though, and for the places where the hearts met the frame, I used a stiff, flat (shader) brush and thinned down the Metallic Lustre a bit with water so I could paint it on with a bit more control.


It worked BEAUTIFULLY!


I continued to color the other five hearts with the colors I had chosen. The Radiant Red looked especially beautiful!


When I was done last night, I had quite a beautiful collection:


I was told by DecoArt that I needed to allow the Metallic Lustre to “dry” several hours or overnight before proceeding.  while they look beautiful now, I still have some wonderful things in store for them to finish them off. 


I will continue my process in tomorrow’s post. I think you will like what I have in mind. The beautiful ornaments will be taken to another level, I think and will really look lovely. 


I hope you liked this step-by-step blog. I think that this product is a great way to enrich your scroll work as well as your painted work. As I said – there are so many wonderful ways to use this wax that I am sure it will open a whole new creative avenue for you all. (Especially if you like 'shimmer’!)  The colors are outstanding and so rich and lovely. What a wonderful way to enhance your creations!


We have had more snow and ice over the weekend and last evening, and It is a 'typical’ winter day here in Nova Scotia. It appears that winter has finally arrived and will be around for a while. I may as well stay inside here and create. What better way to spend my time?


I wish you all a wonderful day and a fun and creative week ahead. Happy Monday to you all!</div>


via Tumblr http://davidpires578.tumblr.com/post/137552228984

Saturday, January 16, 2016

An Embarrassment of Riches

The past couple of years in business have been sufficiently solid that I have been able to make investments in my shop infrastructure. Most of that has been by way of large woodworking machines, many of which were purchased used, some from reasonably near to where I live, and some from quite afar, including Germany, England and Japan. My business is important to me so I chose to take any extra capital that came my way and put it into my business, as opposed, say, to a new car, new clothes, heat for the shop….

Those have been big investments for me and I’ve made note of the new acquisitions as they have come about here on the blog. In terms of the big equipment, my shop is getting pretty close to where I want it, and a very much greater amount closer to what I want than the time I was working out of my kitchen on a sawhorse, which was when this blog first came about.

I feel blessed to have been able to make these investments in equipment, after having made do at times with a lot less, and having to rely upon the good graces of others at times to move projects along by way of equipment I did not have.

Along with the big lumps of iron that I’ve dragged into my shop, I’ve also been investing in all sorts of hand tools, most of which have come out of Japan. I don’t generally remark too much on those items here, though that does not mean they haven’t been incredibly important to me or that I do not treasure them, or that pictures of them haven’t appeared in past postings here and there.

It’s more I didn’t want to make this blog about ‘tool acquisition gloats’. I’m generally more interested in talking about the what/how/and why of the things I make and design, and a bit less about tools. I am however very interested in tools, and enjoy having discussions with other woodworkers about tools, so long as were talking about tools from the perspective of using them and not merely collecting them. Tools are the instruments of the craft and how could you be into your craft without similarly being interested in the tools which you wield to accomplish that craft? The funny thing is, I do meet and know quite a few woodworkers who churn out product without seemingly having much interest in their tools or anyone else’s tools. That’s a bit weird to me, but whatever.

Today a special package arrived from Japan, and I’ll break my normal practice and make some mention of them, as I feel very lucky indeed to have them.

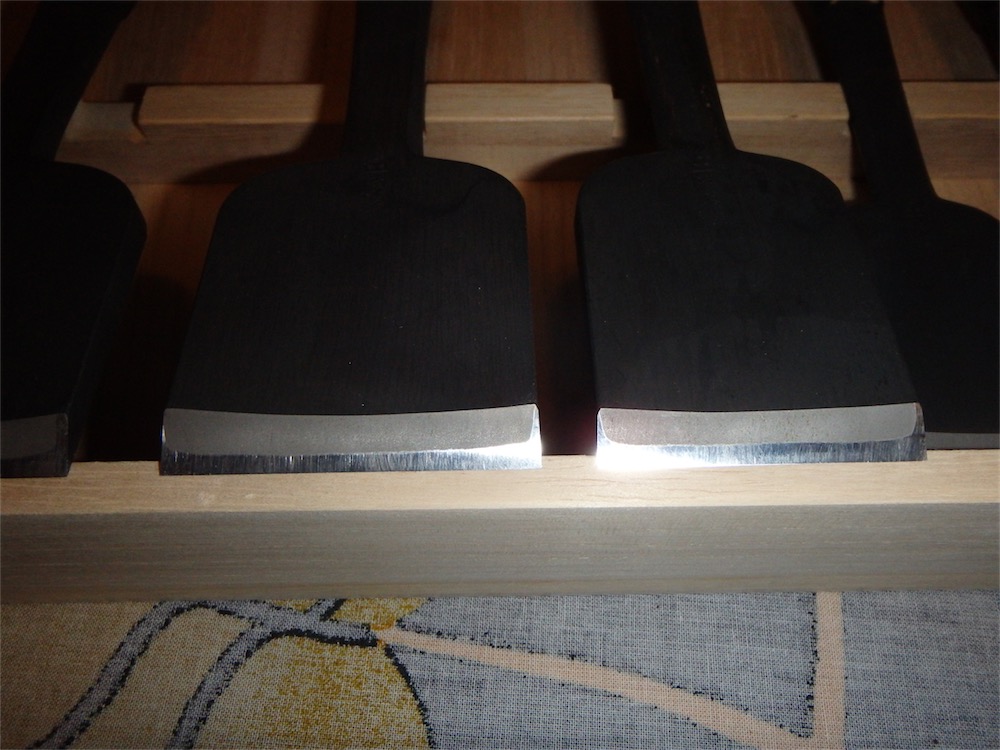
It’s a set of chisels, 16 in total:


They range in size from 1mm on up to 60mm. All are White paper steel #1 - the blacksmith uses a special lot of white paper steel ingots, purer than usual, from the 1980’s if I am not mistaken. Japanese blacksmiths tend to hoard special chunks of material in the same way that woodworkers do.

These chisels are made by Watanabe Kiyoei, who makes chisels, and planes, under the brand name of Kiyohisa. He’s based in the heartland of Japanese blacksmithing, Yoita Village, near Tsubame City, Niigata. I’ve visited that village many years ago, though I met other smiths at that time not Watanabe-san.

I already have several tools make by Kiyohisa, including two planes and a few various chisels. I’ve found them to be exceptionally beautifully made, easy to set up, easy to sharpen and they hold an edge tenaciously. In my experience, Kiyohisa tools are among the best made, and I mean at any point in history. I’d put only a few makers in the same league.

Now, my experiences with Kiyohisa tools seems to have been widely shared by those who have acquired his tools, and as a result a waiting list has grown and the wait gotten longer to obtain them. I ordered a couple of fishtail chisels for a friend a few years back, and the wait at that time was supposed to be 3 years “or so”. Well, the “or so” measure now means that the wait for his tools is likely something like 6 years or longer. I don’t know exactly how long it is, but in general it is longer than I would be inclined to wait myself.

The Kiyohisa tools I have acquired in the past few years happened to have already been on dealer shelves or were regular-order items with a dealer and periodically restocked. In one case, I ordered a reverse trowel-neck chisel, or gyaku kote nomi, and after a year had passed from the order date the dealer offered to sell me one he already had in stock but fitted with a new handle to meet my specs. Otherwise I had all but given up on getting more Kiyohisa. Not that there aren’t plenty of other fine products from other excellent smiths available, but when you find something you really like, you kinda hope for more of it I guess.

So, I have sitting in front of me a 16-set of Kiyohisa 'Kamon’ chisels, and these chisels are totally made for me, to my specifications, specification which included type, sizes, length of head/neck/handle, type of handle, type of ferrule, type of striking ring (kashira). I did not order these 5 years ago, but within the past 12 months. How did this come about?

It was pure happenstance really. A tool dealer mentioned about a year back that a Kiyohisa chisel set had been made for a customer but he had lost contact with the customer and if he were unable to locate the customer the chisels might be available for purchase. He thought I might therefore be interested. I did a bit of digging around and located an email address for the person who I thought was likely the customer, sent that along and lo and behold that turned out to be the connection to the rightful buyer.

While I was only trying to be helpful, the dealer felt obliged to me as a result and on his own impetus asked Kiyohisa if he could possibly fit a special request in to the production schedule. I didn’t know that could be even done, so I was unexpectedly faced with a special opportunity. That rare chance has materialized as this set of 16 beauties.

How about a closer look?


These chisels are a special configuration. They are longer than regular bench chisels, oi-ire nomi, and about the same size as mid-size striking chisels, chū-tataki nomi. They have flattened shanks, what are termed hiramachi style, except the proportions of handle, neck, and head are a little different than standard hiramachi chisels. The flattened shanks allow for deeper mortising, beyond full head depth, without risking that the shank will bruise the mortise opening as can happen with rounded shank chisels.

The handles are gumi wood (more on that below) and are longer than standard, since I have larger hands than the average Japanese carpenter. All the chisels have a single hollow on the back, though I had the option for multiple hollows on the larger chisels. I prefer the single hollow actually, and the argument usually advanced for multiple-hollows, that they provide better support when paring or chopping with a portion of the blade on the work, doesn’t amount to much if you have a good range of chisel sizes to choose from. The multiple-hollow chisels, as they have more cutting steel on the bottom contact surface, are somewhat harder to sharpen and keep flat than the single hollow kind.

As mentioned above, these are a special type of Kiyohisa chisel, the 'kamon’ model, a term which means family crest. The Watanabe crest is three dots over a bar:


The three dots, or mitsu-boshi, refer to three stars, which is a reference to a constellation within Orion, one of the 28 Mansions in Chinese astronomy. In the west these three stars are known as the 'three Kings’. They are in a line, hence the line under the three dots.

Specifically, kamon Kiyohisa refers to special edition chisels and planes which have received a low-temperature annealing. The usual minimum annealing temperature is supposed to be around 160˚C, however Watanabe-san, through some alchemy (likely relating to special steps he takes in preparing the steel and its carbides  -it would be one of his secrets of course) is able to anneal at lower temperatures than other smiths. He has produced chisels and planes with annealing temps ranging from 150˚C on down. I have a 150˚C plane and a 135˚ plane from the same maker (the annealing temperature is inscribed on the back of the tool).

These chisels I just received are all 100˚C annealed.

Several shops in Japan that carry Kiyohisa won’t sell the Kamon models out of the country, but, well, like I said before, I was lucky. Please don’t hate me for being in the right place at the right time.

I feel that I have quite possibly reached the end of the road in terms of chisels I would like to have, or dream of having, and I’m pretty much there as well with hand planes.  I’m looking forward to setting these new chisels up and putting them through their paces.

A few more pics now of these tools:


With a 16-set, I’ve have been able to add a bunch of chisels in those half sizes that I have sometimes wished I had on hand in the past.

Largest and smallest together:


Some forge weld lines to look at:


These chisels have a delicate feel, and yet are comfortable to hold:


Gumi is my favorite tool handle wood.

The gumi handles are cut out from branches, and thus the pith can be seen:


Gumi has been referred to by some as 'Japanese Boxwood’,  however this is totally erroneous. Boxwood, as such, a genus of about 70 species in the family Buxaceae. Chinese boxwood, for example, is buxus sinica.

Gumi comes from the family Elaeagnaceae (try saying that three times fast; the scientific name is Elaeagnus), part of the plant order Rosales. It is a deciduous shrub getting up to 8m tall at most. There are some 50-70 varieties, however the wood used for utensil handles, gumi, associates to E. multiflora specifically.

The English name for Elaeagnus generally is Silverberry, with E. multiflora being termed 'Cherry Silverberry’. The Japanese also call this particular species natsugumi.

A drawing showing parts of this plant:


Here’s a photo of the plant when fruiting:


Source: Wikipedia.

By accounts I have read the fruit has a sweet yet astringent taste, apparently a bit similar in flavor to rhubarb.

With 16 chisels to set up and sharpen, it will be a while until I have a chance to use them all, but I’m looking forward to getting to know them one by one, cut by cut.

All for this round - thanks for visiting the Carpentry Way.

via Tumblr http://davidpires578.tumblr.com/post/137444826604

Friday, January 15, 2016

My Journey As A Scroll Saw Pattern Designer #1681: Update Time!

As the second week of the new year comes to a close, I find myself reflecting. Not so much on the year 2015, but on the last two weeks – the beginning of 2016. It has been a crazy ride so far, with many wonderful things happening. It seems our customer base is growing every day, and I have had lots and lots of orders to fill.


Even though it has been a lot of hard work, I find myself happy and grateful. After all – this is what I have been striving for the past several years. I have always wanted to have a viable and successful business that was centered around creating. It appears that those aspirations have come true, and both Keith and I couldn’t be happier. 


What I hadn’t anticipated was the wonderful sense of satisfaction that came with whatever successes we have had. Because of the nature of what we do, we tend to bring something positive to the lives of others. By providing patterns, kits and instructions for those who wish to create, we are giving them the tools to do something that makes them happy and helps boost their self-esteem. To me, that is truly one of the most important aspects of what I do. It honestly gives me the most satisfaction and because of it, I feel that I am making a difference in the world. It may be a small one, but I feel that these small things are baby steps to doing something that has a positive effect overall, and no matter how small that effect may be, I’ll take it. 


It is not only the amount of sales that we are having that I have noticed, but also the amount of calls, letters and emails from people who are so happy with our patterns and kits. I love to hear the stories of why they are making our designs, or for who they are giving them to or which cause. There is always joy and excitement as they tell of their plans, and that to me is worth more than anything. As we grow, it seems to happen more and more. 


We don’t design for nameless, faceless customers. We design for people with families and full lives and stories. Each pattern of piece of wood from a kit we are making willl go to a ‘person’. Someone who chose our designs from the thousands of those available on the market. To me, that is a privileged. I am very grateful. 


They say that positive reinforcement breeds additional positive responses. I clearly see how that works. As I get busier, I also try to do an even better job than I had done in the past. It wasn’t as if I was careless before, but the work that I do takes on a bit more meaning. As I am drawing up my designs or writing instructions or cutting wood, my mind drifts to those who will be using these tools for their own creativity. And I want things as perfect as possible to make their job easier. I think that this success has not only brought our work to a higher level, but also our pride in our products. It is a cycle that builds upon itself and hopefully will continue to perpetuate. I am truly grateful. 


As you can tell, I think a lot when I am cutting orders. The repetition of cutting the same pieces over and over becomes somewhat automatic after a while and it allow my mind to wander. Not only about the awesome music that I choose to listen to in my headphones, and the memories that accompany that, but also of the customers I am cutting for and the new things that I will be creating in the future. It is all fun and all positive. Even though it can be physically tiring, it is the 'good’ kind of tired. The tired that comes with accomplishment. I hope it continues… 


In between the mad rush of orders these past two weeks, I was able to also draw up and create a couple of new patterns. Keith has been working on our new catalog, which is no small task, and he has some new patterns as well. We added these patterns to the site, and also changed the specials and sales, as well as offered a new free painting pattern as I showed yesterday. We have been busy. ;) 


I still need to write the instructions today for the two new patterns that I created, but they are nothing out of the ordinary and that shouldn’t take too long. They should be posted by this evening when our

newsletter is set to go out. 


The first pattern is that of a pretty set of Damask heart ornaments that I showed earlier this week in progress. I finished them up and they came out really pretty. I call them Damask Heart Ornaments and I am pleased with them:


I cut mine from ash, which is one of my favorite woods to scroll. They are appropriate not only for the upcoming Valentine’s Day holiday, but would actually be nice for any romantic occasion (wedding, anniversary, etc.) The link to the pattern is here: http://www.sheilalandrydesigns.com/product/SLD521  and it will be active later on today when the pattern is posted. I cut another set of these in 1/8" Baltic birch and I plan to decorate them with some wonderful DecoArt products and some hot-fix rhinestones. But for now, I thought these looked beautiful 'naked’ and unadorned. I hope you agree. 


The other new pattern that I will be offering is for the SLD522 Heart and Soul Damask Candle Tray. (Again – the link will work when the pattern is posted)  


This piece is also in the Damask style, and is fun to cut and came out beautiful. While it is probably not a great project for the beginner scroll sawyers, there is no reason it couldn’t be done with a little patience by most. The Damask design is very forgiving and not really as delicate as it appears. I think the most fragile part of this tray is the edging, which I saved to cut until the end. I even left the cut pieces in the cavities on the edges for a bit more support while I finished. I used aspen wood for this try, which is tight grained but light and airy. Since it was ½" thick, it held up fine, but you may be better off using something more dense such as maple if you are leery of using a softer wood. I don’t deny that the edges of this are delicate and this piece is to be handled with care. But as you can see – it is possible to create it. 


I also haven’t decided whether or not to embellish the tray. I do like it 'as is’, but I am intrigued with the idea of adding some metallic wax to it for some different effects. I may take more photos and then give it a try. I will certainly keep you updated. 


Those of you who receive our newsletter should get one by tonight. I have several things to mail out today and then write the newsletter and send it. I don’t know how long that will take me. 


Keith also has new designs that I showed earlier this week that are now posted. And as I said, there are new sales and specials, as well as some new surfaces that I added in. I plan to design on them very soon and will begin with them this weekend. I hope you want to check them out. 


With that said, I will end here for today. Thank you again to all of our customers for your continued support for our little company. You each make a difference in our lives, and we hope we make a small difference in yours. You are very much appreciated. 


I wish you all a wonderful weekend. Whether you are in the sun on a beach or shoveling snow here up north, I hope you enjoy what the day brings. Happy Friday to you all! 


via Tumblr http://davidpires578.tumblr.com/post/137347707014

Thursday, January 14, 2016

A Ming-Inspired Cabinet (26)

Post 26 in a continuing series, which might be interrupted at any point to dig into other topics, you never know.

——————–

Some reader, in a private communication a bit too sensitive to be shared publicly, has been indicating that I am not dressing sexy enough for these posts, so I thought I’d show y'all a little leg today. Hmm, maybe I’ll even go so far as to show a LOT of leg, how about that? Hah!

The first task was to take the leg blanks down in dimension a little bit, not something particularly meriting photography. The next task was to mortise then ends of the leg for the bronze leveler feet. These mortises were 1"x1"x 1.0625" deep, and I wanted to approach the task in two stages, the first being to rough out the mortises, the second to bring them out to dimension. The mortise were square, so they would be finished by chisel work.

A drill is the standard choice, but drilling into the end of a leg, a task which on the surface might seem easy enough, is in fact a bit tricky most of the time. Unless the leg is short, it won’t fit into a smaller size drill press, and if it is long and you have a standing drill press, then you will have to construct some sort of fixture to hold the leg on a line axially true to the drill chuck.

The legs I have could possibly be squeezed into the milling machine in a vertical orientation, however why do that when I can mill at a 90˚ angle, horizontal I mean, with the right angle accessory?:


The right angle accessory, which came with the mill, is a seriously heavy chunk of iron and steel. I use the power z-travel, using the table as a lift to help raise the attachment up into position.

Here, I’m relaxing the tension on a center grub screw which spreads the collar and allowed the attachment to mount more easily - with the grub screw eased off, the attachment will remain in place height-wise on the quill:


At this point the casting of the attachment can still be swiveled around, and I therefore worked to align the accessory to the back jaw of the vise using a transfer punch as a dowel and testing the ‘pinch’ between jaw and rod with a plastic feeler gauge until I had achieved decent parallelism:


As they say on a certain TV commercial from the 1980’s, just a li'l pinch between the cheek and gum will get you where you need to be.

With alignment sorted, the two bolts on the attachment’s collar could be tightened to secure it onto the quill.

Next step was to fit a drilling chuck and then working to center the spur of the Forstner to the stick:


Another view of the initial set up:


I made a start with the motor, and promptly realized that the spindle was turning the wrong way on the output end of the attachment. Oops! I went to the back of the mill and flipped the main switch over to reverse motor direction. Then I set a depth stop onto the vise jaw and did a test cut:


The cut was okay, except the drilling chuck allowed the Forstner bit to spin a bit, and the bit had actually come loose. Not wanting to screw around with that, I removed the drilling chuck altogether and put in a collet chuck instead, which can grab the shank of the bit with the many facets of the collet rather than the three used in the drilling chuck. This solved the problem immediately and I can see why machinists often prefer to use collet chucks instead of standard drilling chucks. I’m going to start using them more often too, and an added bonus is that the collet chuck doesn’t stick as far out of the spindle end, so it is inherently stiffer. I’m tired of spinning drills in a chuck and damaging their surface.

With the collet chuck mounted, I took care to recheck everything was coming to the correct point:


The drilling itself was effected using the x-axis power feed for most of the cut, turning the hand wheel by hand the last tenth of an inch or so to the target depth of 0.9":


A while later all 9 legs were rough drilled:


I then made up an MDF fixture which would allow me to rout on the end grain to mill a 1"x1"x1.0625" deep mortise:


The completed mortise:


Checking the fit of the leveler foot as best I could:


I felt like the fit was about right, just a hair snug.

A while later, all the routing was complete:


From there, it was a bunch of chisel work to bring the mortises out to a square:


A first fitting:


It came together well I thought:


Later, all the levelers are fitted to the legs:


Another view:


The levelers are fitted snugly enough so that the parts won’t separate simply due to gravity and not so tight they can’t be readily pulled apart:


The next step was to mill the combined leg and leveler to dress the all the long faces down a couple of hundredths of an inch:


All four faces on each pair were cleaned up, until I had this tidy pile of parts, of uniform dimension and all square in section:


Making the legs square in section is but a preliminary step - next I’ll be making the leg section slightly rhomboidal. Here I’ve marked out the legs to keep track of which faces get milled at which angle:


All for today my friends. Thanks for visiting!

via Tumblr http://davidpires578.tumblr.com/post/137316686824

My Journey As A Scroll Saw Pattern Designer #1680: Odds and Ends

Somehow when the calendar page turns to a new year, I always get the urge to reorganize. 


It seems that as I pack away my holiday decorations, I am always thinking of which closets I want to weed through and which cabinets to straighten. I also seem to include my computer in this reorganization effort, as it seems like a great time to sort files and back everything up completely. While I do back up frequently throughout the year, it feels great to purge and sort and clean my electronic house as well. It just seems part of life for me. 


While some look at January 1st as ‘just another day’, I tend to look at it as a new beginning. I understand that we don’t need a calendar to indicate when we can dedicate ourselves to making a 'new start’, but it seems that it is as good a time as any to begin a new regime or implement a new plan. You seldom here of people beginning a diet or quitting smoking on a Thursday. It seems that Monday is the go to day for turning the page in our lives on certain habits and starting to try to reach new goals.


Why not New Year’s Day then? Even though it is more psychological than anything, it seems like a fine time to clean things up, reorganize, and begin working towards new goals. I suppose it depends on how you look at it. 


With that said, I seem to be a week or so behind in my annual 'reorganization’ process. This year started off at an amazing pace with the crazy amount of orders I had for my Lynne Andrews “12 Days of Christmas” project group page opening. I never would have thought that there would be so many interested in doing this project with me! What a nice and happy surprise. And even though things were wild and crazy for the first week or so of the new year, I feel that things are getting caught up and I am once again in control. What a great feeling!


So in between filling orders and designing and cutting out my prototypes and writing instructions, I have been weeding through my files and reorganizing some closets and drawers and little by little regaining control over my silly life. It feels really good, too! 


Keith is doing the same, although he always seems more organized than me. He is sorting through our website and working on our new catalog which will be available in the next week or so. That is no easy task! As our little company continues to grow, we are adding new products and categories every day. It can be mighty confusing and a bit overwhelming to both us and our customers. We decided to split our catalog into TWO separate files – one for scroll saw patterns and one for painting patterns – to help alleviate the confusion. This will also make it easier for those who want either scroll saw patterns or painting patterns and surfaces from us. The files will be smaller and easier to manage as well. (Of course, people can download or request BOTH catalogs if they are interested!) We find that getting and staying organized on that front is probably one of the most difficult parts of our business. 


So with that said, I am going to keep today’s post short.  I accomplished a great deal yesterday and I hope to do so today as well. I took finished photographs of all of my new patterns and surfaces, and I will be writing the patterns today for the beautiful heart candle tray and the heart ornaments that I showed on Tuesday. I hope to get the patterns on the site by tomorrow.  


I also wanted to share that I (finally!) changed the Free Painting Pattern on the site. I decided to offer this cute little Valentine magnet or ornament pattern at no cost to you:


Just go to the Free Patterns and Resources tab on our site and you can easily download it to your computer. Of course, I sell the heart cutouts, but the design is so easily adaptable to any type of surface you wish. I just love the pretty colors on it! It looks so bright and cheerful and was a lot of fun to paint! 


I have some more new things to show, but I will do that tomorrow. I have a lot more to do today and I want to get started. 


It is another grey and cold day here in Nova Scotia and we had some more snow. But it is nice and cozy inside and I don’t mind it at all. It is a good time to work on these odds and ends and get things in order. 


I wish you all a wonderful and productive day! Happy Thursday to you all! 


via Tumblr http://davidpires578.tumblr.com/post/137283277724

Tuesday, January 12, 2016

A Ming-inspired Cabinet (25)

Post 25, not even half way there yet in this series.

——————

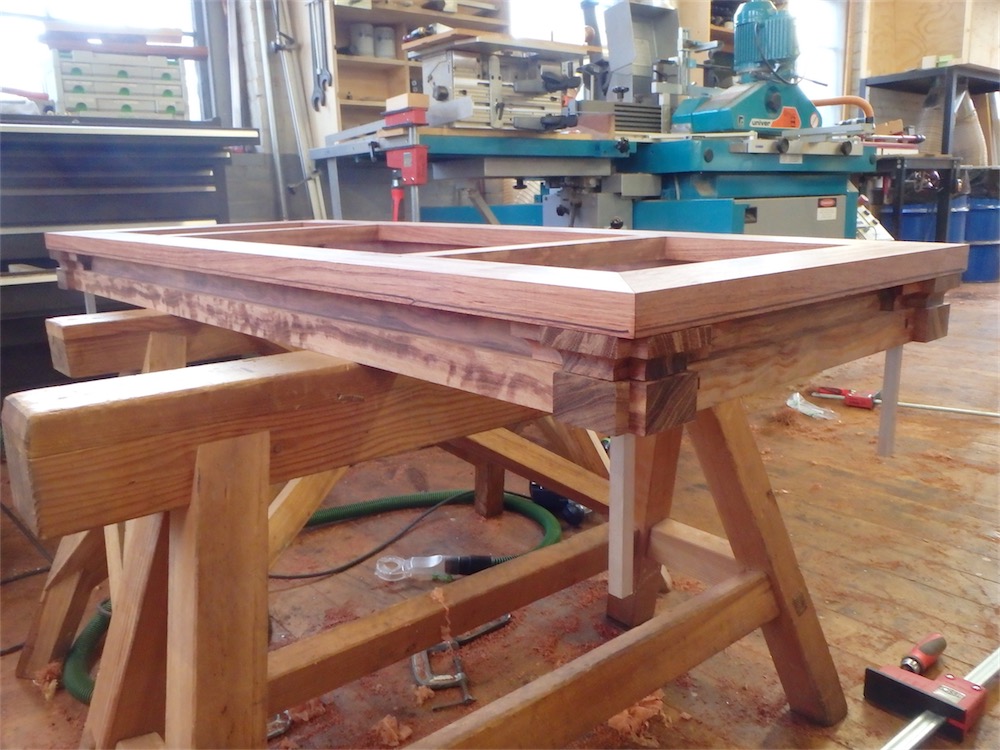
Now working on the connection between the cornice rail assembly and the inverted ’T’ form beam assembly. There the parts connect with a tongue and groove, the groove having sloped abutments which are chopped out by chisel.

The dado is cut largely by router:


Lots of time spent kneeling on the floor and sliding around. That’s why they call it ‘knuckle dragging’.

I’ll jump ahead a little to show the result of the tongue and groove joints reaching completion with this first set of parts:


A closer look at one corner:


A flipped-over view:


The Sharpie lines on the edge of the cornice sticks indicate where the molded profile will be taken (later on).

A look at the interface between the two assemblies, where the hope is (after all the parts are together) that I can convince the viewer (who would have to get real close and personal with the parts to check the seams) that these two items are all of one piece:


Another view:


Working now on fitting together the two assemblies for the other cabinet-  the dadoes have been cut on the underside of the cornice pieces and I’m ready to try the fit:


The pillow block pairs also require a little additional tuning in this round of fitting, their location guided by aluminum locating pins which were also machined to specific dimensions:


Together, and aligned:


Assembly of cornice to inverted ’T’ beams is now complete for the second set of parts:


Another view:


These two assemblies were then set to one side - banished to Waddie land as it were:


Another view:


To mix things up a bit, I decided to carry on with a bit of red bronze machining before I tackled any more woodwork.

Here, I’m checking to see that I have reached target dimension, 1.000", for the length of the 'tenon’:


I found I was able to complete the milling work on the 1"x1"x1’ tenons a bit faster than I had expected:


It’s nice to have some spares, as screw ups remain always a possibility when there are some many steps involved.

Another view:


I took the opportunity to then dress the bottoms of the leveler feet, though these will not actually be the finished surfaces:


The sharp end of the stick, as they say:


Bronze - this type of bronze at least - doesn’t seem to bad to work at all.

The legs slope at a compound angle, so the feet will also need to be milled eventually at a compound angle - an 'entertaining’ bit of work that I shall be content to visualize for the time being. For now, dressing the bottom of the feet to a flat surface makes for more predictable work in the steps immediately downstream. At least that’s what I tell myself as they fit the straight jacket….

The feet can now be set aside. I milled the legs down 0.1" in dimension, and tomorrow I’ll fabricate a jig to allow me to mortise the leg ends to accept the tenons from the bronze feet.

All for today, thanks for visiting the Carpentry Way. Comments always welcome.

via Tumblr http://davidpires578.tumblr.com/post/137187042934