When I left off last time I had described some of the difficulties I was facing drilling well-aligned holes in the bifold door hinge stiles. Due to problems that cropped up using the right angle attachment on the milling machine, which would not hold alignment due to starting torque from the motor kicking it out, I had to scrap the original hinge stiles and make 4 new ones, cutting up a precious 4x8" bubinga beam in the process. That was my last stick of bubinga of any decent size.
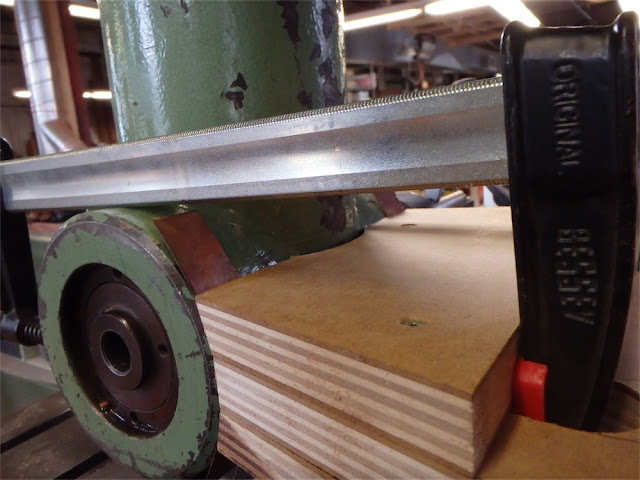
In an effort to stabilize the angle attachment, I put together a plywood gusset and some various blocks to connect it to the column of the mill.
Here’s a look at the arrangement once again:
With considerable fiddling I was able to achieve near-perfect alignment over 5" travel:
Alas, after countless test start of the motor and rechecks and realignments - i’m talking hours of time here- I was forced to conclude that the gusset wasn’t providing adequate reinforcement.
A reader wrote to me and suggested that a culprit in all of this might be the quill itself, which, due to wear, might be permitting a degree of rotational movement. I was skeptical, as the quill seemed tight in travel if anything, however later examination where I used the leverage afforded by the right angle head, showed that there was in fact slop in the quill. A new and interesting fact to learn.
The quill does have a locking mechanism in the head, however the lock gets stuck once clamped and has to be disassembled to get the quill moving again - a bit of a PITA - so I have been making no use of it. With the awareness however that quill movement in rotation may be a factor, I tightened it up to lock the quill.
After sleeping on it, I returned to the shop today and decided to try remaking the gusset again, only beefier. I wanted it as stiff as possible using what i had on hand, namely a few bits of plywood and various hardwood offcuts.
Here’s the ‘MARK II’:
The wood-to-wood connections are screwed and bolted together, but I leave the clamps in there for extra reinforcement:
The plywood connects by way of a pair of Canarywood angled blocks to the sliding dovetail under the ram:
Perhaps the biggest weakness in the entire contraption is the connection to the RA head, which is hardly what one would call a perfect surface. It is also a short surface. i considered bolting metal to it, but I just couldn’t quite bring myself to do that.
I detected some play in the connection so I added some copper shims each side in a bid to rectify the problem:
As it turned out, the 'Mark II’ did offer some improvement, however there still was play, and the the start-up torque simply would find whatever tiny avenue of slop there was in the connections and exploit it. Drilling each hole was a painstaking process of drilling, then re-tramming the mill before the next cut. In this way, while I could not completely eliminate a bit of drift with the RA head, I could keep it to a minimum.
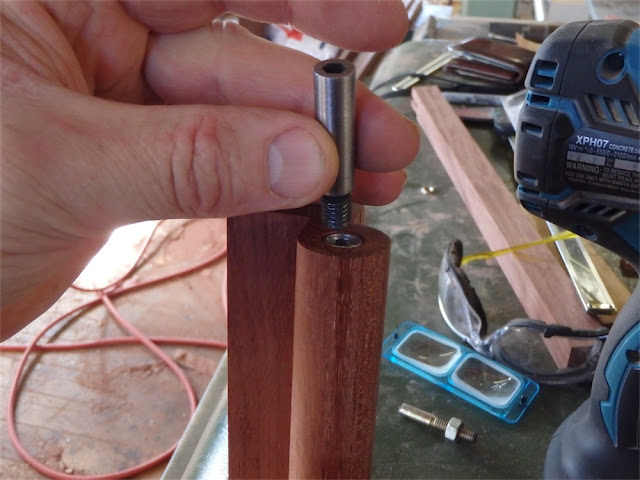
As before, I commenced work putting in the 5/16" x 18 TPI self-tapping inserts. I used a 7/16" (0.4375", 11.11mm) Whiteside end mill to bore out in one go:
I find Whiteside router bits to be more accurate dimensionally than Freud.
In goes the insert, using the shop-made tool:
Done:
Connecting to these inserts are hardened steel pins, originally shouldered bolts, which have had Allen heads burned into them using EDM technology, a task performed by my local machine shop:
In:
The hardened pins in turn slip into Oilite® plain flanged bearings:
The bearings will mount in the cornice beam atop the cabinet, the lower framing member in the bonnet.
All four tops done:
A good while later, at long last, the lower brass pivot pins were fitted as well:
Golly. What an ordeal that was. “Just need to drill 8 holes” - sounds so simple, and it is a simple task in one sense. But it was one of the trickiest aspects to the entire build so far and I took a beating getting it done. Very frustrating at times. After being sick for a month, and then this setback with the stiles, I am about 6 weeks behind schedule, which is stressing me out a bit, and that hasn’t helped any.
Moving forward, the RA attachment clearly is not ready for prime time. Also, a few days ago it seized up while making test starts. I got it freed up again and lubed it a bit, but it probably needs a rebuild from what I can tell. A least a look-see inside. Likewise, the main head of the mill needs a rebuild. I’ve realized this for a while, given the stiff quill movement and sticking (useless) quill lock, and now I can add to the mix the slop in the quill has rotationally. I’d also like to change from the current tool holding set up with a collet nut and convert to a overhead air-powered drawbar set up to hold tooling. Hopefully his year I’ll be able to tackle that project - at least in terms of getting it going. A specialist spindle rebuilder will be needed to put the unit right.
As for the hinge stiles, I still have some catching up to do in terms of cutting mortises for the battens, and dadoes for the panels. I’m planning to knock most of that off with another shop session, however I’ll omit taking pictures since it is a repetition of earlier work. Within a few days I should be able to put some doors together, so that work will form the subject matter of the next entry in this series.
Thanks for visiting the Carpentry Way.
via Tumblr http://davidpires578.tumblr.com/post/157891580439


No comments:
Post a Comment