Continuing on with the work on the shelf frames. After cutting out the tenoned joint halves on the mill, all that remained were the open mortised joint halves, also cut on the mill. I didn’t take any step-by-step photos of that process, being a bit excited to see the outcome. There were a few tricks to the process, but I wanted to know if the method I had come up with on the mill would produce parts which required little or no final fitting work, so I just kept cuttin’.
Here then are the freshly milled joints on the long rails:
Those slots could have been cut completely cleanly had I possessed a flat-toothed rip blade for my tablesaw, or an appropriate dado/slotting head for my shaper. Those items are on the shopping list.
Instead, I mortised the end wall with my hollow chisel mortiser, using a slightly undersize bit, and then took my ATB rip blade up close to the end wall. It did the job.
Just a little chisel clean-out was required at the root of the open mortise:
Followed by a pass or two with a Magicut file:
Bubinga is sufficiently hard that metalworking files are suitable at times.
Cutting of this joint primarily by milling machine seemed like a good idea, and I took pains with my set ups and fixturing - not that improvements couldn’t be made for next time (duly noted) - but there was no way to know the outcome fit-wise until the cut out was entirely complete.
To my delight, he first frame fitted together with no additional work, and the joints were just the right amount of tight:
A look at the four corners, from one side at least:
I thought the outcome proved once again the utility of a pattern mill for joinery work.
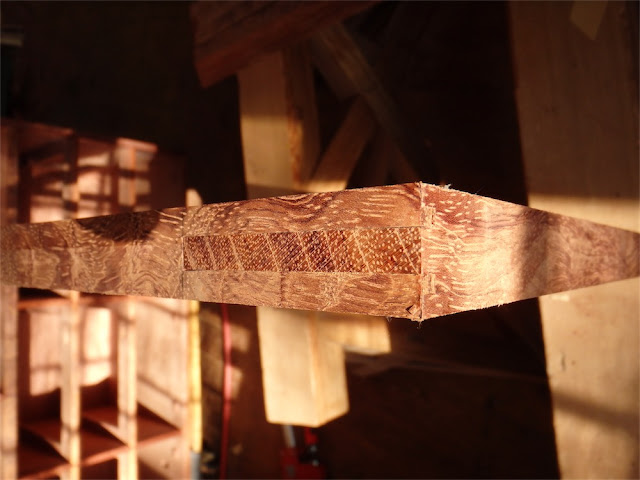
A look at a couple of the exposed tenon ends:
I was very pleased with the results, as the other frames came together with a similar lack of fussing around:
On the second one down you can see one the end grain of the tenon the patch which was put in to repair a defect in the stick.
Now then, while much had been gained, much also remained, cut-out wise. The trenches for the shachi sen needed to be laid out and cut. The layout is simple enough (though easy to confuse as well):
For more info on shachi sen mitered joints, you may wish to take a look at my TAJCD Monograph #1, found in the sidebar to the right of the page, which is devoted to that topic.
The lines from the edges were then transferred down faces of the tenons and cut out could commence. Here I am paring against the grain of the cheek face to start, a normally ill-advised move for which I have my reasons:
I got dug in at that point and didn’t take another photo until I was complete through the first corner. While cutting the trenches on the tenons isn’t too bad, given that one can push a chisel from either side, the trenches inside the open mortise walls were another matter. These have only 0.3125" of height, for starters, and they are blind as well, and they against the grain down the face. I find them among the most difficult sort of things to cut.
The first one came out like this:
With curly bubinga a bit of chip out, as you can see at the left side of the lower trench, is hard to avoid. It was nice, in a way, to be reminded of that with the first joint corners. I will be be able to correct that fortunately.
After a couple more hours, I was through the first three corners of the first frame. That leaves 13 corners to complete, albeit only the open mortise halves of the joints need tackling as the trenches on the tenons are all done. It’s likely to take another day in the shop to get through that lot, and then I will make the shachi sen (wedging pins) and fit them. Then the shelves get fitted, and notched for the shelf pins, before finish planing and finishing can commence.
All for this round - thanks for visiting. Comments/questions always welcome.
via Tumblr http://davidpires578.tumblr.com/post/155992220869


No comments:
Post a Comment