Friday, September 30, 2016

BCM Tansu Repair (VI)

Wrapping up my work on the two tansu from the Boston Children’s Museum. Here, I am taking a look at one of the large drawers:


I had been checking it out and noticed a few odd things, so I got my framing square out to have a look-see to confirm my suspicions.

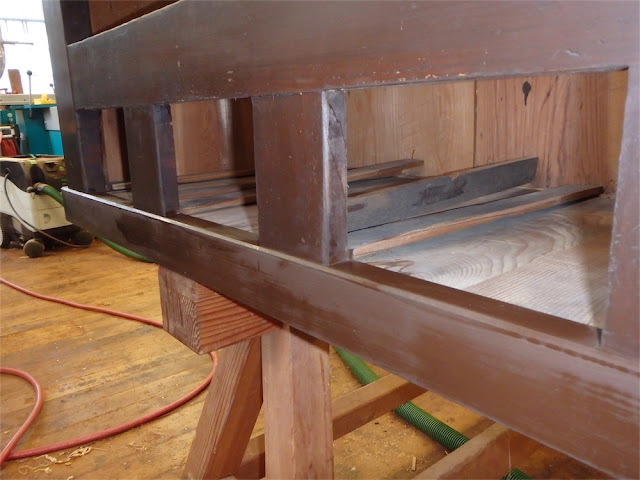
This side of the box is decently close to square:


The other side however is not especially square:


That gap is about ½" at the end of the framing square:


Wayyy out of square. Can only be a manufacturing issue really.

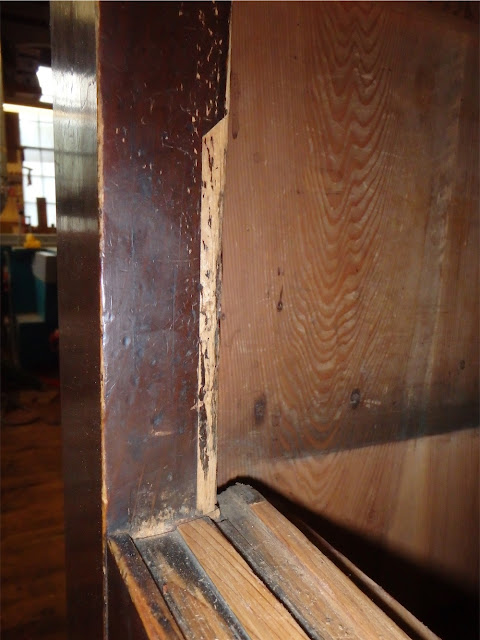
The floor panel has definitely shrunk, and not evenly, shearing off a bunch of the kikugi:


Anyway, though it’s a little odd how it is only way out of square on one side but not the other, and the drawer is closer to a trapezoid than a square, it fits okay into the drawer opening so no further steps were taken beyond re-affixing the floor to the drawer walls. To correct the drawer into squareness would have meant taking it completely apart and remanufacturing the rear wall.

Here’s a detail shot showing the joinery used where the drawer side wall meets the rear wall:


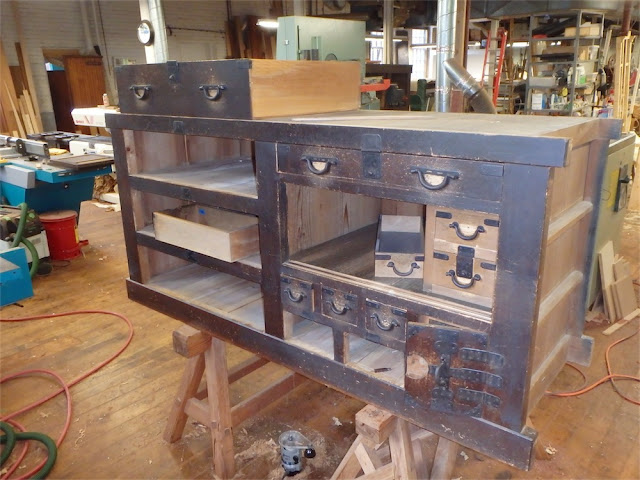
The mizuya-dansu is ready to go back to the Museum:


 Another view:


As you can see, I’ve cleaned it up a bit, but still left plenty of evidence of its wear and tear over the years. The original finish itself is somewhat variegated, some places lighter or darker, some places smooth, some scuffed, and has been modified and re-stained over the years in past repair efforts, so it was not really possible to match the finish perfectly. There was no mandate to completely refinish the cabinet, just repair them to make them functional and so that they were not getting damaged any further from the worn out sliding door tracks. I did attend to a few other issues while repairing those tracks, but mostly I stuck to the project brief.

The living room cabinet is also nearly done:


I found that the boxes did not sit flat to one another when connected. The upper cabinet teeters on two diagonal corners, so I have clamped it flat for the moment at tow corners to see if it draws it back.

As I have not removed the rear or side walls of either cabinet, I cannot see where my repairs could have caused either cabinet to become twisted. I am unsure as to whether the cabinets were originally a good fit to one another or not, or whether something may have occurred in transit or in repair work. It’s a little puzzling, but not a huge issue to resolve. The clamps easily brought the halves together. I’ll have another look at it in the next few days and see what can be sorted out.

Another view:


That concludes this side trip into tansu repair. Thanks for following along, and look for more posts in the ‘Ming-Inspired Cabinet’ thread soon enough.

Thanks for visiting the Carpentry Way.

via Tumblr http://davidpires578.tumblr.com/post/151165142384

My Journey As A Creative Designer - Woodworking and Beyond #1783: Seeing Things Differently

I really love designing. Whether it is scroll saw projects, painting projects or even needlework, I like taking ideas that I have in my head and making them into reality. Sometimes people wonder how I began doing design work, but that is a difficult thing for me to answer. If the term “designing” means changing things up and ‘not following the rules or instructions’ for a particular project, then I suppose I have been designing most of my life. It seems I always had the ability to look at something and see it in a different way. For the most part, I have used patterns as a springboard for making something else. I adjust things to my own liking and taste and many times, the finished item doesn’t resemble the original piece very much. I suppose when it got to the point that I was doing my own thing far more than following the directions give, I grew into being a 'designer’. That is as close as I could be to pinpointing things. 


There is a difference however between altering a design by someone else and coming up with a design you can claim as your own. In the grey area of copyrights, one needs to be extremely careful these days. While the internet offers many sources of 'inspiration’ for new projects, there is sometimes a very fine line between being 'inspired’ and actually copying. I know people can look things up and argue points such as “if it is XX% different, it is allowed” or some other silly statement like that. After all, in artwork how can you accurately place a 'percentage’ on an amount of change that is done to a design?  I think it is pretty much impossible.  


To me, if something still resembles another design very closely, than there is probably no way the new 'designer’ can claim it as their own. There is no scientific calculation or reasoning when it comes to this concept, and you can imagine that the opinions of what the term “resembles” defines will be as broad and varied as the number of people chiming in. But one needs to have developed a conscience and a sense of 'right’ and 'wrong’ and know in their hearts whether the great and wonderful new idea they have come up with is their own, or just a copy of someone else’s. I believe it is defined by ones’ own moral compass. 


But one thing I have noticed – those designers that claim their own designs when they are clearly creating 'knock-offs’ of others’ original pieces seem to come and go fairly quickly. They tap their sources and ride the waves of the temporary success they find in making something that clearly (to some) is not original, and then when that wave passes, they slide back into the ocean of others who have done the same, never to be heard of again. 


Does that sound harsh?  In rereading it, I think it may be. But it is a subject that as I designer I am passionate about and I have seen many of my talented friends scarred by the type of people that I just described. I, myself have also fell victim to copycats, but have neither the means of time to fight the culprit(s). I have learned that my best defense is to move on and do something else. While in some peoples’ eyes that may appear that I am giving in, I have seen over and over again that these people are not only recognized by others for what they are, but also run out of steam fairly quickly and move on to something else. Patience is very much my friend in these situations. I will be very honest when I say that I do find satisfaction when they do eventually fall. 


That doesn’t mean that we just roll over and allow people to take our designs at will. We do everything possible to protect ourselves, from watermarking our photos to posting lower resolution pictures on our site. I find, too that my reach here through my blog also does much towards adding claim to our designs. People see the posts and know our work and word gets out quickly when someone is trying to violate our copyrights. It is a wonderful part of being in the artistic communities – both painting and woodworking – and helps keep things on the level.


We are often asked by our customers if they can alter or change our designs for their own personal use or to sell at fairs and sales. I realize that some designers frown upon this, but both Keith and I are thrilled to see what others do with our designs. Many times when we see the alterations done by others, it serves as a springboard for new designs or ideas that we develop. Most of the time, those doing the alterations are just changing things up so that our designs are better suited to their needs. I do this myself much of the time with both woodworking and painting patterns that I have bought.


As an example, the Lynne Andrews ornament set that I am painting were originally done by Lynne on porcelain surfaces. While they were beautiful, for my own needs they weren’t practical. Each porcelain ornament cost about $6 plus the shipping to Canada. Since I am creating six sets, that would be 72 that I would have to purchase and ship. Not to mention that each one that I gave to those in the USA would have to be shipped back to the recipients. It would not only be costly, but also the chances of them breaking or getting damaged would be high. I doubt that even one of the five recipients would wind up with a full set – or myself for that matter, as I am sometimes a bit clumsy. I thought that doing them on wood would be a far better choice for my purposes. And it has worked out well. But every time I post photos of them, I try to remember to watermark them with LYNNE’S information, not mine. While I did alter the pattern to my own needs, I in no way wanted people to think that I was claiming the design as my own. It is the right thing to do and I believe, the right way to do things. I also did this with the Peggy Harris Cinderalla Mouse project. And Kim Christmas’s cute “Meow, Meow, Boo” project that I did last week. (Are you seeing a pattern here?)  I want to be a credible and honorable designer in my own rite. While I enjoy doing other artist’s designs, I don’t for a minute want others to think that they are my work or that I am claiming them as my own. If mistakes are made and people complement me on MY design when it is someone else’s, I quickly correct them and make it known who the designer is. It is called “integrity”.


With all of that said, I wanted to share with you something that was sent to me yesterday. A woodworking customer (and friend) of ours named Edward Orr sent me some photos of some wonderful alterations that he did to one of my designs. He started with my SLD531 Set of 8 Gothic Cross Ornaments pattern:


He then took the crosses and put his own spin on them and I think they came out beautiful. He cut them out in different sizes as the pattern showed:


Then he cut out just the out frames for an entirely new look:


I thought the result was fabulous! It gave a new look to the pattern that I never even would have thought of. I can think of so many wonderful ways to use these pieces – from framing to overlays to even making smaller jewelry pieces. It started an entirely different thought process in my mind and I am thinking not only about this process for additional crosses down the line, but other shapes as well. 


Most important, it was really nice to see someone who used and enjoyed our patterns so much. To me, that is what designing something is all about. I love to help supply the means for other people’s creativity and pleasure. It makes me feel like I am contributing something positive to this sometimes chaotic world. 


I hope you enjoyed seeing this as much as I did. I also hope that it gave you some ideas as to how we designers feel. I know I am not alone in encouraging others to have fun with my designs. I realize that some designer have strict regulations as to what you can do with their patterns, and you do need to contact each one individually and respect their guidelines, but I do also think that for the most part, as long as you don’t claim your alterations as your own design and give credit where credit is due (to the original designer) most designers are thrilled that you are enjoying their work in that way and are happy to be an inspiration to you. I am, anyway. 


It is a bright and sunny day here in Nova Scotia. On this last day of September, I noticed quite a bit of frost this morning. I spent part of yesterday planting my many mum plants into the ground and I am happy that I did. I believe they may survive a bit longer there. I will hopefully take a photo over the weekend, as the house looks nice with the splashes of bright blooms surrounding it. 


I wish you all a nice weekend ahead. I am going to do some drawing, some more house projects and some additional craft projects. Maybe I will cook as well. It will be a 'typical’ weekend for me and I like that. I hope you enjoy your weekend as well. 


Happy Friday to you all! 


via Tumblr http://davidpires578.tumblr.com/post/151143598954

Thursday, September 29, 2016

My Journey As A Creative Designer - Woodworking and Beyond #1782: Emotional Real Estate

Did you ever feel that you were running in lots of directions at once?  Lately, that is exactly how things have felt for me. I have been busy from the time I wake until the time I finally go to sleep, but have been going from one thing to another to yet another. 


I don’t think that this is a bad thing at all, really. Because in the process, I am checking off a lot of things that I wanted to get done and in the end, accomplishing a great deal.  To the outsider, it may not look like a lot, but when I think of the ‘emotional real estate’ that I am freeing up, I realize that these little pieces of the puzzle that are slowly falling together are far more important than I initially thought. As each piece finds its place, no matter how small it may be, it allows room for my mind to focus on something else. Ideally that would be designing, and as I check off these small things one by one, I do find that my thoughts are heading towards new designs and ideas for projects. It is a process though, and can’t seem to be rushed or forced.


I am certain that many of my colleagues go through this process often – especially when they have changes in their lives. But recognizing that this is just part of 'life’ and allowing things to work themselves out is probably the best way to get through things. For someone who is proactive, such as I am, it is not always easy to allow things to run their course. My first reaction is to force things along. But that only seems to raise the anxiety level and make things worse, thus slowing the process overall. I am finding it is best to 'just do what I can’ and accept my own limitations and let everything run its course and follow the process. Being patient with myself is what will work best. We are always learning new lessons about life, aren’t we?  Perhaps mellowing out a little bit isn’t a bad thing. 


As a result of this, my blogs here may not seem as 'organized’ as they have been in the past. I may seem to jump around a little bit more than usual, as even though I am doing lots of small things at once, I still feel many of them merit showing you all and may be of interest. I hope you agree. 


I’ll start out today with sharing some wonderful things I got from the Artist’s Club the other day. They continue to be one of my favorite suppliers of books and art supplies. (And let’s face it – whether you paint or do woodwork, you have to love new art supplies, right?) 


At this time (until October 9th) they have an offer that includes FREE SHIPPING for all orders over $50. That includes CANADA!  They have this promotion a couple of times a year and since my palette paper supply was getting low, I thought that I would dive in and see what else I could treat myself to in order to make the $50 cut. Needless to say, I had little trouble reaching (and exceeding!) that goal and got a variety of cool stuff:


What a cool array of  art supplies!  As you see, there were a few books that I picked up. Even though many of the patterns and books that I buy are now digital, I still love seeing the beautiful color photos and holding the books in my  hand. The watercolor book was on clearance and has a variety of techniques and lots of information about that medium. I am sure I will learn a great deal from it.  The other two books were impulse buys. I liked the projects that were shown on the website and I thought “one day” I may make them. They kind of went along for the ride with the order. 


One thing that I am anxious to try are these cool sponge dabbers by Loew-Cornell:


They are for using with stencilling and for creating interesting backgrounds and they were very inexpensive (under $3 each). There are three different textures available and I got one of each. I will show more of them as I use them and let you all know how I like them.  


Another product that I was wanted to purchase was Saral Transfer Paper in grey.  


I have found that while I like the DecoArt transfer paper, it is very, very dark and when I try to buff it down with an eraser, it tends to smudge on the lighter things. The Seral brand is supposed to not smear and hopefully will do a better job. Upon opening the package and trying it with my “12 Days” ornaments last night, I think I will be very happy with it. It is much lighter than the DecoArt paper and still did the job nicely. I am pleased.


Finally, I got this awesome Brush Basin and “stuff” from General products.


I didn’t really need a new brush basin, as I use empty plastic containers that sour cream comes in usually, but I wanted the stuff that came in it. I have used “The Master’s” brush cleaner before and I love it. The Factis eraser is nice and clean and works well with both pencils and transfer paper. I haven’t tried the Artist Soap or the Kiss-Off, but I have heard good things about them and thought I would give them a go. If they are anything like the brush cleaner, I should be happy. This “kit” cost about $25 for everything and seeing the cost of the larger brush cleaner is around $15 in itself, I thought it was a good deal. I did use the brush basin last night and I was delighted to see that it has a nice fitting lid for it. Anyone with cats will appreciate that. When I was done or had to move away from my desk, I just popped the lid on and went. My cats tend to pick in my paint water at any opportunity (I know I am not alone in this) and it is good to have something so convenient. The square shape also means it is more stable and less splashing of the water due to bumping. Those of us whose painting table gets 'full’ will understand the value of that.


All in all, I am thrilled. I am thinking about what else I can get from them before the free shipping event is up. Perhaps there will be another order in the near future… .


One more (somewhat) unrelated thing came that day as well – my October issue of Painting World magazine! 


This is the third issue and their first Ornament Special. There is a great variety of all types of ornaments to paint and I loved it. I think that it is a great publication and they are doing a fine job with it. One day I hope to submit to it when things loosen up a bit for me and I have a bit more time. :) 


… and now for something completely different … 


I finished the small curtain on the door to my studio/office.


It may seem like a little thing, but I was so happy to get it done. The door is at the front of our house, and even though most of the traffic is through the side door next to the driveway, I felt like I wanted a bit of privacy when people arrive through the front. While the lace is sheer, it still allows light to come through and I don’t feel like I am as much in a fish bowl. (I know – it is weird. But it bugged me.)  Sometimes it is the small things that make the biggest difference. 


I also finished my small cushion cover for the little bench under the window and got my shelves hung:


My room is one step closer to being fully 'complete’ now, with only the back and side cushions for the daybed to be made. I need to wait a couple of weeks though to do that so I can purchase the foam when I head up the valley for a 'Fiber Festival’ show with my friend – more on that later, though! 


I LOVE how my shelves look:


The wall there was screaming for me to hang something there, but I wanted something that I could change out with the seasons. I could have hung the picture there, but then if I decided to put a seasonal picture there later, things would be off centered and it would be unlikely that I would have something the same size there. I saw this shelving group on Amazon.ca and ordered right up. The four staggered shelves will do a great job displaying all sorts of my projects. You can see I put my “Meow, Meow, Boo!” project there already, as well as one of my own paintings and my Pusheen mermaid. In the next few days I think I am ready to bring up my Halloween decorations, so I am sure that I will change things out soon. I will keep you posted. I wanted a 'fluid’ environment where I will be able to enjoy and display many different types of artwork (thus the multi-colored cushions and the white furniture – EVERYTHING will fit in!) and this has been my vision for my workplace here all along. It is not only satisfying, but also very thrilling for me to see it all coming together so nicely. AND it is so organized and functional, too.  That 'emotional real estate’ that has been planning this has been put to good use, I think. 


And my final photo of  today – my beautiful girl, Coco:


I think that she is very comfortable here, as are my other furry companions. This room alone is about half the size of our entire old apartment. I can’t tell you how wonderful it is to have so much breathing room and clean working space to create in. I love it! 


I will end here today with a progress picture of my Day 8 Maids a-milking  ornaments from the “12 Days” series by Lynne Andrews.


I finished the main design part of the maids, and only need to do the lettering and the backs, which is just a bucket and some greenery. I am in the home stretch on these and hope to get them out by Monday. I am getting closer to being back on track with them and happy. 


I hope you don’t mind these 'all over the place’ posts. The kind of depict the way my life is. I am often told how organized I am and I appreciate that very much, but I also want you to see that sometimes things aren’t as organized as they seem. Sometimes we have to just chip away at the vast amount of things we feel we need to do and free up that emotional real estate step-by-step. It feels great when we even make small strides. 


I wish you all a wonderful day today. Happy Thursday to you all! The weekend is just around the corner! 


via Tumblr http://davidpires578.tumblr.com/post/151098302624

Wednesday, September 28, 2016

BCM Tansu Repair (V)

Continuing work on the repair of a couple of tansu, each composed of two equal-sized halves, for the Boston Children’s Museum.

The new track is now installed in the main compartment:


The lower rail has been repaired from the gouging of the drawer floor nails, reinstalled and re-stained.

This shot shows it while the stain is drying:


One of the drawer sides had a massive split:


No shortage of nails on the near end, huh?

It seemed simplest to glued the crack and clamp it up:


Main compartment floor panel is back in place, with the mouse-chewed corners repaired:


That cabinet could then be set aside.

Onto the final cabinet half of the four:


This one may not require sliding track surgery, though the sliding door lower tongues will need attention at a minimum.

The hinged door at the lower right, along with the two large drawers on the bottom left of the cabinet have been locked for the past 30 years or so, as the museum did not possess a key. I was able to remove the locks from the front fairly easily:


In the bottom right compartment, revealed were a pair of drawers, the lower of which also had a lock mounted:


Locked drawers contained within a locked compartment - interesting. I wonder what they used to keep in there?

The hinged door on that lower right compartment had some issues with its hinge leaves, so I removed them to flatten them atop an anvil. Here, I’m refitting the hinge pin:


After removing the upper hinge plate, also for the purpose of straightening the leaves, I noticed that the maker had made some errant mounting holes:


It’s interesting too that the finish appears to have been applied after the hardware was mounted, not prior. A lot of tedious work that must have been!

Rooting around in the back of the lower right compartment, I found some receipts and other paperwork:


I imagine the museum will be interested in taking a look at those.

Also found in the lower drawer of the lower right compartment was a bag of long coil springs::


Possibly these were parts for a weaving loom (?).

Once I had all the locks out and the cabinet fully opened up, I decided to have a go at fabricating a key. I went to a local hardware store and bought a old style key blank, which I then modified by drilling it out, and making further mods with file and grinder:


Trying it out:


It works:


There are three different size locks on this cabinet however, and they are all larger than the biggest available key blank I can buy locally, so I’ll have to see what else I can find online.

One of the differences in this cabinet from the other three is that the drawers are put together with kikugi, wooden nails, rather than metal ones:


Another view:


Overall, the kikugi seem to have held the drawers together over time better than the metal nails. Presumably, season movement does not cause nearly the same amount of nail withdrawal as seen with metal nails, and even if the kikugi do get drawn out, they are not going to wreak the same havoc as do metal nail heads.

However, it is perfectly possible to split a drawer floor panel with a wooden nail:


I removed the drawer lock from on of the hidden drawers and replaced on the drawer at front which was missing the lock:


Wooden nails do not always hold perfectly over time, as this hanging drawer floor shows:


On the bottom of this drawer was a massive gouge:


The culprit? Metal nails holding the compartment dust panels in place.

Here’s a couple poking out:


And another:


And another:


Should have these cabinets fixed up by the end of the week, at which time I’ll return to work on the ‘Ming Inspired Cabinet’ series. I’ll post one more in this thread in the near future.

Thanks for visiting the Carpentry Way.

via Tumblr http://davidpires578.tumblr.com/post/151075173589

Tuesday, September 27, 2016

BCM Tansu Repair (IV)

Working now on the upper section (cabinet) of the mizuya-dansu:


My main task on this cabinet is to repair the sliding doors and track on the large compartment. However, issues abounded in other areas. For example, all of the openings for the lower bank of drawers were damaged on each side, as if by the action of the lower edge of the drawer sides:


I’ll be repairing these gouges, probably by removing the lower rail, if possible, and rebuilding it.


These drawers do not have conventional sides with floor boards carried in a dado, rather the floor panel is simply nailed to the bottom, so the drawer sides certainly did not cause the damage. The gouges to the drawer openings are presumably the result of the drawer floor nails being drawn out by seasonal wood movement, the nails then gouging the outer edges of the opening at some point in the past. Someone noticed the damage -too late - and tapped the nails back up into the drawer floor.

The drawer side walls attach to the drawer rear walls simply by nailing, and in many spots the nails had rusted away causing walls to separate:


A nail driven from the drawer side into the end grain of the drawer rear wall is a connection doomed to fail however. End grain does not grip fasteners well, generally speaking. Given that the floor panel grain runs lengthwise instead of crosswise, it would have been more consistent, if that is the way you want things to move, to orient the end wall board so the grain runs vertically. That would have provided better nailing at least in the end wall.

In any case, I find the way the grain is oriented in these drawers, just like the way the interior walls backs, floors, and tops of the cabinets, is contrary to designing around minimal wood movement.

The drawer floor panels showed clear wear on their edges where they had been working against the drawer guides inside the cabinet:


A look at a nailed-on drawer bottom:


The bottom, characteristically, is more or less a flatsawn panel, which, again, leads to a maximization of wood movement.

On this one, the nailing was not especially precise:


The drawers are guided and stopped inside the cabinet by small strips of wood, nailed into place:


Here’s a spot where a nail on the upper end of the drawer side had, at one point in time, been proud of the surface and had scraped a gouge into the opening:


An earlier patch was evident on one frame stile:


The main compartment floor panel has a couple of gnawed holes in each corner, presumably from a rodent of some kind. One task therefore was to remove the floor panels - easy since most of the nails were rusted out, then slice the damaged portion out in preparation for repair:


The track, like the ones on the preceding two cabinet halves I have repaired, needed complete excavation:


As with the previous cabinet halves, I’ll be infilling with a piece of wenge for the track, then repairing the sliding door lower tongued ends to re-establish a good operation. Fortunately, the smaller sliding door set on this cabinet is in relatively good condition and will not require any significant reworking.

All for now, stay tuned for more in an upcoming post. Thanks for visiting the Carpentry Way.

via Tumblr http://davidpires578.tumblr.com/post/151020976634