Showing posts sorted by relevance for query tea. Sort by date Show all posts

Thursday, December 1, 2016

The Well of Heaven

The Japanese word for ceiling is tenjō, 天井, which translates as the well, 井, of heaven, 天. Hence the title for this build thread. Japanese ceilings, just like other standard elements of Japanese architecture such as shōji, tokonoma, and fusuma, are highly elaborated in form and style, from mild to wild, though perhaps never quite as wild as their Chinese antecedents. Cultural tastes vary as they say.

This job came about in a curious way. The client is the third owner of a house which is about 25 years old or so, and the original owners were Japanese and had a Japanese tea room put into the house, along with a small Japanese garden outside with pond. The tea room is a 6-mat room, with an attached mizuya- or  'water’ room, where a tea ceremony practitioner would make preparations for serving tea.

The current owners do not practice tea ceremony and have in fact been using the room mostly as a place to store surplus children’s toys. The room also has been not entirely suitable for use in any capacity in recent years as it has a partially constructed ceiling.

A few years ago the bathroom on the floor above the tea room developed a plumbing issue and the ceiling of the tea room was damaged in one section. The owner contacted another contractor in this region, a person who is known for undertaking Japanese architectural work, and that contractor made a start at repairs. For whatever reason, that contractor, after receiving part payment for the job, simply stopped doing the job and wouldn’t return the owner’s calls.

The owner contacted me last year, explained what had happened and was wondering if I could attend to the outstanding issue with the ceiling and damaged shōji. I immediately declined, not wanting to poach another contractor’s client, especially if the involved contractor was someone I knew of, if only slightly. I figured it was a simple breakdown in communication between the two parties. I told the owner I would contact the other contractor and let him know that the owner wished to be in touch.

I phoned up the other contractor and mentioned the situation with the owner. Interestingly, he mentioned that the tea room ceiling “wasn’t a project likely to be of any interest to [me] anyways”, and that he would take care of it. I didn’t ask him about the particulars of the situation - just assumed it was some simple miscommunication or something like that. That’s where I left things and more or less forgot about it altogether in the months that followed. A year passed.

Then about three months back the owner contacted me again. It seems that the other contractor had not bothered to follow up with the owner, and still wasn’t returning the owner’s calls.

“Would I be interested?” she asked.

At this point I felt I had done my due diligence and clearly, for whatever reason, the other contractor couldn’t/wouldn’t complete the work. So, I said, “sure, I’ll come and take a look”.

I swung by the residence, near to Boston, a few weeks later. Not sure what I would find, I was pleased to see that it was a real Japanese tea room. The pictures that follow are taken from this afternoon, so the room is already slightly under construction at this point:


The circular window had a pair of shōji fitted behind, removed at this juncture as they needed their paper replaced. The tracks for the entry shōji are visible in the foreground of the picture. They also will be repapered due to tears in the paper here and there.

A look at the open fusuma leading to the anteroom, or mizuya:


The faucet and drain are installed at a height for the tea preparer to be working in a fully kneeling position, what is termed seiza:


The ceiling, with one panel removed at the area where the leak occurred:


I was surprised, to say the least, when I took my first look at the ceiling work undertaken by the other contractor - it was not the quality of work I might have expected:


It’s a little hard to see from the above picture, but what you are looking at is a series of partially overlapped 1/8"(3mm) veneer sheets stapled to the ceiling. Note the pencil lines for the staples left behind - presumably these lines of staples were to be covered over with a false batten of some sort.

The veneer sheets, when removed, I found to be foam core panels, and had been coved on the backside as well as thinned at one edge:


This was a head-scratcher. The coving and tapering of the panel’s back face is something which is done often on Japanese ceilings having a certain treatment of lapped boards. The coving allows the last inch or so of a board to take a crisp bend, and the taper provides a surface for the bent portion of the next board to fit against. The combination of the bent board edge laying on a tapered surface presents a nice shadow line between boards.

Here’s a view of what that construction would normally look like:
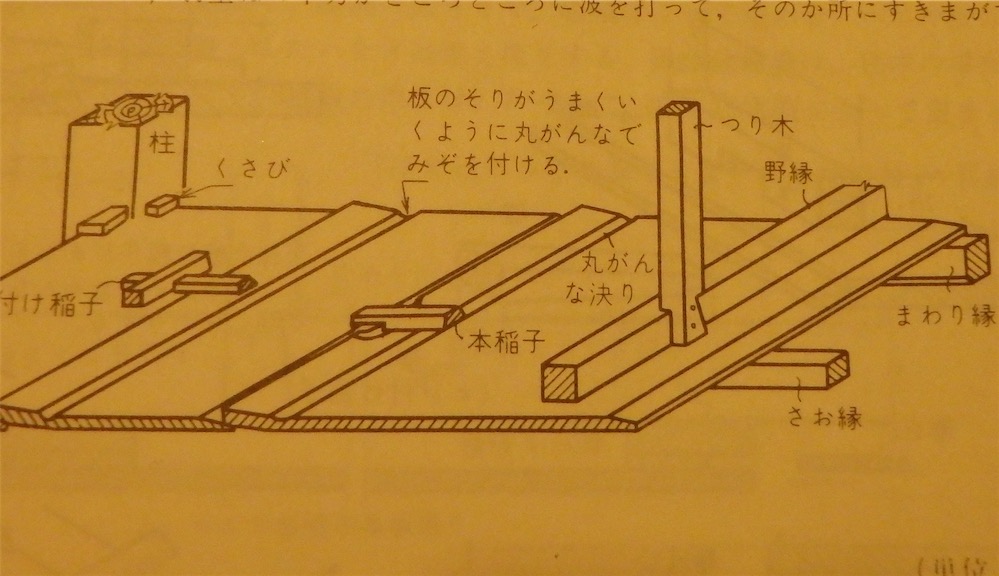

It’s a fairly common sort of ceiling treatment. With solid wood, making the cove cut on the backside can be a tricky affair as you need to judge the depth carefully, just enough to allow the board to flex, and not so much so that the wood will split.

With the foam core material however, it was very difficult, I found, to bend the section beyond the cove cut to any significant extent. But even more to the point, this is a ceiling construction method in which the material is applied downwards, onto rafters or battens, sao-buchi, as the fasteners are applied downward on the backside to push the board flat down to the rafters/battens. That’s the only way to obtain the crisp bend and produce the desired shadow line as far as I know. But applying the fasteners to the face side, especially in a material which wouldn’t bend let along hold a bend, was baffling to me.

And the shadow line reveal is also supposed to show the thinned edge of a solid wood board, not the guts of a foam core laminate. A case of the wrong material for the design, applied the wrong way.

Speaking of the design matters, the owner had requested that the replacement ceiling allow for access to the plumbing afterward, in case problems develop down the line. The other contractor’s solution to this was to make some of the laminate sections shorter in that area, and fasten them in place with screws:


The light colored panel you can see is the old ceiling - the replacement ceiling was simply stapled to it (!). These hundreds of staples made removing the old ceiling mostly a matter of messy destructive tear-out.

What I didn’t get about the use of screws for those ‘removable’ panels was that the screws themselves, like the staples used elsewhere, were to be (presumably) later covered by a batten of some sort. So, in order to remove those panels, one first would have to remove one or two battens as well. An unwieldy solution at best. And how would the battens be fastened to the ceiling - with more obvious screws? That would look bad. Again, normally you would place the frame/battens down, and apply the ceiling treatment down onto it. What had been done here however just didn’t seem at all well planned.

Another basic design aspect to Japanese ceilings is that all the boards, panels, squares, what have you, been even in size with one another. Same with the way a Japanese floor would be tiled. It is considered a disaster and poor workmanship to have insufficiently considered tiles size and spacing relative to the room size and end up cutting tiles are the room edges.

With ceilings, if they are to have boards as their primary pattern, then all the boards should be the same width as one another - - such is not the case here though. While the old ceiling has six, 17.3" wide 'boards’ (actually, the old ceiling was also comprised of veneered boards cleverly detailed to look like solid wood), all of the same width, the replacement ceiling had one conspicuously wide board along one side:


Compare the boards to the left side with the one to the right. If the difference between boards was, say, ½" or so in width, it would be hard to spot, but this was a large and obvious size difference between the adjacent panels. Sure, maybe most people wouldn’t notice, or think it wrong, but, clearly, not much time had been spent in designing. And this sort of matter is nothing more than measure a space and divide, then add a little for the perimeter boards to sit atop the perimeter framework. As far as that went, the boards themselves do not lap onto the perimeter framework, but are butted against it, and in some places gaps are obvious between the perimeter and the panels. The ceiling looks like a tacked-on thing, and does no justice to the original ceiling whatsoever.

I’m not sure what went on there with the replacement - I can only see what was installed and assess it for what it is. If I could find something positive to say about the replacement ceiling, I would say so… however there really isn’t anything coming to mind. The work did not impress.

Mind you, the original ceiling was not put in perfectly either, as witnessed by this grossly mis-matched miter in one corner:


The ceiling perimeter frame, or ledger - termed mawari-buchi - was comprised of two strips, one 'L-’ shaped and screwed to the wall, and the other glued to the first, going in after the ceiling boards I would imagine.

Out with the old, and in with the new: I got to work stripping the replacement ceiling, leaving the remnants of the old ceiling to view at this stage in the process:


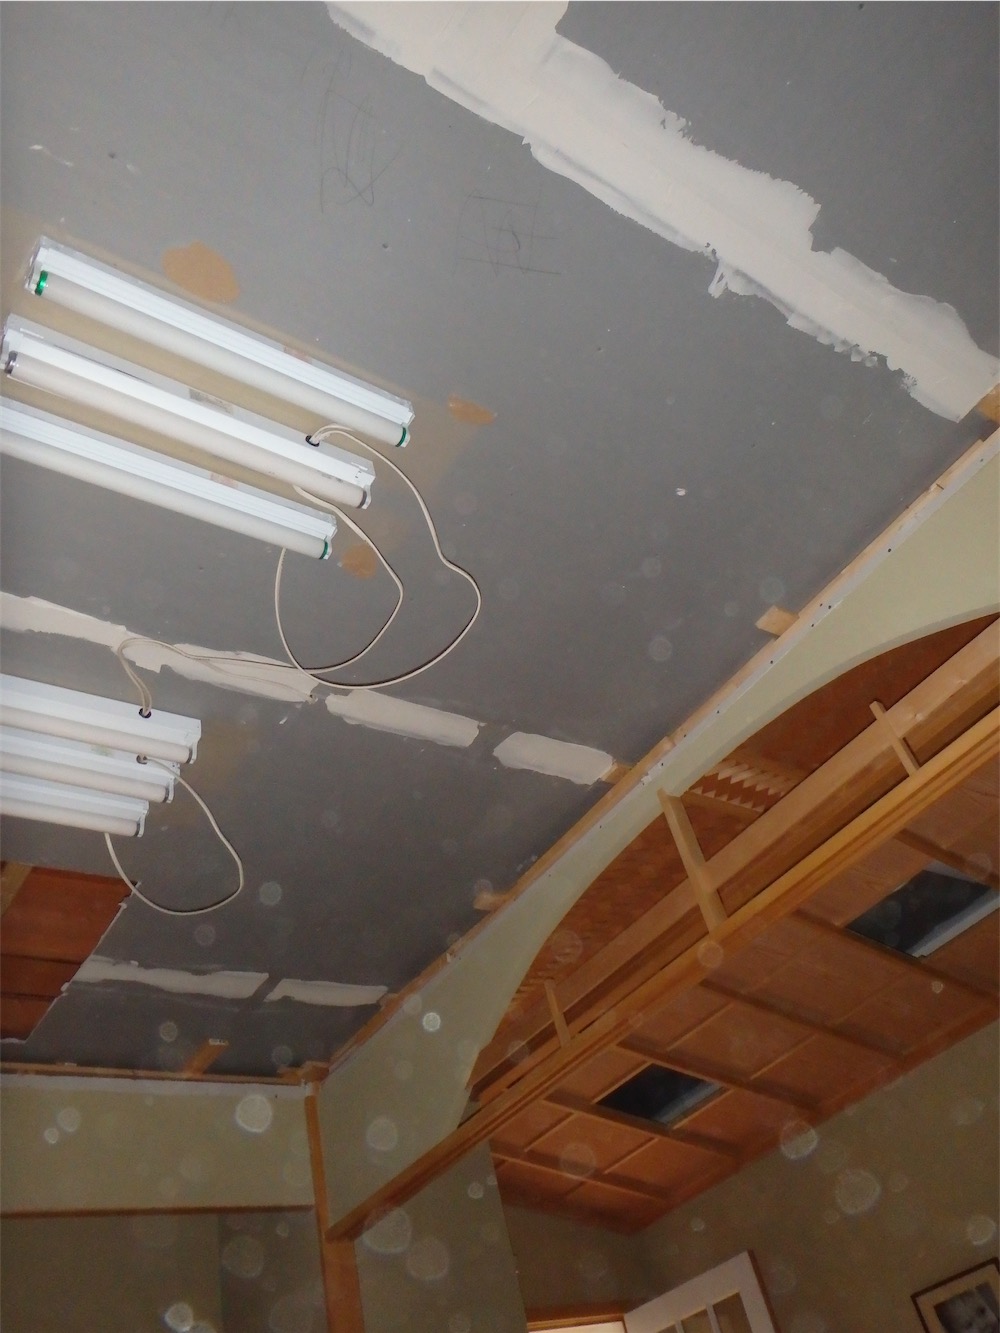
After the dust had settled and the waste carted off, the scene seemed tranquil, if a little bare:


tut-tut, dust on the camera lens….

A look ahead now to what’s coming.

After looking at the situation with the owner a couple of month’s back, I proposed a different ceiling altogether than what was in place - rip the old out and replace it with a frame and panel coffered ceiling. That arrangement would make it easy to provide access panel(s) to the plumbing. The owner agreed to the proposal after careful consideration.

For the ceiling framework, I chose clear vertical grain Yellow Cedar - these pieces specifically:


The boards are full 2" x 10", 132" long.

Another view:


Those sticks are now sitting in my in my shop. I’m looking forward to the slicing and dicing which lay ahead. Also in my shop, and already moved well along is the vertical grain Western Red Cedar, which will serve for the ceiling panels.

I hope you’ll pop back to check in on the build progress, to be detailed over several posts to come.

Thanks for visiting the Carpentry Way.

via Tumblr http://davidpires578.tumblr.com/post/153905347404

Wednesday, February 17, 2016

My Journey As A Scroll Saw Pattern Designer #1698: BUNNIES!!!!

I took the day off  from ‘social media’ yesterday for the most part because I was on a roll. I was in the process of finishing up sanding and packaging several wood orders that I wanted to get to the post by the time the truck came for pickup in the afternoon. (Check!)  I was also doing some drawing for a wonderful fellow designer and I wanted to get some things to her so she could get on with her own designing. She is creating some rubber stamps of her drawings and I am helping her out with the graphics. (Check!) I also wanted to finish up my latest project, which I showed you all some hints of  in the past few entries. (Check!) It was a full day to be sure. I just felt that it would be much easier if I were truly focused on the tasks at hand – and I was. 


By around 9pm, everything that I wanted to do (for the most part) was done. I had a simple dinner and got out my embroidery supplies to  settle down before heading to bed. I made some peppermint tea, set up a good show on the TV and settled in to do some relaxing work. I did clear out most of the day’s mail at that time that I hadn’t go to until later. I was all set. 


My moment of “Zen” lasted about 15 to 20 minutes though. We had a very stormy day yesterday with very strong winds. As things got quiet here, I could hear the wind howling outside, along with the rain. Keith was at his mom’s for the evening working on some stuff in her basement. The cats were aware of it as well, as every time there was a huge gust, they awoke from their respective slumbers and kind of looked around. Finally, things just went black. Once again the power went out. 


In the seven years I have lived here, we have only lost power probably five times. Three of those times have been within the last week. While the winter here has been pretty mild by Canada standards, we have certainly had our brutal days. It seemed inevitable that we would lose it yesterday. At least I was prepared. 


I lit my lamp and sipped my still hot tea and read for a while. Keith came in completely soaked not too long after. We made sure everything was safe, retrieved our recycle bin from the neighbor’s lawn, and called it a night. Within an hour or so everything came back on and the rest of the night was uneventful. 


This morning the storm has certainly passed. It is grey out and quiet and looks dull, as all of our snow has melted. It is certainly not one of the 'pretty’ times of year. But it is part of living in an area with four seasons and we need to take it as it comes. This season will also pass. 


I (once again) have lots of emails to catch up on when I am done here. If you messaged me or emailed me, I ask you to be patient. While stepping away from social media for a day has its positive side, it also has its cost. I will do my best to catch up this morning. 


Now for the new designs … 


I am very happy at how they came out. Last night before I settled down I took a composite photo of everything in the pattern set all completed. I think it makes a wonderful presentation:


I decided to sell the pattern as an 'all inclusive’ set rather than split everything up. I just think that is the best way to do things. It will consist of a plate holder for cookies or even a cake, a pillar candle holder, some napkin rings, and an egg display plate. All painting instructions will be included in the pattern as well. You have choices as to whether you want to paint your bunnies as silhouettes, using soft pastel colors, or a bit more realistically. You can do whatever you like. 


And for my painting followers, I am going to be offering ALL these pieces as pre-cut kits so you can also have fun with them.  The large plate can be painted as I did it, or even used for your own spring design. Not only are these adorable bunnies good for Easter, but spring and summer as well. I hope you like them.


Today I will be writing out the pattern packet and it appears that we will be updating the site by tomorrow. Everything should be posted by then and I will have links to the pattern and the wood pieces as soon as they are available. Today I will also be working on one more type of egg tutorial for you all to decorate some eggs. I had an idea and I think it will be fun. 


Thank you to those who were concerned about my absence. I appreciate the notes a great deal. Sometimes I just have to jump off the grid a bit in order to get some things done. yesterday was just one of those days. 


It is mid-week already and soon the weekend will be upon us. Time is marching much quicker than I like, as usual. But soon spring and summer will be here and I think that will make people much happier. Me – I don’t mind any season. I just take it as it comes and try to enjoy each day. 


Happy Wednesday to you all! 


via Tumblr http://davidpires578.tumblr.com/post/139484986869

Monday, October 26, 2015

Tea Box or Keepsake

Tea Box or Keepsake Box in Cherry and Mahogany

via Tumblr http://davidpires578.tumblr.com/post/131968724244

Friday, December 4, 2015

My Journey As A Scroll Saw Pattern Designer #1664: Frost on the Pumpkin

As time keeps marching on, we are getting closer and closer to the holiday season, as well as winter weather. When I awoke this morning, I looked out on my deck and saw this:


The first significant indication that winter is just around the corner. 


Even though it seems that this past year has gone by too quickly, I tend to take each day as it comes, and appreciate it for what it is. 


I don’t dread winter as many of my friends and family do. If anything, I find it forces us to slow down a bit. I know you all probably think that I am crazy making that statement, as with the holiday season quickly approaching, we seem to be busier than ever, but I do find that once we get a grip on things and stop trying so hard to be everything to everyone, we may actually enjoy the cold, winter days ahead. After all – every day is only as good as we decide to make it. 


Perhaps it is because I am getting older (and maybe a bit wiser!), but I feel that many times we are our own worst enemies when it comes to the holidays. We have this perfect picture of what Christmas and the holidays should “be” in our heads and we set standards that are all but impossible to achieve.


As with most memories, they often are embellished a bit in our minds to be a little bit different than reality. We tend to filter out the negative parts a little bit and focus on the good  parts, which is a good thing, but doesn’t always leave us with a realistic picture of how things were. While this practice is comforting and harmless in most instances, I think that as the years pass and this process happens again and again, we begin to look at our past experiences in a way that our standards are unrealistically set much higher than we can ever imagine. We use these memories as benchmarks for subsequent years and we find ourselves frustrated when we don’t live up to the expectations we have for ourselves in our minds. It doesn’t have to be that way. 


Memories should be cherished. It is wonderful to forget the slightly dry turkey, the bare spot in the back of the tree,  or the ugly sweater auntie Susie got us that one year. Dwelling on those types of mishaps wouldn’t really be productive.  But what I feel is important is not the things that made the holidays special, but the people and the feelings. 


Some of my favorites Christmases were the quiet ones. Some of the most cherished moments were those of just ‘being’ and sitting and watching others and taking it all in. While it is nice to have a beautifully set table or a dinner fit for a queen or king, I think the most important thing that we can all do for ourselves is to train ourselves to look for and appreciate the little things such as the sound of the children’s laughter, the taste of a cup of peppermint tea or the warmth of our favorite pet curled at our legs.


Once we begin to notice and appreciate these things, the other things somehow aren’t so important. And because these simple things are usually part of our everyday lives, we are happier people for appreciating them. We no longer feel the need to have 'bigger’ and 'better’ each year. We find comfort in ourselves and the surroundings we have right now, every day. I believe that makes for a happy life. 


Sorry to go off on a tangent. It is funny what a little snow can do, isn’t it? ;) 


Today we are updating the website. Keith has several new patterns available and I have the new SLDS101 Roc-Lon Tree Border Candle Wrap painting surface:


For a limited time, I am offering a “Buy 2 and get 1 Free” on it. I want you to all see how fabulous this surface is to work with. Not only is it great for Christmas, but for a cabin or camp theme as well. You can now get the “Joy” pattern at Toletown painting community. It will be there for the month of December, and then I will have it on my site. Toletown is a great meeting place for painters of all skills and I think you will love it there! I hope you check it out. 


Keith has three new patterns and pattern sets available as well. His SLDK635 Nativity Oval Overlay Plaque pattern is simple, but pretty and would make a great last minute gift to make:


He also put together a nice set –  SLDK634 - God Is Good, God Is Love and God Is Wise:


As all of the sets of this nature, they are also available individually. 


Finally,we have moved the SLDK629 Welcome Family and Friends plaque pattern to the regular section on our site:


This is a great plaque pattern for any time of the year. It also makes a wonderful gift.


One final thing that I want to mention today is that our newsletter is going to be sent out soon. It will have pretty much the same information as my blog here today, but it will also include a 15% off discount code to all of our subscribers. The code is good site wide and is only available to those of you who subscribe. We do this because we want to thank you for being loyal customers and keeping us designing. We only send out a newsletter a couple of times a month (roughly every two weeks – give or take) and we dont’ share your information or spam. We just want you to see what we have new, as we realize that everyone doesn’t have time to read here every day and keep up with us in these busy times. It is our way of saying 'thank you’ to you. :) 


That will be it for today. This weekend I plan on getting some decorations up and finishing up the gifts that I am making so I can mail them out by Monday (or around there!) Being in Canada means that it will take a little time to get to where I am sending, and I hope I can do so on time. 


I hope you all have a wonderful weekend. I know it is busy for most, but I hope that you all try not to feel too much stress of the season. If you begin to feel anxious, stop and ask yourself how important the thing you are stressed about really is. Chances are that it isn’t life or death and not worth the anxiety you are feeling. “Letting go” is the best gift you can offer yourself. 


Have a wonderful weekend!  Happy Friday to you all!


via Tumblr http://davidpires578.tumblr.com/post/134525190409

Wednesday, October 26, 2016

A Ming-Inspired Cabinet (75)

The past week or so has involved a little side work at the Museum of Fine Arts in Boston, repairing some shōji, and putting together an estimate for a Japanese ceiling in a tea room just outside of Boston - wish me luck with that - so progress on the cabinets has been slowed somewhat. Every time I put together an estimate for a job I am reacquainted with the fact that good wood is steadily getting harder to find, and more expensive all the time.

I have made progress on the frames of the demountable back panels on the two cabinets. As these rear panels are viewable on the front face only, the back of the cabinet being against a wall, the joints I chose to joint the frame corners are haunched mortise and tenons, with a mitered tongue for the front face. I will wedge and glue these connections.

As the frames abut against carcase board rebates as well as infill strips, which happen to be dimensionally different, the miters are made unequal so as to have the line of the miters meet the junctions at the corners of the cabinet properly. This is the sort of detail nobody will likely notice, but it’s the sort of thing that, when I see it overlooked in casework or finish carpentry I happen upon, disappoints slightly.

Here are the parts after the rails have been tenoned and rough-mitered, and the stiles have been mortised:


A closer look at the stiles:


I then moved to cutting the miter housings on one end of each of the stiles, after which I could start fitting the joints up:


These 4 stiles were cut at exact length to fit the opening, because I simply had no extra stock to draw from. The rail’s surface sits a hair proud, however when finish-planed that will be cleaned up - same goes for the outer faces of the stiles.

A closer view:


On the other sets, I was able to leave the stiles long, with little ‘horns’, though these might be a bit on the meager side length-wise:


Normally you leave the horns on so as to allow for tight mortise and tenon fits without risking the end of the stile splitting open, and I think in some woods longer horns are all the better. These shorter horns sufficed for the bubinga - they had to.

A view of the tenon exit faces-  I’ll be flaring the mortises to wedge them, so the vertical tolerance could be a little loose:


This is about half of the joints fitted, and horns trimmed down:


I’m not sure why, but I neglected to take any pictures of the miters, however those pics will be coming along in the next post.

Another view:


The next session in the shop, tomorrow, should see me through the rest of the miter joints, and then onto the dadoes for the panels and mortises for the panel battens.

All for this round - thanks for visiting!

via Tumblr http://davidpires578.tumblr.com/post/152363151709

Thursday, February 22, 2018

Looking for the perf

Looking for the perfect gift or that special piece of home decor that symbolizes the love in your family. These rustic heart linked candle holders will look great in any decor. Each candle represents a different family member, all linked together with love. (Candles can be used separately) Dimensions: Main candles: 2 x 2 x 8 and 2 x 2 x 6.5 The additional candles are : 2 x 2 x 5.5, 5, 4.5, 4, 3.5 White tea light candles are included. This item is made to order. The grains, knots and cha…

via Tumblr https://davidpires578.tumblr.com/post/171151122294

Friday, December 11, 2015

My Journey As A Scroll Saw Pattern Designer #1668: 'Tis the Season

I truly don’t know where the time goes. I know I said that many times recently, but it is hard for me to comprehend that it is already December 11th and the Christmas season is upon us.


Perhaps the reason for autumn passing so quickly is that it is my favorite time of year. After all, we know that when we are enjoying something a great deal time seems to pass in the blink of the eye.


Maybe it is because this is also the ‘busiest’ time of year for most people. So many of my friends are crafters and artistic people, and it seems that the time frame between September and January is the busiest for all of them as well. With craft shows, special orders and making their own gifts, even those who are just starting out seem to have a full schedule.


Add to that the house decorations, baking, wrapping etc., and it is understandable how the days seem to begin and end within just a few short hours.


Yesterday was a milestone for me. I finished up the last of what I intended to 'make’ for those on my gift list. Remember, my list is small, but I have been working on a truly special project that five people on my list will receive throughout the upcoming year.   I had decided to do it in stages, with sending out part of it each month. That is the only way that I can think of that will make it possible for me to do it for them. But I think they will enjoy that as well. For each month they will receive a reminder that they are thought about and loved. What could be nicer?


It also served to take off a large amount of pressure that I typically place on myself for the holidays. I have always done this. Even as a teen living with my mom I used to 'think big’ at Christmas time. I would start baking cookies right after Thanksgiving and would make a new type each night and pack them in the freezer. By the time Christmas actually arrived, I had over 20 varieties of home made cookies to dole out to my family and friends. It was a LOT of work, and expensive as well (even back then in the 70’s) and I look back to those times and wonder how I ever accomplished it. Now I am lucky to make one or two varieties of cookies, if any.


We do tend to learn over the years. I did, anyway. 


I learned to pace myself and to not feel like disaster has struck if I didn’t get every spectacular idea that I had in my mind finished. Otherwise I would drive myself crazy. And while some of you may think I am already there, I assure you, if I am, it is the GOOD type of crazy! The type where I love life and love living to create new things and teach others to do so as well. So come join me! 


As I finished up my pieces yesterday, I had this huge sense of relief. My house here is a bit messy (not too bad, but about a half hour of tidying up wouldn’t hurt!) and I still had to wrap things up to be shipped out. Keith went out for the evening and I had the place all to myself (and the cats, of course) and I could have accomplished a great deal.


But instead I chose to do other things. I made a call to someone dear who has been on my mind. I visited with her for a bit. I stopped by my favorite groups on Facebook and had some conversations with my cyber friends. And I posted some of the 'secret gifts’ for others to see in my private art groups, which brought a bit of conversation with my fellow creative friends. This, to me, was a low-key evening. 


All the while I was doing these things, I had assorted cats on my lap. I made a cup of peppermint tea and had a couple of cookies (store bought) and I laughed at the humor of my friends and I looked at my little tree, which is now naked except for the lights, and I thought – “This is what the season is all about.” It is about loving and caring for others and laughing and crying with them. It is about telling funny stories and teasing and making others smile and feel loved. It is about so much more than the materialistic things we have become accustom to in relation to Christmas. 


When Keith got home, I was already in bed. He stopped in to say goodnight to me (he is a night owl and stays up quite late) he asked how my evening was. At first I said to him through my sleepy haze “I wasted the entire evening doing nothing.”  But then when I told him that I made an overdue phone call and chatted online with my friends for a while, I realized how wrong that statement was. The evening was NOT wasted. It was good. It fed my soul and made me smile and I went to bed appreciating the wonderful family, friends and life I had.


How can that ever be considered “wasted” time?


Everything we do does not need physical results. Sometimes the most important things we do for ourselves or others are the things that can’t be seen, touched or held. They are the things that feed our souls and bring feelings of love, compassion and warmth. They are the small, everyday things that we do to make others smile and make their day a little bit better. I always say that if I can make someone smile on any given day, it is a good one. I try to do that every single day. 


I wish you all a wonderful weekend ahead. I hope you think about what I mentioned here and try to keep yourself calm and happy during this busy time of the year. Things will get done. If they don’t, the world will not stop spinning. I rarely hear of people thinking 'less’ of someone because they only had 12 types of cookies instead of 15. Or that their house wasn’t decorated quite as elaborately as the year before. Remember what is important – to show love and compassion toward all you meet. THAT will fill your heart with the spirit of the season.


Happy Friday to you. Enjoy your weekend. 


via Tumblr http://davidpires578.tumblr.com/post/134984314154

Wednesday, December 7, 2016

Well of Heaven (II)

First task with the Yellow Cedar was to  check the moisture content with a pin meter. This came out at 8~9%, which was fine. Next, some preliminary resawing work to see what was what:


It’s yellow, and cuts like another yellow substance, namely butter. Quite a change from bubinga and shedua. The board in the picture above did move a little bit from the rip cut, but the other boards hardly moved at all. A good sign.

With quartersawn wood, you can generally expect stress relief to occur to some extent, and this is almost always in the lateral direction, the sawn halves moving aways from, or toward, one another. The board above was partly rift sawn, so the board’s movement was slightly lateral outward and slightly upward.

By resawing down the middle, I adopt a ‘divide and conquer’ approach, splitting any residual growth tensions evenly between halves. If the board had more stress in it, and one ripped just a thin slice off of one side - particularly if on the bark side of the board - then one opens to the door to the potential for the ripped board to warp too much.

Each of the two halves, after sitting a day or two, will be divided in half once again to produce the ceiling frame scantlings.

I also did a bit of cross-cutting and end-trimming, and very little stress manifested in the boards  during the cutting - I was pleased. Here’s a slice off the end grain of one of the boards, with the 'super macro’ setting on the camera, showing the incredibly tight growth rings:


The above section of wood measures about 2" tall by 2.25" wide. With the naked eye, it is a bit hard to count the rings.

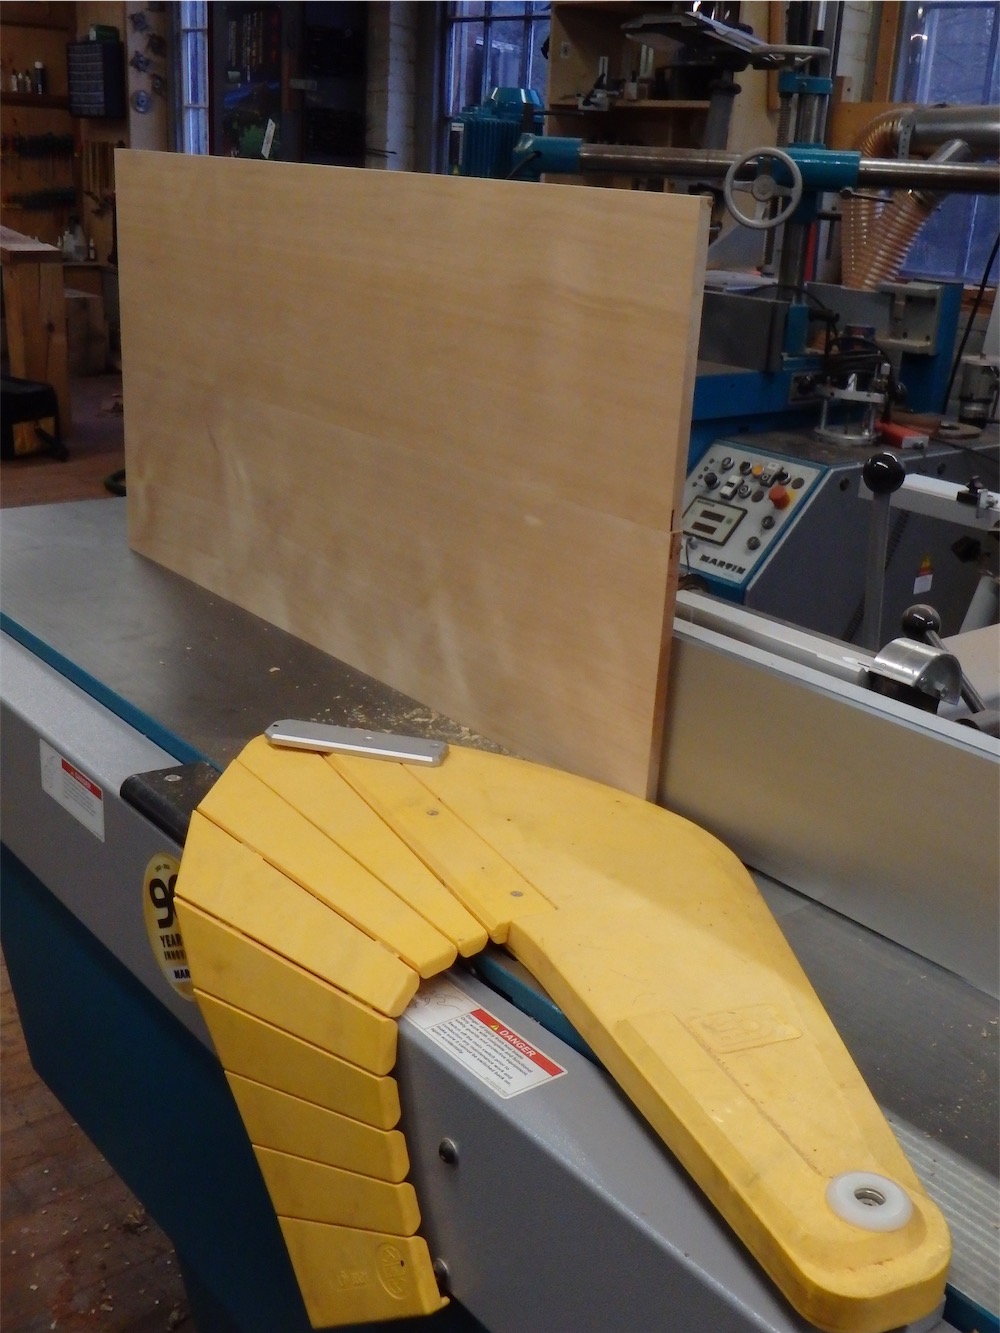
For the panels, the VG Western Red Cedar boards were bought as 1"x10"s a couple of weeks back, in various lengths up to 20’. These were then cut into 3’ lengths, jointed, planed, surfaced, edge jointed, and edge glued. This produced more than 20 glue ups. Next step was to joint each assembly:


That was followed by ripping to width in two passes so as to leave the glue line centered, and then the panels were cross cut on the sliding table saw to produce the 44 ceiling panels required. At this stage, they are left a hair over dimension:


There are slight differences in panel sizing depending upon the location of the panel in the frame work, so I prepared the panels to the largest required dimension, and will trim down panels which can be a little smaller later on.

A few days later, all the ceiling rods were sliced out and dimensioned, a little oversize at this stage:


I’ll let that stock sit for a day or two before bringing it down further.

While doing the milling, I also happened to notice an issue with the ceiling perimeter frame members, mawari-buchi, which I pulled from the tea room wall. They are all different lengths. So , it looks like the room itself has one square corner at best. I’ll need to return to site to check this out further before I fit the ceiling framework to the perimeter frame in the shop.

I also got to work on a frame of a single sliding window, one of a pair. There was one missing from the mizuya room, so I patterned the new one directly off of the existing piece.

Here I’m taking some finish passes on kumiko:


 The frame members were dimensioned, finish planed, end trimmed, mortised and tenoned:


The outer frame is done:


Just need to complete the lapping joints for the kumiko and mortise the frame. I’ve also ordered some spring clips from Japan for the new frame. The new ones look like this:


All for this round. Thanks for dropping by the Carpentry Way. Should have TAJCD Monograph 2 out later this week all being well.

via Tumblr http://davidpires578.tumblr.com/post/154160993389

Tuesday, December 15, 2015

My Journey As A Scroll Saw Pattern Designer #1669: Some Time Away - A Gift to Myself

Many of you may have noticed that I haven’t been posting as regularly these past couple of weeks. It isn’t that I haven’t been doing things, but I have been doing things that I really don’t want to share in public at this point. 


Over the past six years of almost daily blogging, I have met many online friends from all over the world. I have also reconnected with friends and family from different times in my life, and I have enjoyed getting to know them again – some whom I haven’t spoken to since we were children – and seeing their own children and families and learning about their lives. I really enjoy this and think it is one of the benefits I have reaped by writing here every day. 


Lately though, things have been somewhat overwhelming and busy for me. I have been trying to do some little things to surprise some people, and it is difficult to do when I document my daily routine here online. I am still being creative, but I don’t feel that I want to share things that are destine to be gifts for others that may stop by and read. It is as simple as that. 


I have kind of wanted December to be a month that would be ‘low-key’ for me. While it may not be the smartest business move that I could make, I kind of wanted a vacation from thinking that I always 'have’ to be doing something to help my business grow. We get caught up in that, you know. After years of working so hard to make our little businesses work, it soon becomes a lifestyle and we just don’t know how to do things any other way. The term 'relax’ somehow gets lost from our vocabulary and we are unable to unplug ourselves from things without feeling guilty.  At least that is how I feel. 


But life is short. And even though that phrase may be somewhat of a cliche, it is very true. Over the past few years I have seen many people that I know and love succumb to illness and disease. It is natural as we get older to experience this more often, as we are not as 'invincible’ as we thought we were in our youth. It makes you stop and think. 


I don’t want to go through the remainder of my life in fast forward. Things happen quickly enough as it is.  I want to take some time to enjoy some moments and just 'be’. Maybe it means sitting here with a cat on my lap sipping tea. Perhaps listening to music, browsing through a book, or watching something on TV without doing anything else. Maybe writing or painting or drawing with my new pencils without thinking how the resulting drawings or paintings can benefit my business. And letting go. (That is the hardest part)


We program ourselves at a young age to achieve. I think that is a good thing, as accomplishments are something that give our lives purpose. But somehow in that process, we sometimes edge out the 'down time’ that we need to rest, relax and replenish our souls. We forget to take time for ourselves, thinking it is either selfish or detrimental to our business. Usually it is just the opposite. 


As I read about others’ days this busy time of year, I can’t help but feel compassion for them. Many of my creative friends are frazzled. They work so hard at making nice things for others, that they forget to take time for themselves and enjoy the season. Knowing these people and looking in from the outside, I realize how sad this can be. I know they work hard all year. I wish for them that they could just turn off the switch and allow themselves the time to relax, enjoy and maybe do nothing at all. They earned it. Yet I find it hard to justify the same for myself. Funny how we think that way, isn’t it?


I spoke to my dear friend Ellen the other day. She is my 'Canadian mother’ and we spend most holidays with her. She is planning our Christmas dinner, and already she is beating herself up about things. Her house won’t be clean enough (It is VERY clean – always), her meal won’t be good (EVERY meal we have there is outstanding), she is not going to be able to have all her decorations up in time (It is ALWAYS like a Winter Wonderland at her house). It struck me as sad. There will only be six of us, and we are all close and easy-going. Then why kill ones’ self for no reason?  It made me wonder. 


I think it was then that I decided that it is time for me to take a break. While writing here every morning is not a hardship, it is one of the things that I feel I need a rest from. After six pretty solid years of writing here in my blog, I think that a couple of weeks off will do me good. It will help me relax and enjoy my holidays. 


I am not going away permanently. I may even stop in at any given time and post. I just want to not have to do it if I don’t want to. The pressure to present a blog every day will be gone. It will feel great, I believe. 


I am sure that when I return I will be full of ideas and excited to share them. I have lots of ideas now for the upcoming year and I know it will be our best year ever. I am pretty sure as well that I will be excited about writing again when I return, as I will miss corresponding with you all about your own creative paths. After all, we feed off each other, don’t we? 


Thank you for understanding this. I hope when I return that you will return as well. I hope you also follow my example and give yourselves a break this Christmas and holiday season. You deserve to enjoy the time to the fullest. You earned it. 


I wish you all a wonderful day and week ahead.  Enjoy these moments that life has to offer, for if you blink your eyes, they will be only memories. 


Happy Tuesday. 


via Tumblr http://davidpires578.tumblr.com/post/135251505834

Saturday, September 2, 2017

BCM 2017: On a New Track

This year’s repair work at the Kyo no Machiya, located inside the Boston Children’s Museum, is to replace the sliding door track, or shiki-i, and the frames of four paneled doors, ita-do. The track was worn to the point where the dadoes for the sliding doors were all but indistinct, and the doors themselves had worn their lower stiles to the point where there were no longer tongues with which to engage the sliding track. The doors, effectively reduced in height and sitting in an opening with a larger than original height, were perilously close to falling out of their openings entirely.

My first visit was to come and collect the doors and take a look at how easily removable the shiki-i might be. Unfortunately, I found that the lower sliding track was not going to be easy to remove. By design, they should be, however in this case the floor framing of the closet space in behind the track had been nailed to the track with some fairly large spikes. The floor of the closet, 10mm plywood, was also trapped by the 3mm plywood covering the walls of the closet. Taking the floor of the closet out to get at the framing would open up a large kettle of fish, and mean the stairs also would have to come out, so I will instead elect to chop the track out in sections.

Here’s the track in question:


The sliding doors in this area are normally kept shut as they provide access to the second floor of the house, and that is an area not open to the public. A tea ceremony group uses the upstairs space on an intermittent basis.

Back at the ranch, I got to work removing the ita-do frames. Upon inspection, I discovered that one stile on each door had been replaced at some point in the past - likely at the time when the building was installed at the BCM, and the new stiles did not show through tenons from the door battens, as the old ones did. The lower rails were also non-original. A bit more investigation revealed the unpleasant fact that the new stiles had been affixed with an aliphatic (yellow) glue, and thus the joinery could not be knocked apart. Therefore, I had no option but to cut the doors apart, taking care to preserve whatever was left of the tenons on the door battens.

My first pass by the post was to rip the stile on the table saw:


These rip cuts revealed the ends of the mortises in the stiles:


I then cross cut the door rails, removing 2/3:


Then, at each joint location, I sawed around the connection thusly:


A few chisel blows removed waste:


This was not a quick and easy process by any means - it felt a bit like an archaeological dig:


The old stiles could be more or less knocked off their connections, however I decided to kerf around some of the joints just to minimize stress on the small batten tenons when the rails was knocked off:


The old stiles came off in one piece:


The new stiles came off in 30 or 40 pieces each. Amazing what the consequences of glue choice can be, huh? Easy repairability, as it traditional with the use of weak adhesives made from rice paste or similar, or stuff that has to be chopped to bits, when modern adhesives are employed. Sometimes it is great to have adhesives that are stronger than the wood itself and people do like to boast about stuff like that - but it’s not such a fine thing if repair of those assemblies is envisioned in the future. Modern high-strength adhesives do pair well with today’s throw-away culture.

Once I had the stiles off and had chiseled off most of the old glue from the tenons, I took a measure of some of the battens, shoulder to shoulder:


The numbers were not exactly the same from batten to batten, varying by 0.4mm or so, but this number is representative:


When at site I had measured the post interval, inside face to inside face, so having the batten length dimension (i.e., same as the measure between inside faces of the stiles) in hand now allowed me to calculate the correct door widths and stile widths. Once that was done I discovered that the old door stiles had been undersized, at 36mm width, when they should actually have been 38mm. Possibly the stiles may originally have been 38mm wide, and had been modified over time to fit posts when had shifted out of plumb as the building settled over time. I’m just guessing though.

Unfortunately, whoever fitted the replacement stiles in the past had not taken the time to calculate the correct size needed and had simply duplicated the old stile size, so the old doors ended up being too narrow by some 4mm each. Since their fit was so poor in the wall opening due to excessive wear, the issue with incorrect overlap was not, of course, presenting itself too overtly.

I discovered that when the door had been worked on previously to fit the new stiles, they had broken off a few tenons and had redone the connections with a nail:


Not the best way to do things obviously, but I do not know the circumstances of the past repair so I will hold off commenting further.

At last, all four batten and panel assemblies were free of their frames:


I have three batten tenons broken or missing, and will have to either fit inserted tenons or fabricate at least one new batten. I’ll cross that bridge when I get there.

Time to make some new frames, which I decided to make from old growth Port Orford Cedar. Step one was to crosscut the material to length, and then on to jointing:


And then planing:


Then resawing:


And more jointing and planing after that.

Nearly there:


One of the pieces I started with proved to have some internal stresses which rendered the re-sawn sticks anything but straight, so I had to cut up another piece. At the end of the day I have all my stock prepared a couple of millimetres oversize for section width and height. I’ll let it sit over the weekend and take the material down to size next time I’m in the shop.

Thanks for visiting the Carpentry Way. There has been a bit of a hiatus in posting, and I appreciate those readers who have reached out by email to check in on me. Will endeavor to get back to regular posting, and yes, still working on some videos of other projects….

via Tumblr https://davidpires578.tumblr.com/post/164918655289