Sunday, July 29, 2018

Build Thread Index

A sizable number of the posts on this blog are devoted to build ‘threads’ where the reader is taken along the journey of design and construction of a piece. Some of these build threads comprise less than 10 entries, while others run to 100 entires or so.

The links provided on this page will take you to post #1 in each build thread, and each post in a build thread is linked to the next, with the link provided in the body of the blog entry at the end. So, this is not a true index, but merely a way of pointing the reader in the right direction for reading a thread from beginning to end. WordPress seems to lack, at present, a proper sort of index, with entires listed in numerical order, so this thread list is a placeholder until such an index becomes available. Further, I have found that some of the language in these posts, written when this blog was a blogger artifact and not a WordPress one, had to be changed as they referred to things that were present on the blogger site which are not present here. I will be working my way manually through hundreds and hundreds of posts, updating and amending. Some older posts have links to youtube videos which are defunct, and I’m even finding typos, missing page links, and stuff like that. Little by little we’ll get there, making this site more user friendly.

There are more than a dozen substantial build threads, so look for this page to be updated as these threads get cleaned up and all the links working properly.

Build threads:

Coffee Anyone?

Building up my Library (bookcase)

Colgate EALL


via Tumblr https://davidpires578.tumblr.com/post/176409949309

The Art of Japanese Carpentry Drawing

At first, the 5 Volumes, 2 supplements and Kanna Tuning Manual which comprise the series, were listed to the right side of the page with convenient Paypal purchase buttons, however for some inexplicable reason that widget has become non-functional. I am working on this issue with WordPress tech support, but in the meantime I thought it would be convenient, for those interested in the TAJCD material, to provide a listing of the blog pages detailing each of the parts. I’ll make this blog entry a link at the right of the page for convenient future access.

Here are the links to the blog pages announcing each of the TAJCD essay publications:

And the Supplements:
That is the current sum total of TAJCD material. New Volumes are planned but no schedule is set as of yet regarding release dates. These will be announced, of course, on this blog as they become available.

The essay prices are individually noted with each item, however if purchasing 3 or more items, discounts do apply. For example:

5-Volume TAJCD set: $140.00

5-Volume set plus both joinery monographs: $170.00

5-Volume set plus Kanna Tuning Manual: $170.00

Complete set of 5-volumes, both joinery supplements, and Kanna Tuning Manual: $200.00

Payment is generally by Paypal, though for those in the lower-48 states, there are other options, such as USPS Money Order, bank check, or Squarecash. All international purchasers must use Paypal. Contact me via email if you would like to delve in.


via Tumblr https://davidpires578.tumblr.com/post/176409530899

Saturday, July 28, 2018

The Art of Japanese Carpentry Drawing

At first, the 5 Volumes, 2 supplements and Kanna Tuning Manual which comprise the series, were listed to the right side of the page with convenient Paypal purchase buttons, however for some inexplicable reason that widget has become non-functional. I am working on this issue with WordPress tech support, but in the meantime I thought it would be convenient, for those interested in the TAJCD material, to provide a listing of the blog pages detailing each of the parts. I’ll make this blog entry a link at the right of the page for convenient future access.

Here are the links to the blog pages announcing each of the TAJCD essay publications:

And the Supplements:
That is the current sum total of TAJCD material. New Volumes are planned but no schedule is set as of yet regarding release dates. These will be announced, of course, on this blog as they become available.

The essay prices are individually noted with each item, however if purchasing 3 or more items, discounts do apply. For example:

5-Volume TAJCD set: $140.00

5-Volume set plus both joinery monographs: $170.00

5-Volume set plus Kanna Tuning Manual: $170.00

Complete set of 5-volumes, both joinery supplements, and Kanna Tuning Manual: $200.00

Payment is generally by Paypal, though for those in the lower-48 states, there are other options, such as USPS Money Order, bank check, or Squarecash. All international purchasers must use Paypal. Contact me via email if you would like to delve in.


via Tumblr https://davidpires578.tumblr.com/post/176387238869

Friday, July 27, 2018

Colgate EALL (15)

Things have been progressing smoothly, save for a glitch on one front, which has pushed the install date back a couple of weeks.

In the past couple of weeks, there were a few days where many bats were hanging about the shop, including this one which clung to the front door one day:

OLYMPUS DIGITAL CAMERA

I believe this to be a juvenile large brown bat (Eptesicus fuscus), one of two species common in Massachusetts, but I’m not totally sure.

I later found a second bat treading water, and quite groggy, in my sharpening pond, and then a day later another one hanging around under my planer which tried in vain to scare me off with some bared teeth. I put these visitors into a box and placed them out on the yard so they could find their way back to wherever home is when night fell.  I’ve had no surprise visits since. I like bats, and given the problems bat species have been facing in N. America due to white nose syndrome, which has laid waste to their populations, it was good to see some on the scene after what had been a few years where I hadn’t noticed any.

The symbolism though, of the upside-down bat reminded me strongly of an aspect of Chinese design iconography. The bat is an auspicious symbol, suggesting good fortune. Many in this country will find that a baffling association, since many have been conditioned since they were young to have strong aversion to bats and similar animals, and think of bats largely in association to halloween, and as ‘spooky’. I’m not sure if the average Chinese person these days feels positively toward bats, but in classical art references, the upside down bat image is found quite often. Take this Qing dynasty gourd-shaped vase decorated with red bats for example:

B60P46-720x991

(photo © Asian Art Museum of San Francisco)

Here the descending bat motif can be seen on a piece of rosewood furniture:

f6c4f2a9-8c3b-43bc-82b3-30a9f44fe97e

And here’s another example, a bit easier to view, on a Chinese paneled screen:

IMG_1805

You may wonder: why is the bat image auspicious? The pronunciation of “bat” in Chinese, 蝠, is “fú” — which happens to be the same as that of some other characters that have a different meaning, such as “blessing” ,福, and another, “riches”, 富.

Add in the character for “upside-down/descending” in Chinese, 倒 , read “dao”, and one obtains the term “fúdao”, for “descending bat”. However, the reading of “dao” is also used for another character, 到, which means “to have arrived”. So, the image of a descending bat, termed “fúdao”, 蝠倒, also suggests the meaning “good fortune has arrived” when written (and pronounced exactly the same) “fúdao”: 福到.

We have puns in English, but these hidden gems of Chinese art are visual puns, more like Rebus puzzles. If you’re not familiar, here’s a Rebus puzzle for you – see if you can work it out:

Rebus_escort_card

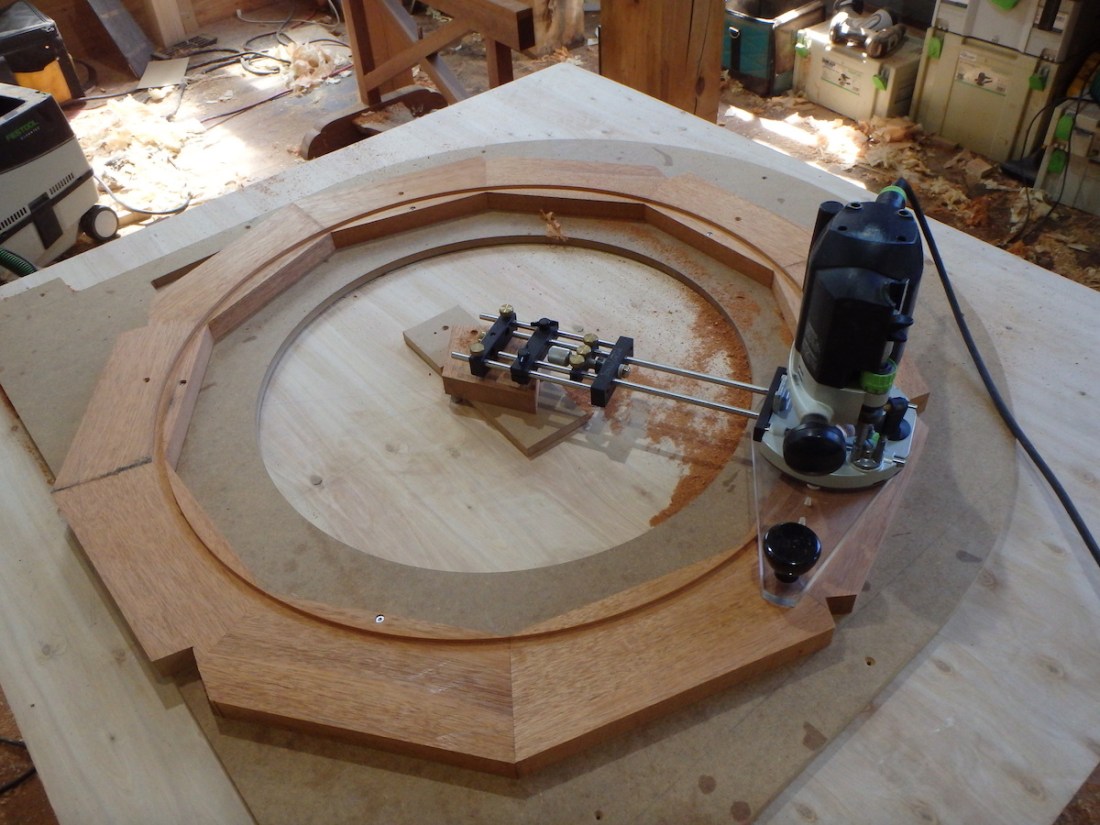
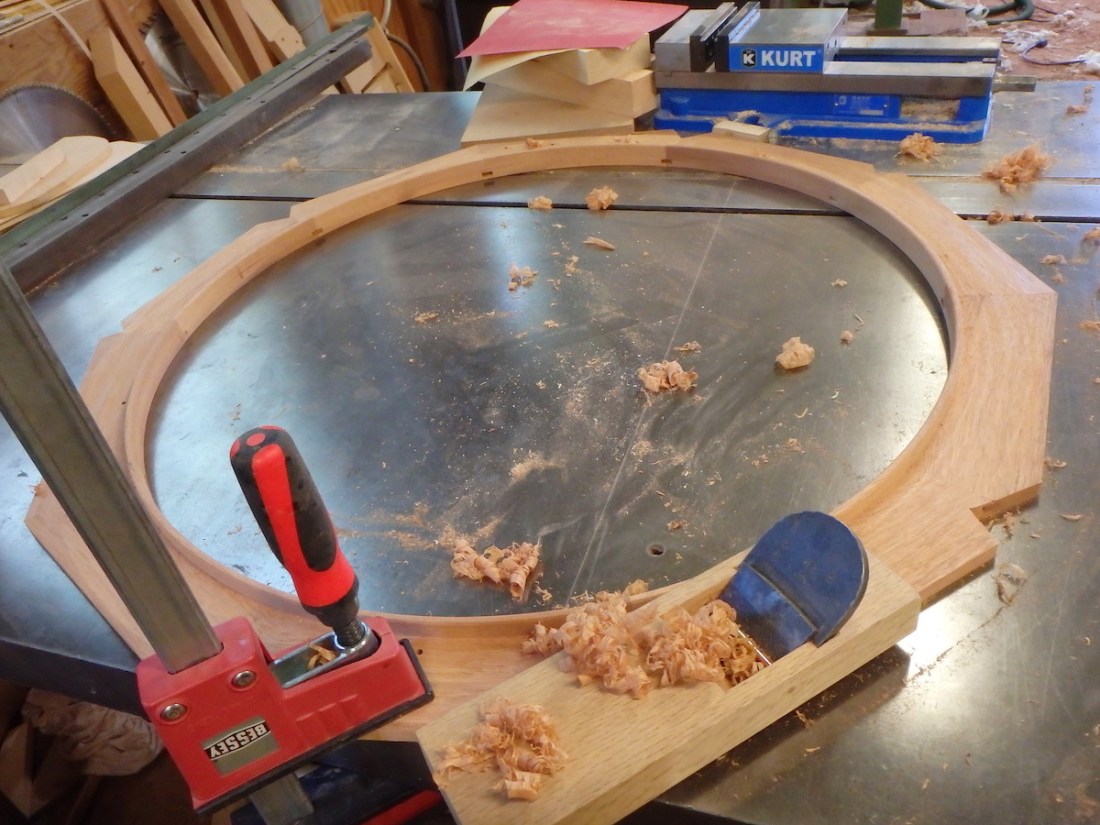
Anyway, on the topic of Chinese puzzles, recently I have been working on the latticed window for the Chinese room:

Colgate EALL chinese window

Initial time was spent, as you might expect, with stock selection, milling and dimensioning, followed by working through the joinery required on each piece:

OLYMPUS DIGITAL CAMERA

As I will be chamfering the sticks on all four arrises, the tenons will be housed a little, as will of course the mitered lap joints.

OLYMPUS DIGITAL CAMERA

The outer frame receives a fairly simple splined miter joint at each corner:

OLYMPUS DIGITAL CAMERA

While there were multiples of all of the parts, anywhere from 4 to 8 of each different stick, I didn’t manage to do much in the way of gang cutting, rather, worked through the individual cuts stick by stick:

OLYMPUS DIGITAL CAMERA

The miters, as with the ones on the Japanese transom featured in the last post, were joined using a pair of splines, a task for my milling machine.

A bit of a pedal-to-the-metal phase made for a lack of assembly photographs or video, however I did manage one of the completed glue up:


via Tumblr https://davidpires578.tumblr.com/post/176358116244

My Journey As A Creative Designer - Woodworking and Beyond #1861: Be Fearless!

My new blog post shows some new designs from Keith as well as myself. “Be Fearless!”

https://sheilalandrydesigns.wordpress.com/2018/07/27/be-fearless/

(http://www.sheilalandrydesigns.com/product/SLDK779http://www.sheilalandrydesigns.com/product/SLDK779)

http://www.sheilalandrydesigns.com/product/SLDK780

Stop by and see. :)


via Tumblr https://davidpires578.tumblr.com/post/176338909204

Friday, July 13, 2018

Colgate EALL (14)

This job sure entails a diverse range of items, from architectural millwork, sliding doors, to furniture, to windows, and so forth. It’s fun in that respect.

I’ve been working on the round window for the Japanese alcove. I considered various ways to make a round window, and in the end decided that glue up from solid segments made the most sense. I chose a decagonal arrangement of pieces as a compromise between grain straightness and overall complexity.

After gluing up pieces in a couple of stages, I had two half-rings of 5 pieces each. These were then tuned along their abutting ends with a hand plane:

OLYMPUS DIGITAL CAMERA

Once that was satisfactory, I could proceed with the glue up:

OLYMPUS DIGITAL CAMERA

All of the joints have an internal spline.

With the glue up done, I proceeded to process the cuts to make a round, lipped window frame:

OLYMPUS DIGITAL CAMERA

A bit of table sawing with the rip blade cut away the remainder of the waste and I cleaned up the surfaces of the flange by plane:

OLYMPUS DIGITAL CAMERA

Then some additional smoothing work to finish the cut out out phase:

OLYMPUS DIGITAL CAMERA

On goes the finish, in the end 5 coats applied and hand rubbed between in total:

OLYMPUS DIGITAL CAMERA

It’s nice to use Enduro Var as it allows me to get several coats on per day.

The spline ends are exposed, but fairly discrete, so I doubt they will be noticed:

OLYMPUS DIGITAL CAMERAOLYMPUS DIGITAL CAMERA

The cusped window is done, and has been waxed:

OLYMPUS DIGITAL CAMERA

The alcove has a floor on each side. The alcove proper has a single piece black cherry slab, now into its 4th coat of finish:

OLYMPUS DIGITAL CAMERA

The other side of the alcove, which features the round window and the staggered shelves, has an avodire floor, and is a glue-up of 4 pieces:

OLYMPUS DIGITAL CAMERA

The glue up produces a panel w


via Tumblr https://davidpires578.tumblr.com/post/175860474694

Thursday, July 12, 2018

Wadkin Dimension Saw: Resurrection (Phase I), Part II

I’ve been too engrossed with project work to be able to make it back up to Rees shop in NH, however he has made a lot of progress on the machining work. In fact, the work is complete after nearly 40 hours. I asked him to take some pictures as he went and he kindly obliged.

The sliding table’s upper surface was one of the first things Rees tackled, and just a few passes with the planer shows the condition of the surface quite well:

unnamed-17

The table was bowed up in exactly the last place where I could tolerate it, right next to the saw blade when ripping stock.

Just like hand-planing a piece of wood, you can reach a point where most of the surface is done, but the ends remain low and many passes are yet required to flatten things out:

unnamed-18

unnamed-19unnamed-20

After about 0.023″ (0.6mm) had been sliced off, there was at last a flat table top:

unnamed-21

A bit more than that had to come off the underside of the table, along the runs where the linear rail assemblies are fastened. All in all, over 0.05″ (nearly 1/16″) was removed in correcting the surfaces, which was about the degree that things appeared out of whack with the table at my shop when it was on the machine.

Curiously, one of the underside rail supports was dead straight until the last 12″, where it veered off of parallel with the other rail by 0.005″. This would have of course contributed to the difficulties I found in getting the table bearings tightened  – it was not possible to get them adjusted properly, and I had to run the table such that it had too much play in the middle of the stroke and got slightly tight at the end of the stroke. Those bugbears are going to be problems in the past now, it would appear.

After the upper table was sorted Rees got to work on the support beam:

unnamed-22

The support beam was decently straight, yet was improved to a higher standard than before, with about 0.012″ taken off.

One of the tricky parts was dealing with the linear rail support ribs, which have a sloped top and a curved bottom surface:

unnamed-14

Rees also dressed the sides of the casting to clean them up:

unnamed-15

The sliding table casting has also been cleaned up in the same manner.

Another view of the planing work underway on a linear rail rib:

unnamed-16

With the two castings straightened out, the mitre fence was then worked on, and after that, the holes for the mitre fence in the table were redone. Both the main pivot hole, which had been heli-coiled previously as a repair, and the worn out detent holes for the various mitre positions were bored out, plugged, and redone. The detent holes are conical. The pivot pin threads were cut off and a Whitworth 1/2″x12TPI set screw was installed.

Here’s the primary mitre fence position after the re-working:

unnamed-11

I had Rees add a second position of pivot and detent holes in the middle of the table, so that when I do obtain a back mitre fence to pair with the main mitre fence, it will be much more usable tool in terms of the sliding table being able to support the work:

unnamed-10

In case you’re wondering what a back mitre fence is, here’s a picture from the Wadkin PP saw brochure showing it in use (see pic lower left):


via Tumblr https://davidpires578.tumblr.com/post/175805216479

Wednesday, July 11, 2018

Письмо «Мы нашли нов

Письмо «Мы нашли новые пины для вашей доски «Корзины и коробки».» — Pinterest — Яндекс.Почта

via Tumblr https://davidpires578.tumblr.com/post/175795675999

Wood Project Plans -

Wood Project Plans - CHECK THE IMAGE for Lots of DIY Wood Projects Plans. 48372723 #woodworkingprojects

via Tumblr https://davidpires578.tumblr.com/post/175795675494