Friday, January 27, 2017

A Ming-Inspired Cabinet (84)

Work on the bifold doors for the two cabinets continues. I realized in the past while that these doors will be the last sets of mortise and tenons to tackle on this project, a point which has certainly been long in the making. Something to savor.

After a spell of fitting work connecting rails to stiles, I had a set of 4 door frame ‘ladders’ for one cabinet together. Before moving on to fitting the panels and upper/lower rails to those frames, I wanted to be certain that I had the door widths correct. While there is a designed specific door width, errors do accrue as assemblies are brought together, and there isn’t a lot of wiggle room between doors with overly large gaps between (i.e., the doors are too narrow) or which are too wide and will not close. Of the two, the latter is to be preferred as an initial outcome of course, however I did not want to be in a position of having to shave significant amounts of material off of the door sides after they were put together for good. It was preferable at this juncture to make any adjustments in that direction by decreasing the shoulder-to-should distance with the door rails, and then to construct the top and bottom rails to suit any adjustments which had to be made.

In what seemed like half a lifetime ago, I had put together the cabinet carcases. While I often rely upon a caliper for measuring where possible, in the case of each carcase the width was too great for any caliper I have, so I had to make do with a measuring tape to layout and produce the desired 51.25" carcase width. I know from working with calipers and the DRO on my mill that rules and, more particularly, measuring tapes, are not the most accurate devices. Many times I have laid something out with pencil and Incra rule, where there are machined 0.5mm dots for each pencil position built right in, and found later via the milling machine’s DRO, and later checking the same dimension with a caliper, that the Incra ruler layout was not as accurate as I had hoped. With a regular rule or tape the problem is even worse though in that errors of parallax can also creep in. Regardless, after the cabinet carcases were glued up, I checked by measuring tape and found them to be 51.25" wide, but of course realizing that the number had inherent imprecision. There was a +/- of 0.01~0.02" there, and while that might seem slight, it’s also about the amount of space required for door clearance, and if I strayed too far, with cumulative errors say to 0.03~0.04", then the gap would be too large for my liking. If I was to be out on my dimensions, I could hope that I wouldn’t be out in the direction of the doors being too narrow and therefore gappy. Looking for slightly fat doors….

With the door frames assembled, given that the rail tenons protruded at this stage, I couldn’t simply lay the doors down on the carcase and see if everything fit. The rail tenon portions sticking out kept the stiles from coming together against one another. So, in order to check, I decided that I needed to get an accurate measure of each half of the cabinet, to match with a given bifold door assembly, and then I could measure the doors separately, add up the numbers, and see if they were going to be a close fit or not.

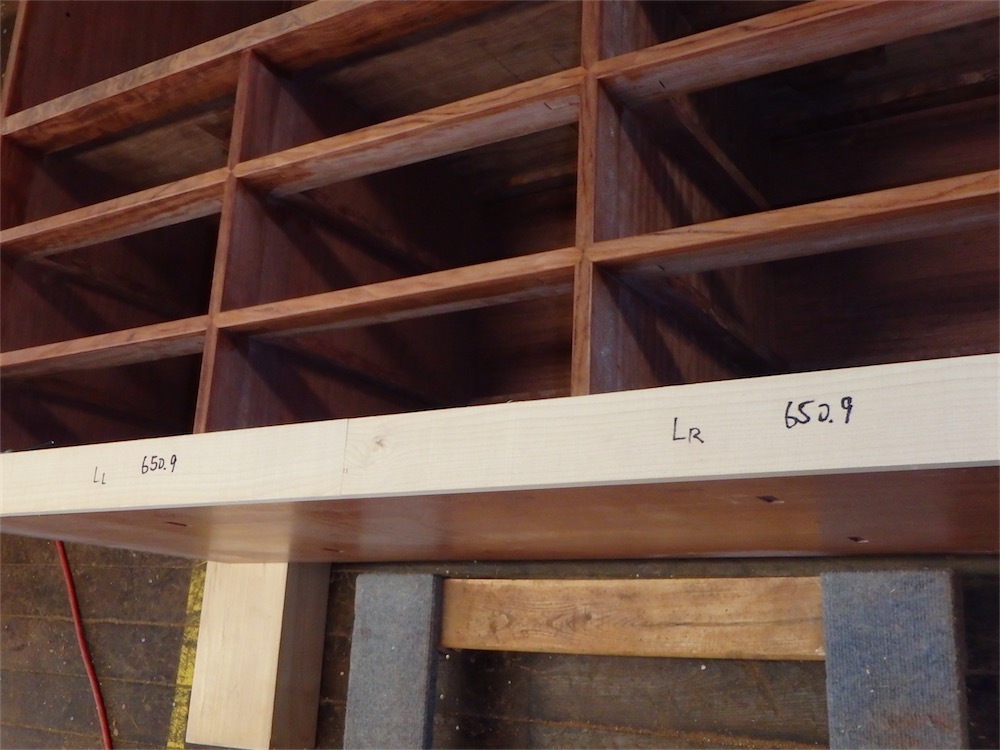
To obtain a measure of half the cabinet width, I used the sliding table saw and an end stop with screw adjuster to cut a pair of matched sticks until they fit end to end across the cabinet:


I made two sets of these gages, so as to account for any possible variation in the cabinet width at top or bottom.

The cabinet was nominally 51.25" wide, or 1301.75mm. Divide that in half, and you obtain 25.625", or 650.875mm.

I was very pleased to find that the carcase half-width at the bottom was pretty much right on the money at 650.9mm:


At top, the width was only very slightly larger, at 651.00mm:


Now to check the doors themselves to se how they compare to their openings. I happen to have a 1meter long Mitutoyo Digimatic, something I picked up used, and at a reasonable price, from Germany at the time I acquired the Zimmermann milling machine:


It comes in handy at times for sure.

So, the half-opening width was 650.9 or 651.0mm, depending. I measured the left side door of the left half bifold at 325.43mm, and the right side at 325.56mm, which adds up to 650.99mm. I was stoked! That made my day. I kinda started geeking out at getting such a close-to-target result and even called my wife up at work to tell her about it. Yeah, yeah, she has learned to put up with my eccentricities for sure, not simply humoring me in such matters but really getting the significance and meaning of such things for me. That’s nice.

Anyway, I figure after finish planing of the rails that I will be fine with current rail shoulder-to-shoulder distances, and could therefore move on with further cut out.

One of those tasks was processing the housings for the tenon haunches on the top and bottoms of the stiles. Here, I am starting that cut on one of the hinge stiles:


One of the aspects to the milling machine I have come to really appreciate is the slotted table, upon which one can clamp stuff down so the stock just doesn’t move anywhere. It makes the cuts chatter free and clean, and there are no problems with the work wiggling loose while cutting and the associated sorts of disasters that can eventuate with that scenario. I have made many wood and MDF fixtures over the years, and a typical weakness with those fixtures is that the act of clamping the stock to the fixture often deforms the fixture itself, leading to cut out errors. With the mill, the thick cast iron table is not really deforming to any significant degree when I lock stuff down, which improves the final product in some concrete ways.

This is a one-pass cut:


Result:


As I completed the ladders, I laid them out on their respective boxes:


Set #2:


Next up were the top/bottom rails, which are formed in an 'L’-section like the stiles. Task #1 was to mill the dadoes for the panels. Given the 'L’-sections, and position of the groove, the mill seemed the best suited and safest for the task:


Climb cutting made for zero tear out in grooving.

Once the dadoes were done, I moved onto tenoning - these are the very last tenons cuts on the project I do believe:


At this juncture, the tenons are complete on one face and shoulder, and rough cut on the other face and shoulder:


Another view:


One more for good luck:


Next time I’m in the shop, I’ll complete the tenons, which are halved and haunched as well, and move onto fitting these rails to the stiles.

Thanks for visiting the Carpentry Way.

via Tumblr http://davidpires578.tumblr.com/post/156462519874

My Journey As A Creative Designer - Woodworking and Beyond #1816: Some Updates for Our Site

Good day to you all. I am still in my ‘organizational mode’ here and I am sorry to say that I have been so busy that is has been difficult to find time to blog. Add to that the many wood orders I have been receiving (thank you!) and the fact that both Keith and I are fighting this cold/flu thingy that is going around, and you will understand why I haven’t posted. It has been a crazy month to start out the new year, to say the least. 


Our kitty Richard is doing better, though, so that is a relief. So many of you have been wonderful and have asked about his progress. I think we are finally past the severe liver infection he had and all of the subsequent damage that had caused him. At least things seem to have settled down in that department so that is one worry we can check off the list. It is with 'guarded optimism’ that I say that he is well on the road to recovery. Yay for that! 


Through all of our cutting and coughing and blowing our noses, we have still been able to do some work that has kept us busy. I think that is one good thing about being self-employed. We get to slow things down a little when we aren’t feeling our best and for the most part, it can go unnoticed. After spending the weekend finishing up my SLDP256 Winter Songbirds Painting pattern, I spent a couple of days packaging and mailing out orders. While everyone was wonderful about taking my time to get them out, I knew for myself that I have other things on deck and wanted to get them filled and shipped as quickly as possible. It felt good to be so busy. 


Keith worked on some new things as well this past week. He not only has a new free pattern posted on our site, but he also has a new welcome sign that can be personalized to fill your own needs. 


I’ll start with the new free pattern … 


We really try to change our new free patterns periodically, but sometimes that task falls to the bottom of the list. We are so fortunate that we are busy. We always appreciate that and wouldn’t have it any other way. 


You can go to our Free Patterns & Resources page to find the new free scroll saw pattern:


I think it is a cool and fun sign that can be used in a variety of ways. We hope you enjoy it. 


Keith’s next new scroll saw pattern is a beautiful and elegant welcome sign that can be personalized by you to hold your family name, address numbers or any appropriate greeting. (SLDK705


This pattern comes with a full alphabet so you can change the pattern to accommodate whatever suits your fancy (within reason.)  It’s clean cut lines and pretty lettering would fit in just about any decor. We hope you enjoy it. 


As for myself, I finished the pattern for the SLDP266 Winter Songbird Mittens painting pattern and everything has been shipping out.


The pattern is 19 pages long with over 30 step-by-step photos so that even the newest painter can create these lovely mittens. I decided last weekend to do a “pre-order” on the patterns and the Super Combo Kit (SLDPS256) which includes the pattern, the wood pieces, the charms and the silver wire for hanging. The only thing I didn’t include in it was the fur. The response was tremendous and I spent the past week cutting and filling out orders. I am all caught up now though and ready to move ahead to other projects and orders. So it was a great week.


Finally, for today’s post, I wanted to give a little sneak peek of the next project that I am doing with the very talented Lynne Andrews. Lynne and I had so much fun with the “12 Days of Christmas” series that I have been showing you all, that we decided to do another year-long project. This time we are painting a series of “Noah’s Ark” designs that we think will be sure to be fun and delightful for those of you who paint and the recipients alike. The Noah’s Ark theme lends itself not only to children but also to just about any spiritual setting. Lynne’s wonderful talent and adorable critters will certainly make this series one that you will cherish for generations to come. 


In the series, there is a larger, plaque -sized Ark which will show Noah and several animals. This plaque can be used on its own as a decoration, or as the centerpiece of the entire series. In addition to the large piece, there will be 12 smaller Ark ornaments that will somewhat depict a theme for each month. (i.e. January- polar bear, February – moose with hearts, March – Raccoon with shamrocks, April – Bunny, etc.) Each design in itself is fabulous! 


Lynne is still creating the 12 ornaments at this time and I am designing a Prim type dowel tree that can be used to display everything, but those will come later on. For now, we are planning to kick off this project in early March and start the creating process. I am in the process of setting up a Facebook Group in which we can all paint together, as we did with our “12 Days” projects. Lynne will be there to moderate with me as well as Vera and Lynn who helped with the “12 Days”.  We will have videos and articles with tips and techniques and as with our other group, we will have the support of our fellow painters so that we all have a wonderful, positive and successful painting experience. I hope you join us! 


I have the surfaces ready to purchase up on my site right now so if you are interested, you can order them and be ready. The SLDPK157 is for the set of three two-piece, bevel-cut ornaments and the SLDPK158 is for the larger two-piece plaque. I ask that you order as soon as you decide so I can work on getting the pieces to you as soon as possible. I have no idea how many will be ordered, but as always, I will do my best to get you your pieces in a timely manner. Since each piece is hand-made, it does take a little time. I am so happy that you understand that. 


Lynne tells me that the patterns will be available on her site (www.lynneandrews.com) by the beginning of March. I will not be selling her patterns, but I am sure you will enjoy shopping at her site. She has so many other wonderful patterns as well, and I know you will want to get several of them. 


So that should about do it for today. I am sending out a newsletter to our Subscribers later on today to announce these new project patterns, surfaces, and sales. If you are on our list, please look for them by the end of the day. 


It is good to get back into the swing of things. I hope to be posting more here as things get back into a routine. But for now, I just post when I can. I wish you all a wonderful day and a happy weekend ahead. 


Happy Friday to you all! 


via Tumblr http://davidpires578.tumblr.com/post/156444832014

Thursday, January 26, 2017

stamp on both sides

stamp on both sides of the case and blank cards inside

via Tumblr http://davidpires578.tumblr.com/post/156422808839

Hidden Desk Apotheca

Hidden Desk Apothecary Cabinet | Knock-Off Wood | Bloglovin’

via Tumblr http://davidpires578.tumblr.com/post/156422808619

'Sunset' a box for R

‘Sunset’ a box for Rachel - by Andy @ LumberJocks.com ~ woodworking community

via Tumblr http://davidpires578.tumblr.com/post/156420865424

how to build a vinta

how to build a vintage style mail sorter to organize shoes Remodelaholic

via Tumblr http://davidpires578.tumblr.com/post/156420865189

Tripped over the pil

Tripped over the pile of shoes by the door recently? Here’s a practical set of shoe racks to keep that from happening again!

via Tumblr http://davidpires578.tumblr.com/post/156420864819

How To Build A Farmh

How To Build A Farmhouse Storage Bed with Drawers #furniture #bed #space-saving

via Tumblr http://davidpires578.tumblr.com/post/156420864269

A Totally New Rubber

A Totally New Rubber Band Gun, For Old Time Fun.

via Tumblr http://davidpires578.tumblr.com/post/156420263924

Feed

Feed

via Tumblr http://davidpires578.tumblr.com/post/156420263744

Extragroß:

Extragroß:

via Tumblr http://davidpires578.tumblr.com/post/156420263639

Custom Made Hard-Edg

Custom Made Hard-Edged Box

via Tumblr http://davidpires578.tumblr.com/post/156420263494

Tuesday, January 24, 2017

A Ming-Inspired Cabinet (83)

At last I am dug into the work on the bifold doors, the last construction step in this extended build. With two cabinets, that means 8 frame and panel doors to construct. Some of the parts for this, like the panels, were milled and taken to near-finish many months ago. The hinge stiles were milled 3 or 4 months back. Some parts are more recent productions, but in all cases, I have taken my time to work the parts down to dimension in stages, wanting the pieces as straight and square as possible.

At this juncture, I have all of the parts for these doors in some stage of processing. the stiles, for example, are processed to shape, length, and dimensions, and have been mortised:


These mortises are off the hollow chisel mortiser, deliberately cut undersize (using a 5mm hollow chisel) so I can clean them out afterwards on the pattern mill with a ¼" (6.35mm) bit:

 
The two step approach avoids the unpleasant outcome, more common with the smallest hollow chisels, of the auger wandering slightly in the cut and causing a mortise with little round marks on the side walls. As these are through tenoned, many of them will show, doors open or closed, and I want the mortises to be free of any glitches, so I mortise in two steps rather than one.

The hinge stiles and hanging stiles are all in ‘L’ sections:


The 'L’ form allows for good support at the mortises for the rails, and keeps the exposed frame on the front quite slender, which allows for a maximum visual impact as far as the panels are concerned.

After opening the mortises to size on the mill, some chisel work is then required to clean out any remaining bits and produce the completed mortises. Then it is time to fit the rails, which were tenoned several weeks back.

Here’s the first door ladder frame assembly:


Another view:


At this point the tenons are proud and un-wedged. Later the mortises will be flared, wedges driven in, and the ends trimmed flush.

Another look:


At this juncture, 3 ladder frames are done, and another day or so should see me to the completion of that work. Then the panel need their dovetail trenches and the top and bottom rails will need to be tackled. One thing at a time….

While working on the doors, I am moving the shelf parts through finishing:


I have to be careful not to dribble any finish onto the end grain portions of the miters.


Frame and panel work is certainly more difficult to finish than other forms of construction. You can’t just spray the assembly with finish, as is so common these days, and once the parts are assembled additional finishing will be required, great care taken not to dribble finish into the expansion gaps for the panels.

The shop remains quite cold, but humidity is low, so the finish dries pretty quick. Still, I am doing just one coat a day, letting the finish get just that little bit harder before sanding between coats.

Onward and upward. Thanks for visiting the Carpentry way - hope you enjoyed your time here.

via Tumblr http://davidpires578.tumblr.com/post/156329702549

Thursday, January 19, 2017

A Ming-Inspired Cabinet (82)

Nothing but chisel work huddled next to a heater for the past couple of days, getting the trenches cut for the shachi-sen. At last, today, they are all done, along with the pins themselves:


The pins are not driven in yet of course.

Another view:


Afterwards, while routing the dado for the shelf panel in a rail, I unexpectedly had a chunk of bubinga blow out:


It’s not a visible area unless one takes the shelf out and flips it upside down for inspection, however I patched the area anyway (forgot to take pictures too). All the rest of the dadoes were done by climb-cutting, so there were no further problems.

Just for a look see, I slipped a frame assembly into a cabinet:


With the shachi-sen untrimmed, of course it cannot slip all the way back into position, and a notch is required on one side to clear the backing strip at the carcase side. Soon enough.

These shelves will have a more interesting front edge to view, once the pins are trimmed flush, than the previous slab shelves:


Panels have also be trimmed to size, rebated for a tongue all around, and are entering the phase of the second coat of finish:


All for this round. I should be done the shelves in the next day or two and can at last turn to finishing up the final construction phase, namely the bifold doors.

via Tumblr http://davidpires578.tumblr.com/post/156099069704

My Journey As A Creative Designer - Woodworking and Beyond #1815: It's All in the Details

It really feels good to get back to creating. The last month and a half went by so quickly. Between the holidays and the chaos of having my beloved pets ill, it seemed that with a blink of an eye the month of December and now most of January is behind us. I wish I could say that I was more productive. But I spent my time doing what needed to be done and taking the time I needed to deal with these personal things. 


I know I am working my way to a better place because there are so many ideas that are creeping back into my head. I have even been able to sit with my embroidery in the evening to wind down. It is a relief to see this happening, as I was beginning to wonder if I would ever feel the same again. Little by little the ‘pink cloud’ is returning and along with that, my optimism. I am learning that experiencing illness and death is part of life, and it only serves to help me appreciate the good days even more. It is easy to be optimistic when things are going well. But much more difficult to do so when things are not so good. That is when we need to reach inside ourselves and try to focus on the things we do feel good about in our lives and embrace them with all we have. It helps pull us through our darkest days. 


I finished up my SLDP256 Winter Songbird Mittens project yesterday. The last time I showed them to you, the main painting was done on them and they looked nice, but I knew I wanted to add some other touches to make them look even better. I had a vision in my mind as to how I pictured these, and they were close, but not quite there. It was fun to put the final touches on them and see them come to life. 


My friend Vera was a great encouragement for this project. I had mentioned to her that I was thinking of painting some winter birds and she was probably my biggest cheerleader. She “gently” kept reminding me to get moving on them whenever we talked or posted on Facebook, and it was just the push I needed to indeed get moving and get something accomplished. Good friends are like that. They know when to push and when to back off. 


I had many winter animal and bird ideas for these mittens, but for this first set I chose the English Robin:


The Bluejay:


And a Cardinal:


I thought this trio would make a beautiful combination for a set of lovely little mittens. I have several other ideas for animals and birds and may expand on it later, but for now, this is a nice representation of how I pictured the project. 


Since my last photos, I decided to add some metallic silver shading around the oval frame of the mitten. You can’t see in the photo, but I also did this to the sides of the pieces. I then painted two coats of DecoArt Glamour Dust paint in Silver over these areas to look like sparkly silver sugar. The effect is subtle, but in person, they are really beautiful. (I used all the beautiful DecoArt Americana paints for this project.)   I then used some silver wire for the hanger, along with a couple of pretty silver metal charms. I added a glass snowflake aurora borealis charm for a beautiful glimmer and finished the mittens off with a white boa cuff. 


I had debated on whether to use the boa on my mitten or not. I didn’t want it to overpower the design. But when I considered painting a fur cuff on the edge, I knew it just wouldn’t have the same impact as the feathered boa does. I did have to trim my boa a little bit to shorten the feathers. That worked fine and while it was a little messy, it vacuumed up very quickly. The result is a fun piece, which is filled with textures and interest. The striking contrast of the birds against the soft backgrounds allows them to still be the center of attention, even with all the embellishments. I am happy with the project. 


Today I will be writing the instructions. In order to do this properly, I will be painting the mittens again so I can take step-by-step photos for the pattern. I really believe that anyone can do this project successfully – even if they are a newer painter.  I also plan on offering a 'kit’ for this project which will include the pattern, wood pieces, wire, and charms. I decided not to include the boa in the kit because they are available very cheaply on Amazon or in local fabric stores. It would be cheaper and easier for people to get those themselves. 


So that is my plan for today. Keith also has been working on some new patterns and put a new scroll saw pattern up on the site last night:


It is an addition to his “Self-Framing Leaf Bordered” series and it is (as you can see) a Howling Wolf (SLDK244)  He is also working on another project and we should have that up on the site by the update later on this weekend. We hope you all enjoy it. 


After what seems like an eternity of 'time off’ at our busy season, it feels great to be productive again. While working doesn’t remove all the sadness in my heart of late, it does help me put things in a good perspective. If I focus on the positive things in my life, they will certainly remind me that I have much to be grateful for. I can’t forget that. 


Have a wonderful Thursday. 


via Tumblr http://davidpires578.tumblr.com/post/156081323479

Tuesday, January 17, 2017

My Journey As A Creative Designer - Woodworking and Beyond #1814: Back to Creating

I spent the long weekend working on a new painting pattern set. While I have had this idea in my head for quite a while now, I had to just bring myself to do it. I don’t know why I am always so timid about jumping into a new project. There is sometimes a fear that it won’t come out like I envisioned it in my head. You would think that after all of these years of designing that I would be over those fears and have more confidence than that. But that isn’t always the case. 


I find that I am drawn to the soft, pale blue tones of winter. Every year around this time when I am designing projects, I tend to gravitate to the same tonal color palette. When I am asked what my favorite color is, I usually respond with something in the ‘blue-green’ family, such as turquoise or teal. But for winter artwork, I love to use muted tones of blues and grays. Cool tones to represent the quiet calm of winter. I suppose it is all connected to mood. 


The bunny snowflake that I showed last week is an example of this. I loved the way that turned out so much that I wanted to create a set of winter birds with similar colors. While I have other ideas for a set (or several) of polar animals in similar tonal settings, I also wanted to show a set of birds. Unlike the animals that tend to blend in with their backgrounds, these birds offer a striking contrast to their surroundings. I thought this would make some lovely ornaments and marry the elements of the subtle, soft backgrounds with the vivid subjects of each piece. Below is my result:


You can order the ornaments from me here: SLDPK130. Of course, these don’t have to be made into ornaments. I think that they would be lovely on any type of framed surface. The simple backgrounds are easy to extend into just about any shape, and they would also look nice in other media such as colored pencil or even watercolors for those who are adventurous. 


I haven’t quite completed them yet. I still have the final embellishments to add on to them and the final touches. These last steps will make them truly special, I think. I hope they are received well. I will show them tomorrow after they are complete. 


I need to re-paint them now for the pattern packet. This way I can take step-by-step photos of the process so that I can better teach the technique that I use. It is really simple when broken down into steps, and very forgiving. I hope to have the packets available by the weekend. 


We spent our Monday doing errands. Unlike the USA, Canada did not have a holiday yesterday. We had to go to Yarmouth and shop and stock up on things. That took just about the entire day and I didn’t accomplish much work-wise.  


My kitty Richard had a small setback over the weekend, too. That kind of threw me for a loop, as it put my nerves on edge again. Once again, our vet came through and after a good discussion with him, I came to realize that I need to prepare myself for good days and not so good days with Richard. It is part of what afflicts him. I can’t fall apart every time he has a setback and just need to know how to work with things to get him back to a good place. As with most things in life, it isn’t all black and white. Much of what we will experience will be somewhere in the gray areas. The goal is keeping him comfortable and happy and having the remainder of his life as good as possible. I was happy to see him doing lots of “cat things” when we returned home. He was active and playing and acting more like himself. His little 'hiccup’ has passed he is back to his calm and happy place. We hope it stays that way. 


Again I want to thank everyone for your kind notes, comments and even gifts regarding my kitties. As pet lovers, you understand the huge amount of stress and distraction that we have when our fur babies are ill. I appreciate everyone’s patience, and I promise that I am trying my best to get back on my feet again and find my way back to my “pink cloud” way of life. I enjoy the role of being an optimist. Sometimes we need to 'act happy’ to 'be happy’. I am giving it my all. 


With that said, it is up to the shop for me today to cut orders. I will then finish up my embellishments on these mittens and then re-paint them for the pattern packets. I think that by breaking them down into simple steps, any of you can do them. :) 


I hope you agree. 


Have a beautiful and creative Tuesday!  


via Tumblr http://davidpires578.tumblr.com/post/155992221004

A Ming-Inspired Cabinet (81)

Continuing on with the work on the shelf frames. After cutting out the tenoned joint halves on the mill, all that remained were the open mortised joint halves, also cut on the mill. I didn’t take any step-by-step photos of that process, being a bit excited to see the outcome. There were a few tricks to the process, but I wanted to know if the method I had come up with on the mill would produce parts which required little or no final fitting work, so I just kept cuttin’.

Here then are the freshly milled joints on the long rails:


Those slots could have been cut completely cleanly had I possessed a flat-toothed rip blade for my tablesaw, or an appropriate dado/slotting head for my shaper. Those items are on the shopping list.

Instead, I mortised the end wall with my hollow chisel mortiser, using a slightly undersize bit, and then took my ATB rip blade up close to the end wall. It did the job.

Just a little chisel clean-out was required at the root of the open mortise:


Followed  by a pass or two with a Magicut file:


Bubinga is sufficiently hard that metalworking files are suitable at times.

Cutting of this joint primarily by milling machine seemed like a good idea, and I took pains with my set ups and fixturing - not that improvements couldn’t be made for next time (duly noted) - but there was no way to know the outcome fit-wise until the cut out was entirely complete.

To my delight, he first frame fitted together with no additional work, and the joints were just the right amount of tight:


A look at the four corners, from one side at least:


I thought the outcome proved once again the utility of a pattern mill for joinery work.

A look at a couple of the exposed tenon ends:


I was very pleased with the results, as the other frames came together with a similar lack of fussing around:


On the second one down you can see one the end grain of the tenon the patch which was put in to repair a defect in the stick.

Now then, while much had been gained, much also remained, cut-out wise. The trenches for the shachi sen needed to be laid out and cut. The layout is simple enough (though easy to confuse as well):


For more info on shachi sen mitered joints, you may wish to take a look at my TAJCD Monograph #1, found in the sidebar to the right of the page, which is devoted to that topic.

The lines from the edges were then transferred down faces of the tenons and cut out could commence. Here I am paring against the grain of the cheek face to start, a normally ill-advised move for which I have my reasons:


I got dug in at that point and didn’t take another photo until I was complete through the first corner. While cutting the trenches on the tenons isn’t too bad, given that one can push a chisel from either side, the trenches inside the open mortise walls were another matter. These have only 0.3125" of height, for starters, and they are blind as well, and they against the grain down the face. I find them among the most difficult sort of things to cut.

The first one came out like this:


With curly bubinga a bit of chip out, as you can see at the left side of the lower trench, is hard to avoid. It was nice, in a way, to be reminded of that with the first joint corners. I will be be able to correct that fortunately.

After a couple more hours, I was through the first three corners of the first frame. That leaves 13 corners to complete, albeit only the open mortise halves of the joints need tackling as the trenches on the tenons are all done. It’s likely to take another day in the shop to get through that lot, and then I will make the shachi sen (wedging pins) and fit them. Then the shelves get fitted, and notched for the shelf pins, before finish planing and finishing can commence.

All for this round - thanks for visiting. Comments/questions always welcome.

via Tumblr http://davidpires578.tumblr.com/post/155992220869