Friday, March 10, 2017

My Journey As A Creative Designer - Woodworking and Beyond #1827: All That Glitters

It has been a wild and incredibly busy week. I have spent most of my days up in my shop, working on cutting my wood orders. It is difficult to call it ‘work’ because I do enjoy doing what I do so much. With the release of Lynne Andrew’s Noah’s Ark series last week, there has been a huge rush to purchase the wood pieces from me. Along with this have been our regular orders and all the other business tasks. I never in my wildest dreams could have imagined being in such a wonderful and productive place for our business. I am so grateful.


In order to keep my sanity and not get burned out in the process, I have been adhering to a strict limit of my time in the shop. I have been closing things up at 6 pm (or thereabouts) and I have allowed myself the evenings to be 'free’ to do as I please. After all – I get up pretty early and start answering emails and doing paperwork early – not to mention this blog – and I am smart enough to realize that if I spend every waking hour pushing myself hard, it won’t be long before I either get sick or tired of doing it. I have to have some down time, too.  I have made this apparent to those who see me online and I have sent messages to my customers who ordered that I am doing my best and it may take a little longer than the usual 1-2 days for me to ship things out. Everyone so far has been wonderfully understanding and hasn’t had a problem with it. Sometimes just hearing the words (or reading them) from people makes all the difference in the world. Instead of feeling tense and pressure about the influx of orders, I feel happy and thrilled. That is how it should be. 


With that said, after a day in the shop yesterday, I spent my evening 'playing’. When Keith went to the “postie” (my word for mail) I had received one of my shipments that I ordered of alcohol ink.  I was beyond excited!  Last week I was looking for some German Glass Glitter in black for some new Halloween designs and to use when I paint the designs from Amy Mogish's upcoming Halloween Ornament Club. (You can read about that HERE. It is going to be AMAZING!) 


I have done several projects now with Amy, providing the wood pieces for her adorable painting projects, and it has been a lovely relationship. For Christmas this past season, she sent me this beautiful “Glitter House” (which is much like the German “Putz Glitter Houses”.  Google them if you want to know more!) 


When I saw the house, I knew that it would fit just beautifully with my skating pond scene that I have set up on my sideboard for the winter:


What I noticed most about this charming piece was the incredible shine of the glitter that Amy used:


The sparkle was amazing and it was not like anything I have ever seen. (And you know how I love sparkle!)  


I asked Amy and she said that it was German Glass Glitter. She said it came in colors and she used black for her Halloween ornaments for the upcoming club.  I knew I had to have some.


I began my search online and found that it was very expensive. A small package (about a tablespoon) ranged in price from about $6 US to about $15. And that was prior to shipping to Canada!  I am not a cheap person, but I know I would be using LOTS of this for subsequent projects so I kept up the search. (Yes – that is what I do in my time off!) 


Amy had told me that she used FloraCraft Diamond Dust for the clear on my house and I also looked for that. I found a sizable jar (14 oz) on Amazon.ca for about $16 CDN with free shipping. (It is also on Amazon.com for those in the States)


I received it very quickly and it is truly beautiful. It is fine shards of glass. “Flakes”, if you will. 


The shine is awesome!  I was thrilled with it, but me being me, I wanted it in COLORS.  So I kept searching… 


In my internet travels, I came across a photo of someone using Alcohol Ink to 'dye’ the glass glitter. I researched further and found a video of her doing just that. I had questions about it, though, as the video was very brief. So I looked up Alcohol Ink and came across the Pinata brand by Jacquard.


They had a nice sampler “Exciter Pack” on Amazon.ca and I jumped in and bought it. I am still waiting for it now, but after I ordered, I remembered that Dharma Trading out of California carries Jacquard products and I checked to see. They do carry the FULL LINE of “Pinata” inks! and the Exciter Pack that I bought the day before was about half the cost of what I paid! (Live and learn!)  But I decided to order up on the colors that were not included in the “Exciter Pack” and they arrived yesterday. (I am still waiting for the Black, but it should be here any day!) 


They had a light orange color that they called “Tangerine” and I tried that first. I put some of the glass flakes in a glass bowl. (NOTE: This is GLASS – It is NOT for using with kids and you need to be very careful with it. It is for decorations that are to be respected and not “played with” or handled, as the glass can 'bite’ you if you get it on your hands. Do not use near kids or pets and keep it tucked away. Use COMMON SENSE!) 


I added a couple of drops of the Tangerine ink and stirred it around with a fork. At first, it stuck to the drops, but the fork broke the pieces apart and distributed the color evenly after a couple of minutes. On the video, the girl used a ziploc bag, but I felt the static in the bag would make the glass stick and hard to get out. I like the bowl better. I liked the white bowl, too because I could really see the color and also when I cleaned I was sure that none was left in it. 


The result was stunning!  


I made some in Chili Pepper red next with the same beautiful result. 


Finally, I tried the Metallic Silver to see if the metallic would dull the glass. 


I am thrilled to say it looked like Mercury Glass almost, similar to a mirror.  This will be a wonderful addition to my creative arsenal! 


The shine is simply amazing:


I wish that the pictures did it justice. I can’t wait to try them on real projects! 


I posted this on a painting page and there were several questions from the girls. I am going to do further testing to see how this works in practical application. It was late when I finished up and I promised a post about the process this morning. Amy says she uses clear-drying white craft glue to adhere her glass to her houses and ornaments. I will try that with a couple of common brands. I also suggest that the glitter is applied OVER varnish and that you do NOT varnish over it. I never varnish over my glitter, anyway. I would think it would dull the beautiful shine that sets the glass glitter apart from the plastic stuff. 


I am also going to see how it works with different bases, although I think that dried acrylic sealer wouldn’t pose any type of issues at all. The Alcohol ink does reconstitute using alcohol. So that will be avoided in order to avoid running. Again – common sense prevails.  


Any tests that you all have tried is also welcome. I promise to explore this subject further. But for now, I am THRILLED that I have found a very economical solution to colored glass glitter! I think it has lots of promise. 


That is all for today. I am going to be packing up orders all day and called in the reserves (Keith’s mom!) to help me. 


I hope you all have a wonderful day and a great weekend. Enjoy it to the fullest and have lots of fun! :)


Happy Friday to you all!


via Tumblr http://davidpires578.tumblr.com/post/158229964364

Monday, March 6, 2017

My Journey As A Creative Designer - Woodworking and Beyond #1826: The Business of Running a Business

I think that most who hear that I design for my living and have my own business have visions of me spending my days in the dreamy wonderland of creating… lolling away the hours overlooking the rolling meadow or gazing out to the ocean, drawing or painting my heart out to the sound of the lapping water on the beach. It is truly a wonderful thought, isn’t it?


While I have been able to experience days such as I described, they are few and far in between. As our little business grows, the daily part of running it seems to take up more and more time and less time is left to be creative. 


I am not complaining about this at all. I am thrilled and amazed at the directions we are heading. I truly enjoy every part of the business and as I often say, switching from wearing one hat to another keeps me excited and ‘hungry’ for the next new project. There is not really time to get stale and burned out. There is always something wonderful ahead. 


The unfortunate thing that I find about cutting lots and lots of wood pieces is that it doesn’t really make exciting blog material. Here is a photo of two days’ work:


It doesn’t really thrill most of you, does it?  LOL! 


But it DOES thrill those who ordered from me, as they are looking at their 'future heirlooms’ as I call them and dreaming of how they will look finished. (I must admit, I do that, too! That is one of the best part of 'knowing’ your customers. You get to imagine the wonderful places that these pieces will travel and the amazing transformation they will take with the touch of the magic brush!)  


OK.  I am a little romantic about it. But it really is true. Being both a woodworker AND a painter helps me understand things a little better. Things like the importance of accurate cutting and the thrill of taking a piece out of the box and NOT having to touch it with a sander. These are the things that painters look for when buying surfaces. This quality, I feel, will be my 'edge’.  The positive reinforcement that I receive from my customers only makes me want to strive to do even better. It really makes a difference. 


After cutting on Friday and Saturday,  I then needed to pack this first batch of many that will be heading out the door. Fortunately, Keith’s mom came over and helped me pack up the shipment. It truly takes most of a day to get to this point:


If things keep on going in this direction, I may have to hire her permanently. We had a dinner of “Subway” to thank her for helping (which wasn’t our usual meal when mom is over). But Keith said, “even slave labor has to eat”, so I sent in the kitties to offer up some extra cuddles to show our gratitude. They seemed to do the job. ;) 


The week for me will be a cycle of cut and pack. This pile was about a quarter of what was ordered over the weekend, so I have a lot on my plate and you may not hear from me too much. But have no fear, I will be busy dreaming of the beach and the rolling waves and of all my new projects that I will be drawing and cutting and painting while I am doing these orders. By the time I finish, I will be anxious to start to see them come to life. Hopefully, there will be a burst of projects then. I can’t wait to show you all what I am thinking of! 


On a final note today, I wanted to show you Keith’s new design:


His SLDK710 Filigree Standing Tree pattern is already a big hit. We did an update to our site on Saturday and we were happy at how many loved this pattern. I am sure that Keith will be working on similar patterns that will enhance your holiday decorating. They should be awesome. 


That is all for today. I have to get to my shop and get busy. To all those who ordered – thank you so much. You all make my life fun and exciting and I enjoy working for you so, so much. 


Have a wonderful Monday! 


via Tumblr http://davidpires578.tumblr.com/post/158066774229

Saturday, March 4, 2017

My dominoes have bee

My dominoes have been a huge hit.

via Tumblr http://davidpires578.tumblr.com/post/158003909739

Friday, March 3, 2017

My Journey As A Creative Designer - Woodworking and Beyond #1825: Just "Wow"!

I am very pleased with the way things are going these days. It seems that many of the things that I have been planning over the past several months are all coming into reality, and so far the result has been more than I could have ever asked for. 


I love working with other designers. (Are you seeing a theme here?) Having a “partner in crime” that you admire and trust really does make a difference. Not only are you motivated to do your absolute best, but you also learn a great deal from a fellow artist. This knowledge and experience is something that is difficult to measure. 


Yesterday, I spoke of my project that I have been working on with Amy Mogish of Classic Amy Joanne. While the launching of that project is still several weeks away, the response was really great and I am sure that it will be a smashing hit!  I can’t wait to paint the ornaments myself. It will be fun and I will also learn from Amy’s techniques, which are new to me. 


The other ‘big project’ that I have been working on is with one of my favorite designers ever – Lynne Andrews. Many of you who read know that Lynne is the wonderful designer who created the “12 Days” series that I am working on. (I am on Day 11 – times SIX sets!  Almost done!)  Last year I began a Facebook Support Group Page and we had, and are still having, a wonderful time painting, learning and making lasting friendships. I think that by the looks of it, this group will be doing the same. It promises to be a wonderful and fun creative experience for all – whether you are painting the project or not. 


While I was busy getting surfaces ready and designing the dowel tree that will be used to display and present the ornaments, Lynne was busy painting and writing instructions. Both of us are like two peas in a pod. We are both happiest when we have lots of creative things going on at once. To say that we are in that situation now is an understatement. 


Last evening, Lynne called and said she 'finished’ with the ornaments. She sent me a picture of the full set with the larger plaque. This was the first time I saw everything together, too. While I knew without seeing anything that they would be good, I was still floored when I saw them. They were better than I could have ever imagined! 


Here is a photo of the finished group: 


They are pretty darn cool!  Lynne thought it would be a good time to 'reveal’ the set on our group page  - Inspirational Ark Series by Lynne Andrews and on our other Facebook painting pages. The response was amazing! It seems that others are just as excited as we are with this wonderful project! Our group membership skyrocketed and everyone can’t wait to begin. 


If you want to join our group, you can click on the link to the page. We have this group as “closed” to keep out spammers, so we have to approve your membership. You don’t have to be painting the pieces to join and it costs nothing. We are happy to have anyone there who wants to even just watch and encourage the members. 


Lynne will be posting some great, short videos which will show techniques. We all will be there to share tips and answer questions and it is modeled after a face-to-face painting groups. The sole purpose of the group is to share creativity and joy. If it is anything like our “12 Days” group, it will be a wonderful success. I see that many of the same members joined so I expect only good things. :) 


Lynne will be selling the patterns for the series on her website at http://www.lynneandrews.com. She is getting them posted there this weekend. 


I am selling the Ark ornament and plaque pieces on my own site on the “Surfaces” page: http://www.sheilalandrydesigns.com/painting-surfaces . I have lots of orders already and I will be doing my best to get them out as quickly as possible. I tried to have a stockpile of some extras, but they went out the door immediately. It is a good problem to have, though, and I am sure everyone understands if there is a slight delay in getting their orders. 


I really hope you all decide to join us. 


We are also doing a site update tomorrow. For those of you who are interested in our scrolling patterns, Keith’s wonderful offer on this Self-Framing Leaf Bordered set will expire tonight. I want to be sure you know so if you are considering it, now is the time to move. 


It is a great deal and the plaques are just beautiful! Every one of them is filled with detail! 


So that is it for today. I have to get to my cutting and work. You can look for an update tomorrow as we are sending out a newsletter. 


Thank you all so much for your support of our little business. All I can say is just “Wow!" 


I wish you all a wonderful day and a beautiful weekend. Happy Friday to you all! 


via Tumblr http://davidpires578.tumblr.com/post/157944152314

Thursday, March 2, 2017

My Journey As A Creative Designer - Woodworking and Beyond #1824: More Great Adventures

As usual, it has been a wild and crazy week. Monday was spent finishing up sending out orders and (what else?) organizing some more! I suppose when I get on a roll, I really get into it. My office, as well as my shop, is so fine tuned right now it is amazing. I only have one more section to do that houses my needlework and embroidery supplies and I am totally good to go! That section isn’t too bad, though, and I think that will need to wait for another time. I have so much to do to move forward! I have so many exciting things that are coming up soon and I can’t wait to share them with you!  


I will begin by talking about a project that I am doing with Amy Joanne Mogish. (You can visit her website and see her wonderful work and read her blog at https://classicamyjoanne.com/ ) Amy and I have worked together on some other things where she provided beautiful designs and I cut her wood pieces for her. She is a very talented artist and has her own unique style that I absolutely love. When she asked me if I would like to work on another project with her, I was on board in a millisecond! I couldn’t wait to hear what she had in mind.


The project is what Amy calls her “Classic Halloween Ornie Club”.


How it works is that the members will be sent four mailings, to be sent out in June, July, August and September. Each mailing will consist of three patterns and three two-piece bevel-ornaments to paint. The members will also receive instructions to create the flag banner and ornament tree as well as a 20% coupon from Amy for a one time purchase of patterns, surfaces and books and other ‘treats’ as well. I am also offering a 20% off one-time use coupon for members only. You can read more about the club on Amy’s blog here: https://classicamyjoanne.com/2017/02/27/classic-halloween-ornie-club/#more-6265  


The 12 ornaments are absolutely adorable! 


I will be painting them as well! Each one is done on a chalky base but embellished with beautiful ground glass glitter! 


The painting is not difficult and at a level that even a beginner will have wonderful results! I am going to be painting a set myself and I will certainly share my progress with you all! I have some ideas about some things that I will be sharing, too, so hopefully, you will learn some new techniques that you will be able to apply to your other creative endeavors. 


Sign ups have started for the club already so that I am able to provide her with the wood pieces in a timely manner. She already has lots of members, and I expect the club will be wildly popular. I don’t believe there is a time limit to sign up, but by letting us know early, we can better prepare for getting you your patterns and ornaments with the first mailing. I hope you go check it out. :) 


I was going to tell you of some other adventures that I am working on, but I think I will save that for another day. I have a full day of cutting orders again and want to head up to the shop as soon as I can. Hopefully, I will post more often and keep my posts shorter so you can read them quickly. 


I absolutely LOVE working with other designers on these projects. While I have MANY new ideas of my own, I love the thrill of working with some of the ladies that I have admired and respected. I think it is a win/win/win for ALL of us – designers and those who create our projects. It is both fun and exciting and helps us all expand our thinking and skills! The old saying “two heads are better than one” really does apply here. I hope you all agree. 


I wish you all a lovely day today! I hope you enjoy your day and do something that makes your heart sing!  Happy Thursday to you all! 


via Tumblr http://davidpires578.tumblr.com/post/157903320604

A Ming-Inspired Cabinet (87)

When I left off last time I had described some of the difficulties I was facing drilling well-aligned holes in the bifold door hinge stiles. Due to problems that cropped up using the right angle attachment on the milling machine, which would not hold alignment due to starting torque from the motor kicking it out, I had to scrap the original hinge stiles and make 4 new ones, cutting up a precious 4x8" bubinga beam in the process. That was my last stick of bubinga of any decent size.

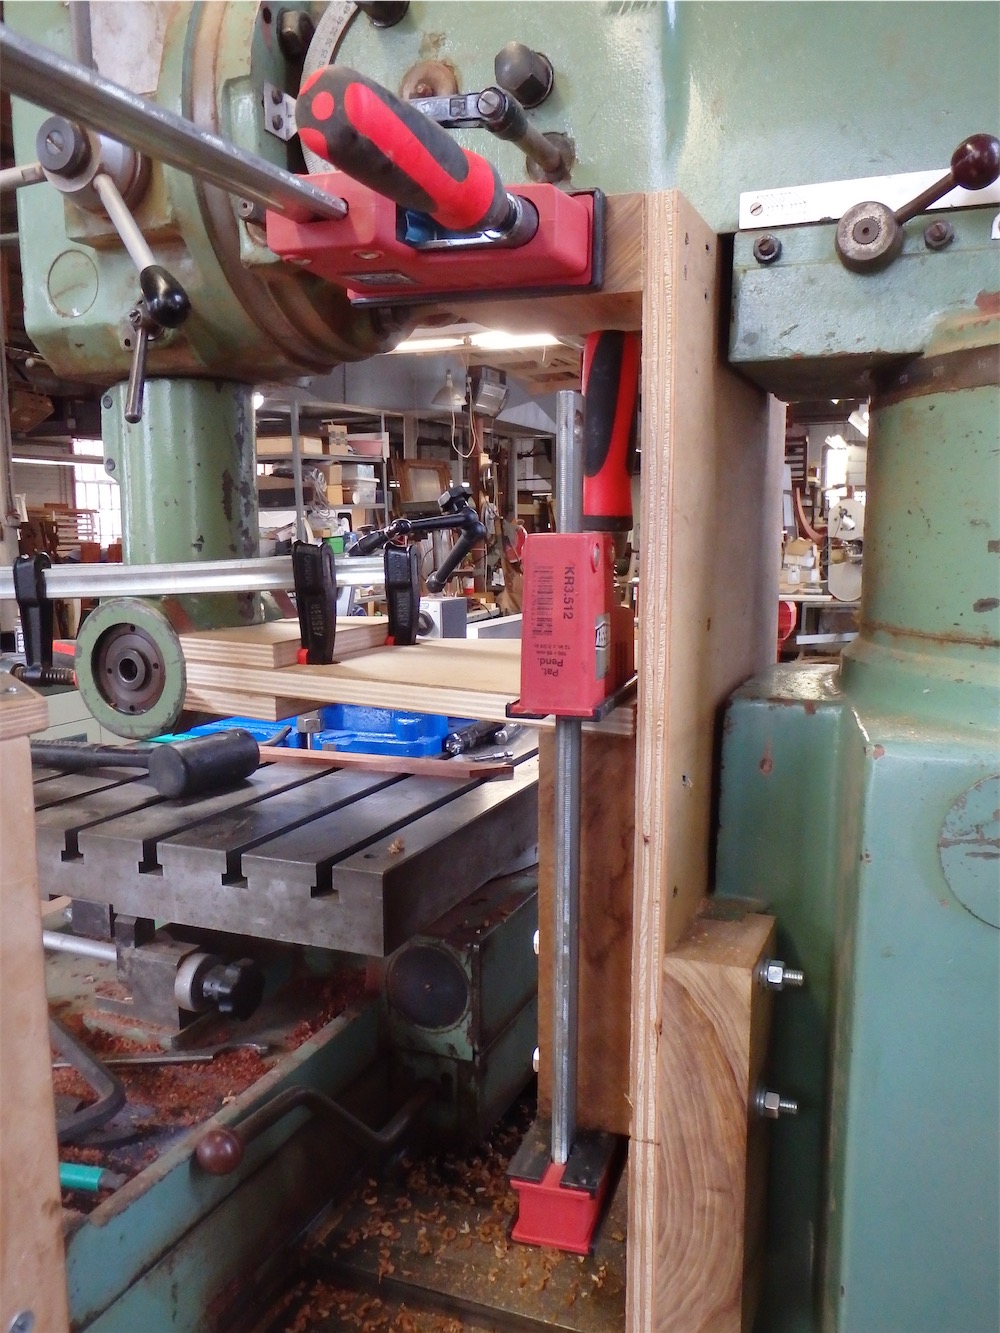
In an effort to stabilize the angle attachment, I put together a plywood gusset and some various blocks to connect it to the column of the mill.

Here’s a look at the arrangement once again:


With considerable fiddling I was able to achieve near-perfect alignment over 5" travel:


 Alas, after countless test start of the motor and rechecks and realignments - i’m talking hours of time here- I was forced to conclude that the gusset wasn’t providing adequate reinforcement.

A reader wrote to me and suggested that a culprit in all of this might be the quill itself, which, due to wear, might be permitting a degree of rotational movement. I was skeptical, as the quill seemed tight in travel if anything, however later examination where I used the leverage afforded by the right angle head, showed that there was in fact slop in the quill. A new and interesting fact to learn.

The quill does have a locking mechanism in the head, however the lock gets stuck once clamped and has to be disassembled to get the quill moving again - a bit of a PITA - so I have been making no use of it. With the awareness however that quill movement in rotation may be a factor, I tightened it up to lock the quill.

After sleeping on it, I returned to the shop today and decided to try remaking the gusset again, only beefier. I wanted it as stiff as possible using what i had on hand, namely a few bits of plywood and various hardwood offcuts.

Here’s the ‘MARK II’:
 

The wood-to-wood connections are screwed and bolted together, but I leave the clamps in there for extra reinforcement:


The plywood connects by way of a pair of Canarywood angled blocks to the sliding dovetail under the ram:


Perhaps the biggest weakness in the entire contraption is the connection to the RA head, which is hardly what one would call a perfect surface. It is also a short surface. i considered bolting metal to it, but I just couldn’t quite bring myself to do that.

I detected some play in the connection so I added some copper shims each side in a bid to rectify the problem:


As it turned out, the 'Mark II’ did offer some improvement, however there still was play, and the the start-up torque simply would find whatever tiny avenue of slop there was in the connections and exploit it. Drilling each hole was a painstaking process of drilling, then re-tramming the mill before the next cut. In this way, while I could not completely eliminate a bit of drift with the RA head, I could keep it to a minimum.

As before, I commenced work putting in the 5/16" x 18 TPI self-tapping inserts. I used a 7/16" (0.4375", 11.11mm) Whiteside end mill to bore out in one go:


I find Whiteside router bits to be more accurate dimensionally than Freud.

In goes the insert, using the shop-made tool:


Done:


Connecting to these inserts are hardened steel pins, originally shouldered bolts, which have had Allen  heads burned into them using EDM technology, a task performed by my local machine shop:


In:


The hardened pins in turn slip into Oilite® plain flanged bearings:


The bearings will mount in the cornice beam atop the cabinet, the lower framing member in the bonnet.

All four tops done:


A good while later, at long last, the lower brass pivot pins were fitted as well:


Golly. What an ordeal that was. “Just need to drill 8 holes” - sounds so simple, and it is a simple task in one sense. But it was one of the trickiest aspects to the entire build so far and I took a beating getting it done. Very frustrating at times. After being sick for a month, and then this setback with the stiles, I am about 6 weeks behind schedule, which is stressing me out a bit, and that hasn’t helped any.

Moving forward, the RA attachment clearly is not ready for prime time. Also, a few days ago it seized up while making test starts. I got it freed up again and lubed it a bit, but it probably needs a rebuild from what I can tell. A least a look-see inside. Likewise, the main head of the mill needs a rebuild. I’ve realized this for a while, given the stiff quill movement and sticking (useless) quill lock, and now I can add to the mix the slop in the quill has rotationally. I’d also like to change from the current tool holding set up with a collet nut and convert to a overhead air-powered drawbar set up to hold tooling. Hopefully his year I’ll be able to tackle that project - at least in terms of getting it going. A specialist spindle rebuilder will be needed to put the unit right.

As for the hinge stiles, I still have some catching up to do in terms of cutting mortises for the battens, and dadoes for the panels. I’m planning to knock most of that off with another shop session, however I’ll omit taking pictures since it is a repetition of earlier work. Within a few days I should be able to put some doors together, so that work will form the subject matter of the next entry in this series.

Thanks for visiting the Carpentry Way.

via Tumblr http://davidpires578.tumblr.com/post/157891580439

Sunday, February 26, 2017

Pencil Box Plans - W

Pencil Box Plans - Woodworking Plans and Projects | WoodArchivist.com

via Tumblr http://davidpires578.tumblr.com/post/157761718544