On many of my projects I place my maker’s mark. Sometimes these marks are hidden, sometimes they are more obvious to view. I often ask the client which they may prefer, and so far people seem to like to see the mark.
In the case of these cabinets, as they draw from many architectural elements, I thought it fitting that the maker’s mark should do something similar. A few years back I made a Japanese temple garden lantern and incorporated gegyō, which are hanging pendants originally used to cover the ends of ridge beams and purlins. On the gegyō I fitted carved bloodwood flowers, like this:

It is not unusual for gegyō to have flowers on them; in fact it is a fairly standard thing. The typical gegyō has a hexagonal flower which is termed a rokuyō. Here’s an example:

Here’s another one:

The same motif shows up in a number of places, for example, kugi-kakushi, or decorative nail covers seen inside a traditional house on the nageshi (a type of tie beam, later just a trim piece, fitted around columns).
I usually employ a stylized Chinese bellflower, and place it within a pentagon. The pentagon is a nod to the Golden Mean. However, I have found many people do not notice the pentagon inlay at all, and merely see the flower element, so I had been thinking about how to address that. For this cabinett I have gotten rid of the pentagon inlay and instead made the flower itself more overtly pentagonal in shape.
While most gegyō are 6-sided, other versions do exist, including pentagonal. Here’s an example of what is otherwise a somewhat rare form:

When 5-lobed, the flower would be termed goyō instead of rokuyō.
With that in mind, I created a new maker’s mark. The surrounding frame is double lozenge in shape, making use of some of the spare door lattice kumiko I had:

The bonnet sill and cap each have a triangular housing to accept the frame:

Then comes the flower, and, after a hole is drilled, the mounting bolt:

The back of the flower has 4 notches cut to fit precisely to the lozenge frame. That was tricky to do but it came out as planned.
Locking the flower down (which in turn helps secure the lozenge frame to the shedua standoff panel), is an ebony ‘pistil’ (the Japanese term for this part is taru no kuchi) and a decorated holly collar (kikuza):

To keep the 'pistil’ as small/short as possible, the metal insert goes in about ¾ of the way, and the holly collar wraps around the protruding bit.
Assembled:

The heart-shaped cutouts are a traditional feature of rokuyō and goyō. The are termed, interestingly enough, i no me (猪の目) which means 'eye of the wild boar’. Not to er, 'boar’ you, but the Japanese word transliterated as 'me’ is pronounced like the English word 'may’
Another view:

The client’s cabinet also has a goyō mark, however it employs different woods so I’ll keep a blanket over that, so to speak, so as not to spoil the surprise. Hopefully the client will like it.
With the maker’s mark fitted, I could now do the final assembly on the upper bonnet frame. The parts were pushed together until the joints started getting tight:

I took a video of the process:
Note that video quality in the first few hours after upload is on the poorer side. The HD version will appear soon enough, once the video has been completely processed by YouTube.
After the pegs were trimmed flush, I put a coat of finish over the peg locations:

Another step remained, and that was to lock the bonnet upper and lower frames together. The client lives in a seismically active area, and the cabinet will have a couple of large hooks holding the top of the cabinet to the wall framing. I needed to lock the two bonnet layers together so they would not come apart under that sort of loading, and, just like the Japanese do, turned to metal fasteners to accomplish that task.
The two halves of the framework were assembled around the shedua standoff to start:

A series of steps were required to counterbore, drill, mark, drill again, and finally an insert could be fitted using the fastening bolt with a nut to jam against the insert:
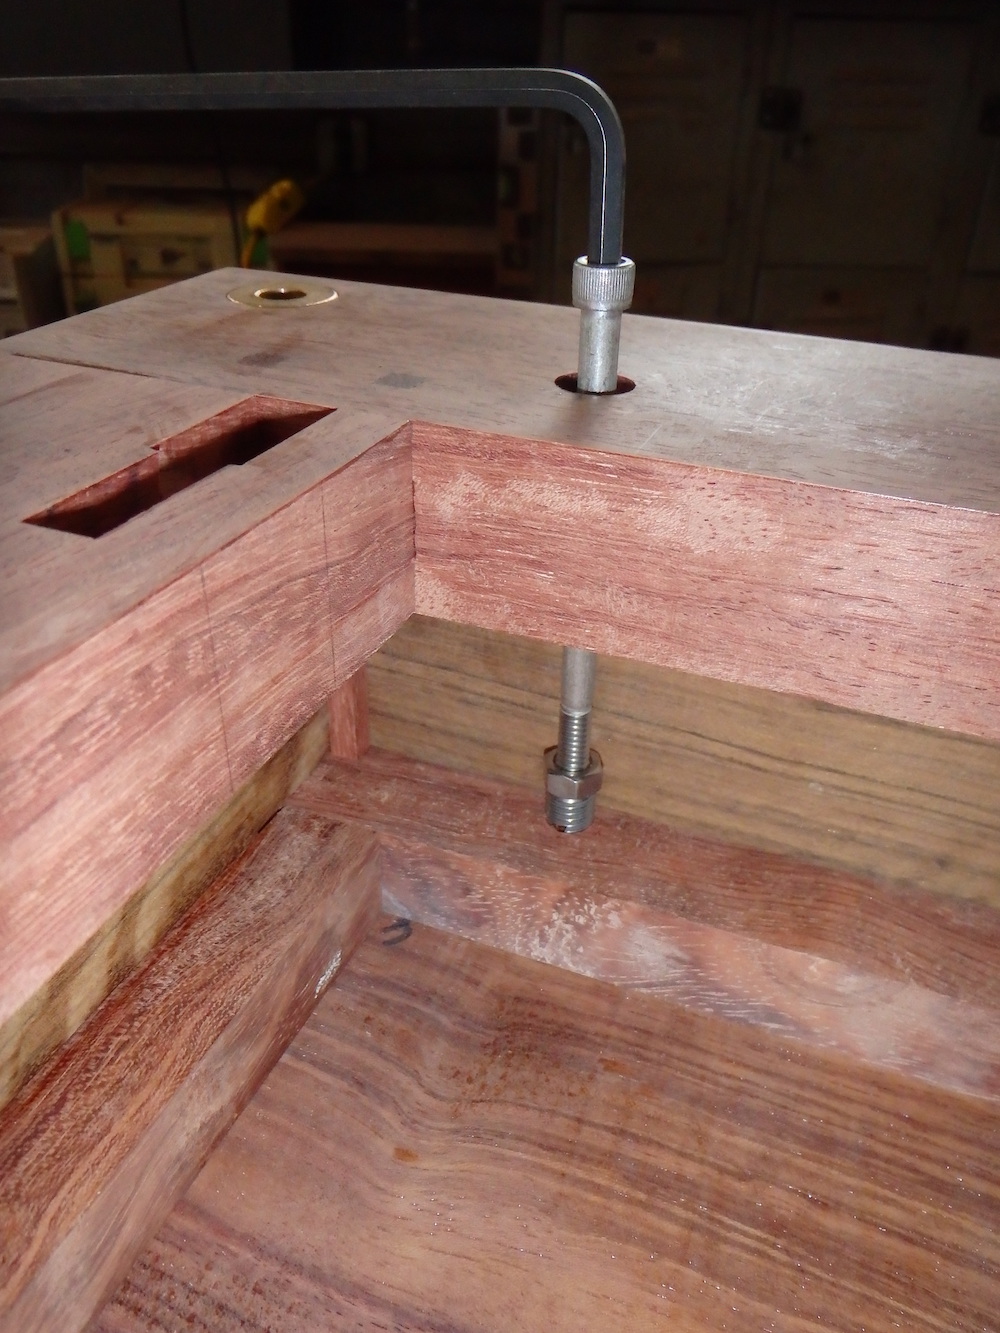
Using the bolt in the entry hole to drive the insert into place ensures it lines up properly. The bolt and the insert are stainless, and there is one bolt in each corner.
A while later, the top side of the frame received one last thin coat of finish:

A look at a corner showing the stub post in front of the brass bushing for the door:

All for this time. Thanks for visiting the Carpentry Way.
via Tumblr https://davidpires578.tumblr.com/post/160286631694
No comments:
Post a Comment