I’m sure many readers have drifted off to sleep by now with this series, but I’ll forge ahead with new posts all the same.
Presently I’m working on the frames for the upper sliding doors. These frames are to be mitered at the corners, and will accommodate both a solid wood shedua panel and the recently completed latticework panels.
I decided to go with twin tenons on the frame corners. The reason for twin tenons instead of a single tenon relates to improved strength. How so? Given that the frames are 1.125" thick, a single tenon would typically be 1/3 of that dimension, or 0.375". If you consider that tenon as a volume, which is a way of gauging the number of fibers it places into the mortise, for this example the tenon volume is 0.264404 cubic inches.
With the twin tenon, each of the tenons has 0.17627 cubic inches, together a total of 0.35254 cubic inches, representing 33% more fiber than we see with a single tenon. Also, when considering a joint which will be glued, looking only at the tenons cheeks (the primary gluing surfaces), it is readily apparent that the twin tenoned version has twice the number of cheeks, so roughly twice the gluing area overall:

Finally, if the twin tenoned part represents the end of a beam, as it does in the case of these sliding door frames, the twin tenons provide greater support and stability against twisting than does a single tenon:

The caveat is that a single tenon represents a greater likelihood of a good joinery fit than do twin tenons, and thus the advantages of a twin tenon may be moot if the cut out results in a sloppy fit. Also, the twin tenon takes much longer to cut and fit, so it is hardly an economic choice. A single tenon is a fine, and adequate choice, but the twin tenon is a little better, putting labor cost to the side.
Here, following a roughing out of the tenons in respect to the thickness of the sticks, I am reducing the tenon height by sawing:

I chose to diminish the tenons so as to accommodate the dado in the frame. Were it possible to center the dado between the tenons and leave the tenons taller, that would have been most ideal, but the panel dado is off-centered in this case, and I wanted the exposed tenon ends to be evenly spaced on the faces which show.
We slice, we dice:

That excitement is followed by some chisel work:

These tenons measure ¼" (6.35mm) thick, with a ¼" space in between.
A completed twin tenon:

A while later, the tenons were completed on all of the frame rails:

The short pieces with mortises in the above picture are the frame stiles, which have had their mortises roughed out at this stage.
Another view of the tenoned rail ends:

You will undoubtedly notice that 4 of the sticks are tall and 4 are shorter. The tall ones will have a tongue cut into their upper edge to insert into the sliding door upper tracks, while the shorter ones will fit to the lower tracks and have a much smaller tongue.
While I’ve been working on the frames, I’ve been gradually gluing up the lattice work panels, getting one done per day. Today saw the last one into glue up. Once the glue has dried overnight, I plane the panels off to level everything out and get an even sheen.
The joinery work for these frame corners, meanwhile, does takes a while, partly due to the fact that the miters are slightly unequal, instead of being the more usual and easily dealt-with 45˚.
Here’s one frame corner coming together:

The parts meet and the miter line looks reasonable for an initial fit:

The tenons will be wedged and glued sometime down the line.
Another view - this is the back face of the frame:

Here’s another corner:

Another view, this being of the front faces:

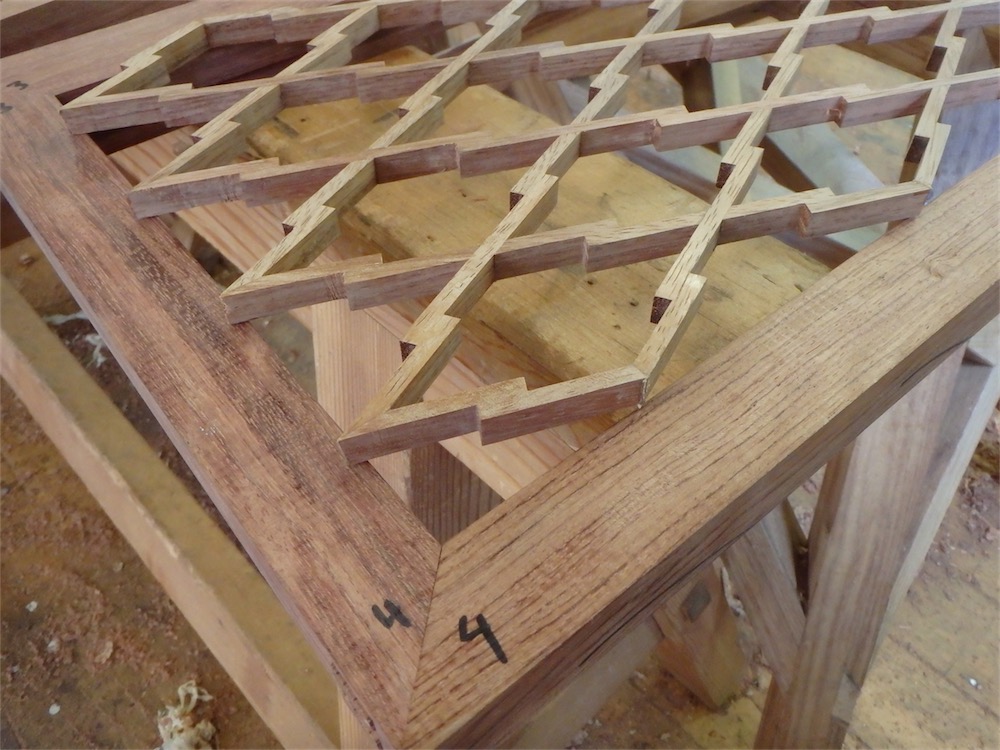
The first frame took me most of the day to fit together, and here it is, with the lattice panel sitting atop just for a sense of what’s coming:

Another view:
I’m intending to get through the remainder of the joinery in the next couple of shop sessions. Then I will rebate the frames, check the fits of the frames to the cabinet, and to one another, and finally mould the fronts with a bead.
All for this round. Hope you liked the progress report.
via Tumblr http://davidpires578.tumblr.com/post/145681043469
No comments:
Post a Comment