With the bonnets largely complete (see previous post), save for their upper panels, I turned my attention to the means by which the bonnets will attach to the main cabinet carcases. This might seem like a relatively trivial matter but many hours over the past month or two, usually while I am commuting to and from the shop, have been devoted to ruminating about this topic.
The cabinet is essentially four principal assemblies, namely the stand, the carcase, the bonnet, and the main doors. The carcase attaches to the support stand using 4 hammerhead keys which will be cross-wedged below, this is more than adequate to secure those two components together, however the point to be made about that point of connection is that the entire weight of the cabinet and its contents bears down directly upon the junction. Thus, the interface is unlikely to develop any issues with slight separations forming between the layers due to wood movement.
The connection between the bonnet and carcase is different in that the weight is not there, and the bonnet framing can act as a stiffening agent to keep the top board of the carcase, where the sliding doors run, in a flat condition over time. This portion of the cabinet is directly at eye level, so any misfits are more readily observable. Added to the situation is that the bonnet is offset forward so as to cap over the front bifold doors. This means that the front of the lower frame of the bonnet overhangs the carcase edge by a significant amount. In fact, I increased the size of the tenons on the cross members of that lower frame, and added extra shedua stiffeners atop the middle cross members in an effort to mitigate against any tendency over a long period of time for the frame’s front sill rail to distort and roll downward slightly over the top of the carcase.
I wanted the bonnet to be demountable, but not in such a way that the connections are intended for frequent disassembly. The cabinet will be shipped with the bonnet attached, along with the doors as I don’t want to leave the client with the task of putting those parts together in precise alignment. If ever the cabinet needs to be repaired, and the bonnet removed for any reason, then I wanted it to be a straightforward task to remove the bonnet (or, likewise, to remove the carcase from the stand, or the back panels from the carcase). So, no glue will be involved to put the bonnet and the carcase together. No wood screws either, though they have long been a popular choice in cabinetmaking history.
Weighing the various options I came up with a combination of sliding double dovetails and stainless allen head machine capscrews. I am always reluctant to specify metal fasteners, however, if they present the best solution, irrespective of other factors, then that’s what I will go with.
There are many steps involved in this seemingly trivial task of putting the bonnet and carcase together mechanically. Days go by as the steps are worked through.
The first step is to disassemble the bonnet and place the bonnet sill frame atop the carcase. Then I use gage blocks to offset the sill frame from the carcase, which means 2" for the front rail:

And 0.75" gage block offsets the sides and back:

That gives me decently approximate position. Then I use the Mitutoyo Digimatic to refine the offsets to target:

As we get closer to the desired values, the frame is clamped lightly and final taps are made with a dead blow mallet to get the frame into its correct position:

Once the sill frame is in place, I affix a pair of MDF plates in position, one each side:

These plates serves as a reference for a secondary routing template to be applied.
The routing template is prepared. Two cutting steps are needed, one to rout a slot and the second to rout the dovetail. I use 8mm shank tools for both steps.
Here’s one sliding dovetail mortise after routing:

And another:

As you can see, there are some blocks of cedar visible in the bottom of the mortise, as this mortise partially occludes with the sliding door tracks below. This was unavoidable, but no major issue either. I tucked the cedar in there, and clamped it, preparatory to chisel work.
The amount of interference when the dovetail key and plug are in place is quite modest:

The sliding door’s upper tongue misses these parts entirely, however I will still later trim them flush with the ceiling of the groove.
The rough-cut mortises are then chiseled to the lines:

A closer look:

The double dovetail keys are then prepared - which occupies no small amount of time in itself, and then the keys are fitted as each mortise is trimmed out to the lines:

The keys are made a hair fat so they are just ever so slightly slightly too tight upon first fit:

This is as far as the key can be slid in at first fitting:

The key is then ‘tuned’ for fit, fettled if you like, and eventually can be slid all the way in, with a good tight fit. I use a prepared gage stick to check I have the key slid along the proper distance:

After a while, all four keys are in place:

The same keys are then removed and fitted likewise to the corresponding sliding dovetail mortises on the bonnet sill cross pieces. Once that is done, the keys are removed from the sill pieces and reinstalled into the carcase top.
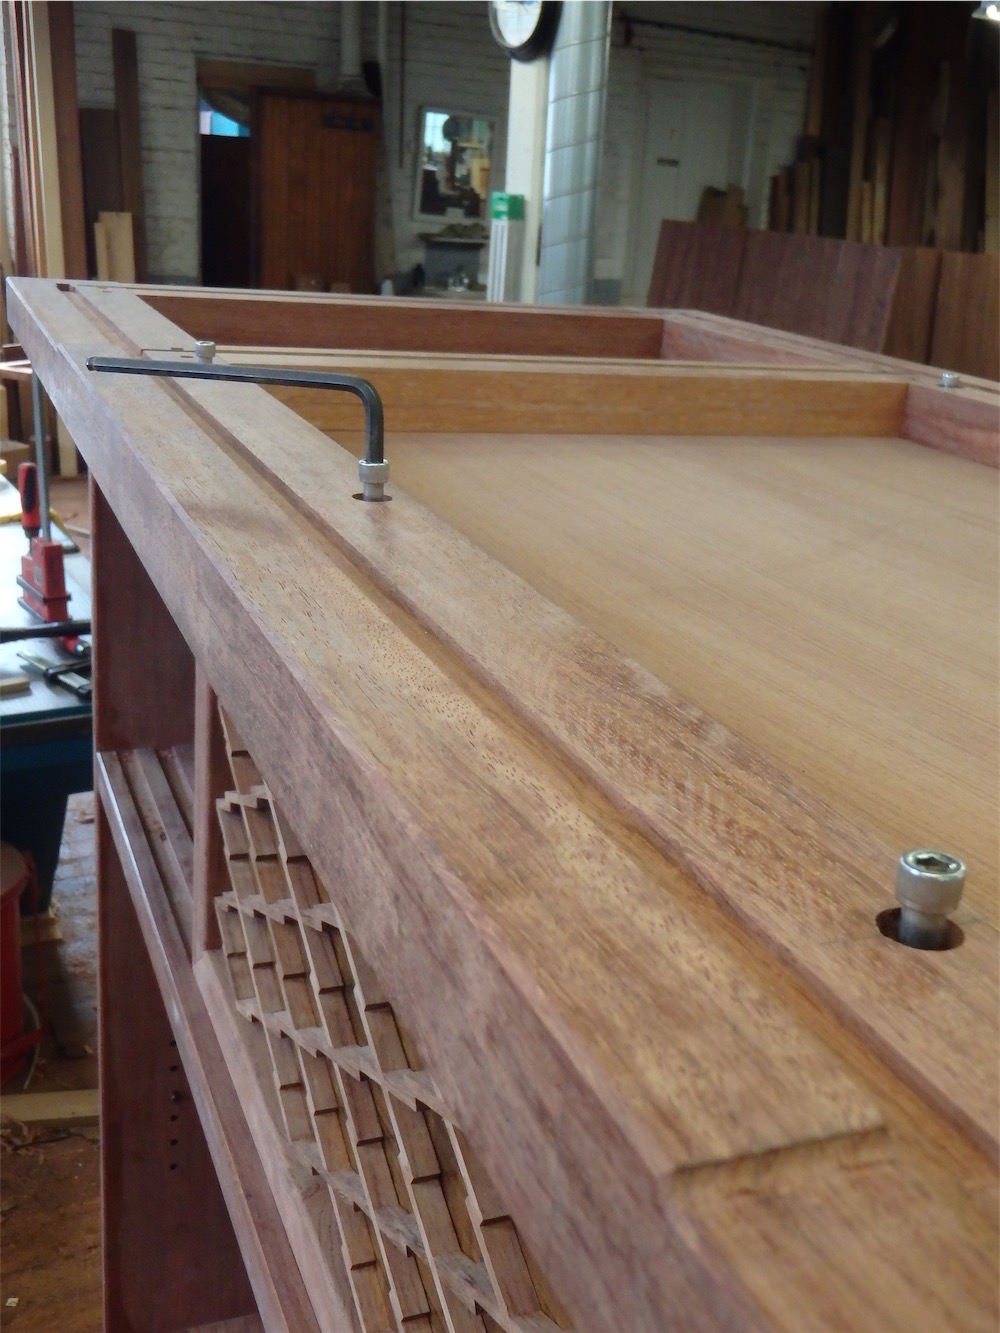
Then plugs are fitted to prevent the keys from sliding back out during assembly:

Time for a look-see – the frame dropped down onto the mortises just right:

Then I use a mallet to drive the frame back about an inch to seat it into final position. It takes many firm taps, alternating sides, to move the frame back into place.
A look at the seam line along a short side reveals no gaps:

Once the frame is all the way back, I check with the caliper to see if I am where I want to be:

It’s nice to be on your numbers.
That takes care of the dovetail keys. The sill assembly is then removed and disassembled. I set a sill rail up in the mill and drill three holes in the rail at a pre-determined spacing and inset distance, using the DRO:

The sill is then reassembled, and refitted to the top of the carcase. Offsets between frame and carcase are checked using the caliper and adjusted as required. Then I clamp the frame and carcase together so they can’t move apart from one another, and drill down through the holes (just made by the mill) into the top board of the carcase. Definitely a time where you want to be sure the drill depth is correct!
Once the holes are drilled, I remove the sill frame again, and, using a ¼"-20tpi bottoming tap, thread the holes:

I have come to quite like L.S. Starrett tap handles, and have gradually come into possession of several sizes.
The frame is disassembled again, and the rails remounted into the mill. I use a pin to relocate/re-reference the already-drilled holes with the mill’s DRO settings. Then the holes are enlarged to the correct diameter.
Now, the carcase can swell and shrink with changes in humidity, so the frame connection needs to accommodate that. My solution is to elongate the holes are the rear rail. Here, I’m engaged in just that task:

The elongated holes are then counterbored, also in an elongated manner:

The connection allows for a full ¼" (6mm) of movement on the part of the carcase:

To obtain bolts with the right amount of unthreaded shank length, I had to buy over-long bolts, which then needed to be shortened appropriately:

I use an angle grinder with 4.5" cut off disc for this task. Cutting stainless bolts with a hacksaw is not recommended….
The front sill rail with bolts fitted, countersunk flush:

Well, once the drilling frenzy was over, I reassembled the frame and plonked it back onto the cabinet. Then it was driven over into position and the distances checked with the caliper. Time to see if the bolt holes all aligned as intended:
Things went together exceptionally smoothly, with no farting around or head-scratching required at all. Weird, huh?
Here’s the opening in the middle of the cabinet between sill rail and top carcase board before the middle bolt is tightened:

After:
via Tumblr http://davidpires578.tumblr.com/post/149905137864
No comments:
Post a Comment