The Japanese word for ceiling is tenjō, 天井, which translates as the well, 井, of heaven, 天. Hence the title for this build thread. Japanese ceilings, just like other standard elements of Japanese architecture such as shōji, tokonoma, and fusuma, are highly elaborated in form and style, from mild to wild, though perhaps never quite as wild as their Chinese antecedents. Cultural tastes vary as they say.
This job came about in a curious way. The client is the third owner of a house which is about 25 years old or so, and the original owners were Japanese and had a Japanese tea room put into the house, along with a small Japanese garden outside with pond. The tea room is a 6-mat room, with an attached mizuya- or 'water’ room, where a tea ceremony practitioner would make preparations for serving tea.
The current owners do not practice tea ceremony and have in fact been using the room mostly as a place to store surplus children’s toys. The room also has been not entirely suitable for use in any capacity in recent years as it has a partially constructed ceiling.
A few years ago the bathroom on the floor above the tea room developed a plumbing issue and the ceiling of the tea room was damaged in one section. The owner contacted another contractor in this region, a person who is known for undertaking Japanese architectural work, and that contractor made a start at repairs. For whatever reason, that contractor, after receiving part payment for the job, simply stopped doing the job and wouldn’t return the owner’s calls.
The owner contacted me last year, explained what had happened and was wondering if I could attend to the outstanding issue with the ceiling and damaged shōji. I immediately declined, not wanting to poach another contractor’s client, especially if the involved contractor was someone I knew of, if only slightly. I figured it was a simple breakdown in communication between the two parties. I told the owner I would contact the other contractor and let him know that the owner wished to be in touch.
I phoned up the other contractor and mentioned the situation with the owner. Interestingly, he mentioned that the tea room ceiling “wasn’t a project likely to be of any interest to [me] anyways”, and that he would take care of it. I didn’t ask him about the particulars of the situation - just assumed it was some simple miscommunication or something like that. That’s where I left things and more or less forgot about it altogether in the months that followed. A year passed.
Then about three months back the owner contacted me again. It seems that the other contractor had not bothered to follow up with the owner, and still wasn’t returning the owner’s calls.
“Would I be interested?” she asked.
At this point I felt I had done my due diligence and clearly, for whatever reason, the other contractor couldn’t/wouldn’t complete the work. So, I said, “sure, I’ll come and take a look”.
I swung by the residence, near to Boston, a few weeks later. Not sure what I would find, I was pleased to see that it was a real Japanese tea room. The pictures that follow are taken from this afternoon, so the room is already slightly under construction at this point:

The circular window had a pair of shōji fitted behind, removed at this juncture as they needed their paper replaced. The tracks for the entry shōji are visible in the foreground of the picture. They also will be repapered due to tears in the paper here and there.
A look at the open fusuma leading to the anteroom, or mizuya:

The faucet and drain are installed at a height for the tea preparer to be working in a fully kneeling position, what is termed seiza:


I was surprised, to say the least, when I took my first look at the ceiling work undertaken by the other contractor - it was not the quality of work I might have expected:

It’s a little hard to see from the above picture, but what you are looking at is a series of partially overlapped 1/8"(3mm) veneer sheets stapled to the ceiling. Note the pencil lines for the staples left behind - presumably these lines of staples were to be covered over with a false batten of some sort.
The veneer sheets, when removed, I found to be foam core panels, and had been coved on the backside as well as thinned at one edge:

This was a head-scratcher. The coving and tapering of the panel’s back face is something which is done often on Japanese ceilings having a certain treatment of lapped boards. The coving allows the last inch or so of a board to take a crisp bend, and the taper provides a surface for the bent portion of the next board to fit against. The combination of the bent board edge laying on a tapered surface presents a nice shadow line between boards.
Here’s a view of what that construction would normally look like:
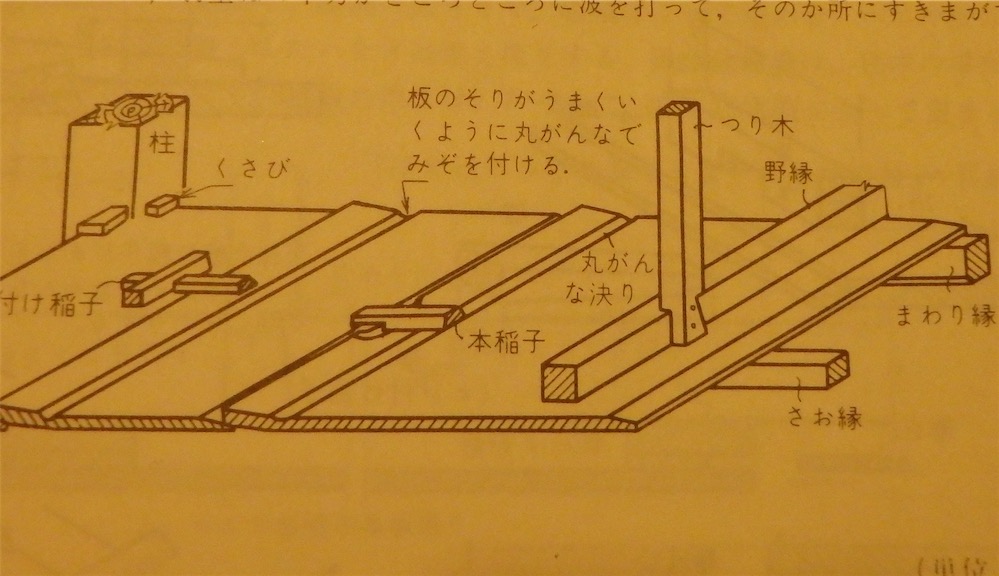
It’s a fairly common sort of ceiling treatment. With solid wood, making the cove cut on the backside can be a tricky affair as you need to judge the depth carefully, just enough to allow the board to flex, and not so much so that the wood will split.
With the foam core material however, it was very difficult, I found, to bend the section beyond the cove cut to any significant extent. But even more to the point, this is a ceiling construction method in which the material is applied downwards, onto rafters or battens, sao-buchi, as the fasteners are applied downward on the backside to push the board flat down to the rafters/battens. That’s the only way to obtain the crisp bend and produce the desired shadow line as far as I know. But applying the fasteners to the face side, especially in a material which wouldn’t bend let along hold a bend, was baffling to me.
And the shadow line reveal is also supposed to show the thinned edge of a solid wood board, not the guts of a foam core laminate. A case of the wrong material for the design, applied the wrong way.
Speaking of the design matters, the owner had requested that the replacement ceiling allow for access to the plumbing afterward, in case problems develop down the line. The other contractor’s solution to this was to make some of the laminate sections shorter in that area, and fasten them in place with screws:

The light colored panel you can see is the old ceiling - the replacement ceiling was simply stapled to it (!). These hundreds of staples made removing the old ceiling mostly a matter of messy destructive tear-out.
What I didn’t get about the use of screws for those ‘removable’ panels was that the screws themselves, like the staples used elsewhere, were to be (presumably) later covered by a batten of some sort. So, in order to remove those panels, one first would have to remove one or two battens as well. An unwieldy solution at best. And how would the battens be fastened to the ceiling - with more obvious screws? That would look bad. Again, normally you would place the frame/battens down, and apply the ceiling treatment down onto it. What had been done here however just didn’t seem at all well planned.
Another basic design aspect to Japanese ceilings is that all the boards, panels, squares, what have you, been even in size with one another. Same with the way a Japanese floor would be tiled. It is considered a disaster and poor workmanship to have insufficiently considered tiles size and spacing relative to the room size and end up cutting tiles are the room edges.
With ceilings, if they are to have boards as their primary pattern, then all the boards should be the same width as one another - - such is not the case here though. While the old ceiling has six, 17.3" wide 'boards’ (actually, the old ceiling was also comprised of veneered boards cleverly detailed to look like solid wood), all of the same width, the replacement ceiling had one conspicuously wide board along one side:

Compare the boards to the left side with the one to the right. If the difference between boards was, say, ½" or so in width, it would be hard to spot, but this was a large and obvious size difference between the adjacent panels. Sure, maybe most people wouldn’t notice, or think it wrong, but, clearly, not much time had been spent in designing. And this sort of matter is nothing more than measure a space and divide, then add a little for the perimeter boards to sit atop the perimeter framework. As far as that went, the boards themselves do not lap onto the perimeter framework, but are butted against it, and in some places gaps are obvious between the perimeter and the panels. The ceiling looks like a tacked-on thing, and does no justice to the original ceiling whatsoever.
I’m not sure what went on there with the replacement - I can only see what was installed and assess it for what it is. If I could find something positive to say about the replacement ceiling, I would say so… however there really isn’t anything coming to mind. The work did not impress.
Mind you, the original ceiling was not put in perfectly either, as witnessed by this grossly mis-matched miter in one corner:

The ceiling perimeter frame, or ledger - termed mawari-buchi - was comprised of two strips, one 'L-’ shaped and screwed to the wall, and the other glued to the first, going in after the ceiling boards I would imagine.
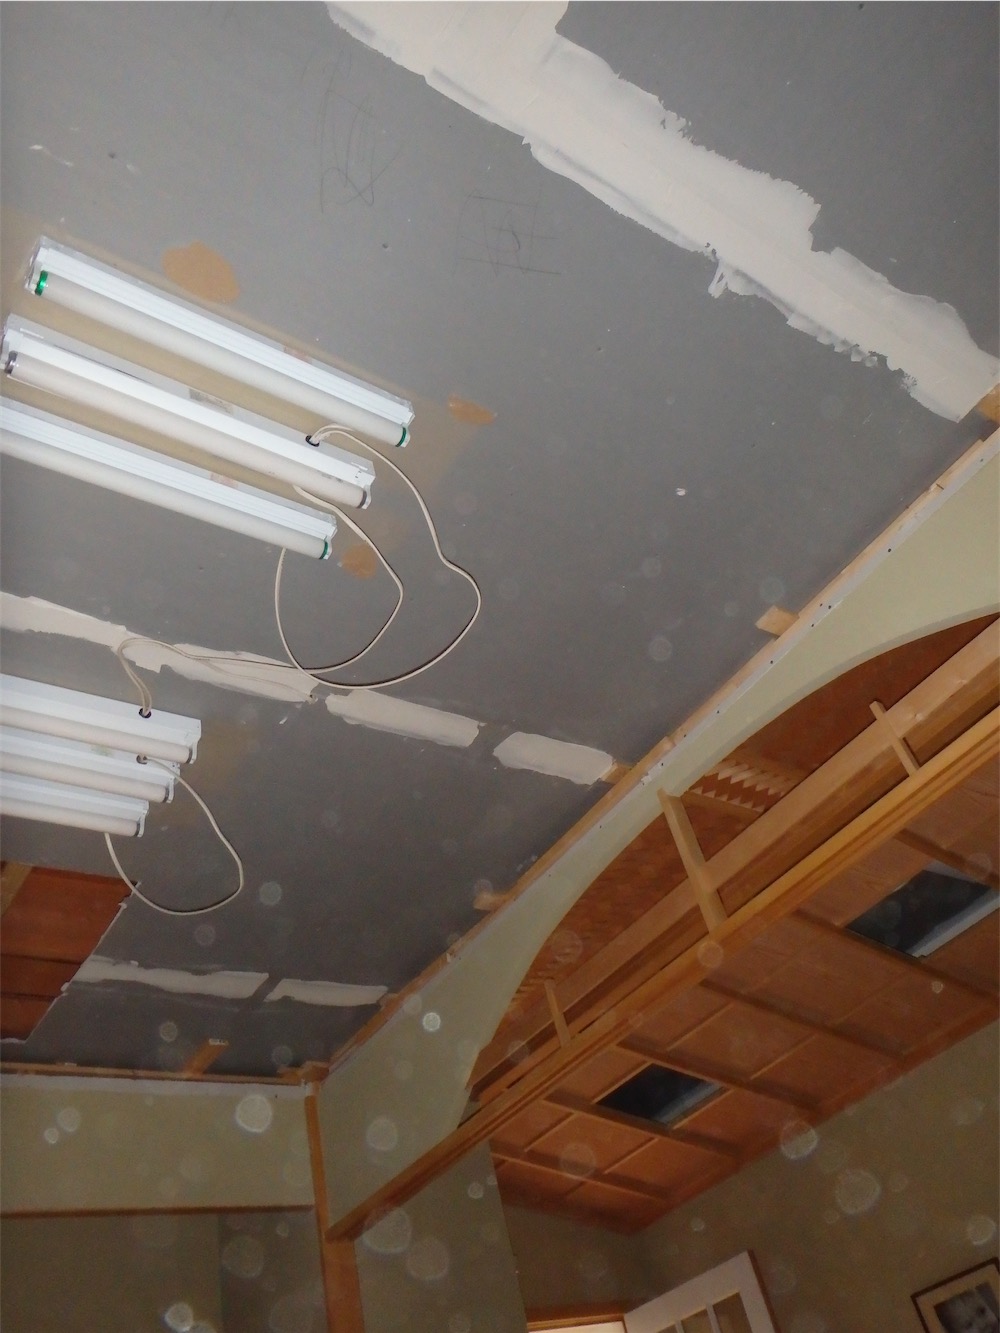
Out with the old, and in with the new: I got to work stripping the replacement ceiling, leaving the remnants of the old ceiling to view at this stage in the process:

After the dust had settled and the waste carted off, the scene seemed tranquil, if a little bare:


tut-tut, dust on the camera lens….
A look ahead now to what’s coming.
After looking at the situation with the owner a couple of month’s back, I proposed a different ceiling altogether than what was in place - rip the old out and replace it with a frame and panel coffered ceiling. That arrangement would make it easy to provide access panel(s) to the plumbing. The owner agreed to the proposal after careful consideration.
For the ceiling framework, I chose clear vertical grain Yellow Cedar - these pieces specifically:

The boards are full 2" x 10", 132" long.
Another view:

Those sticks are now sitting in my in my shop. I’m looking forward to the slicing and dicing which lay ahead. Also in my shop, and already moved well along is the vertical grain Western Red Cedar, which will serve for the ceiling panels.
I hope you’ll pop back to check in on the build progress, to be detailed over several posts to come.
Thanks for visiting the Carpentry Way.
via Tumblr http://davidpires578.tumblr.com/post/153905347404
No comments:
Post a Comment